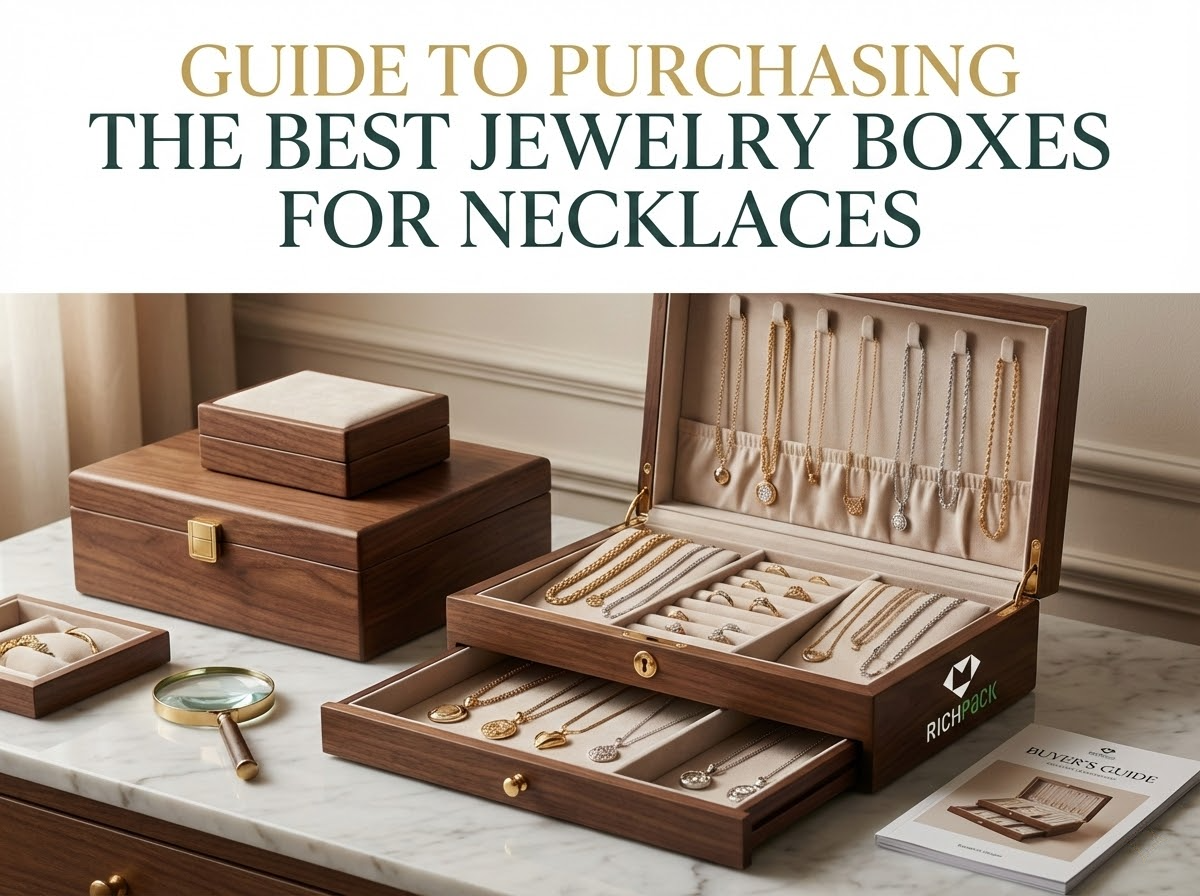

Many buyers think a jewelry box for necklaces is just an organizer with hooks. I look at it as a full protection system. It must hold the clasp and stop the chain from swinging. It also keeps the pendant safe from pressure and bumps. I often see “mystery knots” in my sample tests. These happen when chains slip out of shallow pouches. You need to focus on hook spacing and pouch depth. Don’t just trust the pretty marketing photos.
I’ve put together some quick picks for different needs. You’ll also find a scorecard and a checklist for your suppliers. This guide uses real-world evidence and clear data. It gives you exactly what you need to make a smart choice.
I’ve seen many brands lose money because necklaces arrive tangled or scratched. You pay twice when the opening experience feels poor. It costs you in fixes and lost customer trust.
I won’t name specific brands here. I will give you the exact specs and shapes to look for. This helps you compare options and check quality easily. I use this method to stop costly mistakes during the sampling phase. It keeps your production run smooth.
I recommend this for 20 to 30 inch chains. It works well for lariats and heavy pendants. These pieces often swing and knot without good support.
I’ve found that long chains tangle when the tail floats. A tall rail and deep pouch keep things still. This combo stops the chain from moving too much.
I often see pouches that look deep but fail. The tail slips out when you move the box. I always check this during my sample reviews.
Key specs:
Tradeoffs: Taller boxes will cost you more to ship. Deep pouches can press pendants if the fit is tight. Crowded hooks cause tangles, so watch your spacing.
These work best if you have limited counter space or tight storage carts. I often recommend them for retail backrooms and subscription box kitting tables. They fit perfectly where the room is tight.
A small size only helps if you can grab the right necklace fast. I’ve found that vertical layouts and thin drawers stop messy pile-ups. Hanging organizers also keep your daily workflow much cleaner.
Key specs
Tradeoffs
I see this most with team travel, event kits, or influencer seeding. These shipments face constant vibration and fast handling. After working with many brands, I know you need packaging that handles that movement.
Chains tangle because of vibration and extra space. I often see people use straws or plastic wrap to fix this. These hacks work because they control the chain path. If you stop the chain from moving, you stop the knots.
I focus on high-value unboxing and retail gifts. This works well for PR mailers and premium launches. In these cases, the box truly sells the piece.
A solid necklace box does two main jobs. It locks the piece in place. It also frames it like a display. I’ve seen chains shift during shipping. This causes tangles and bent pendants. It ruins the first impression for your customer.
These are the specs I look for:
Watch out for these common trade-offs:
I always check for shipping proof. Ask for tests like ISTA 3A or ASTM D4169. These tests simulate drops and shakes during shipping. For the lining, ask about dye transfer. I recommend AATCC rubbing tests. This keeps your jewelry safe and clean.
If you manage many items, you need to see the stock quickly. I recommend this for brands that move products often. It helps you pick the right piece without hunting through boxes.
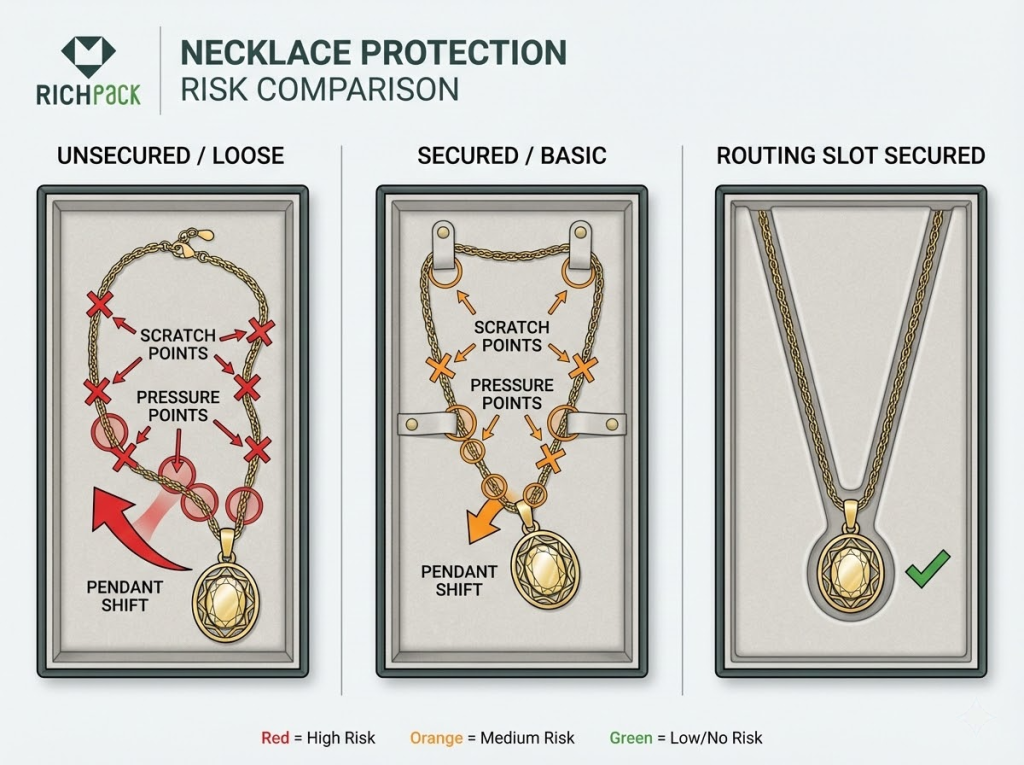
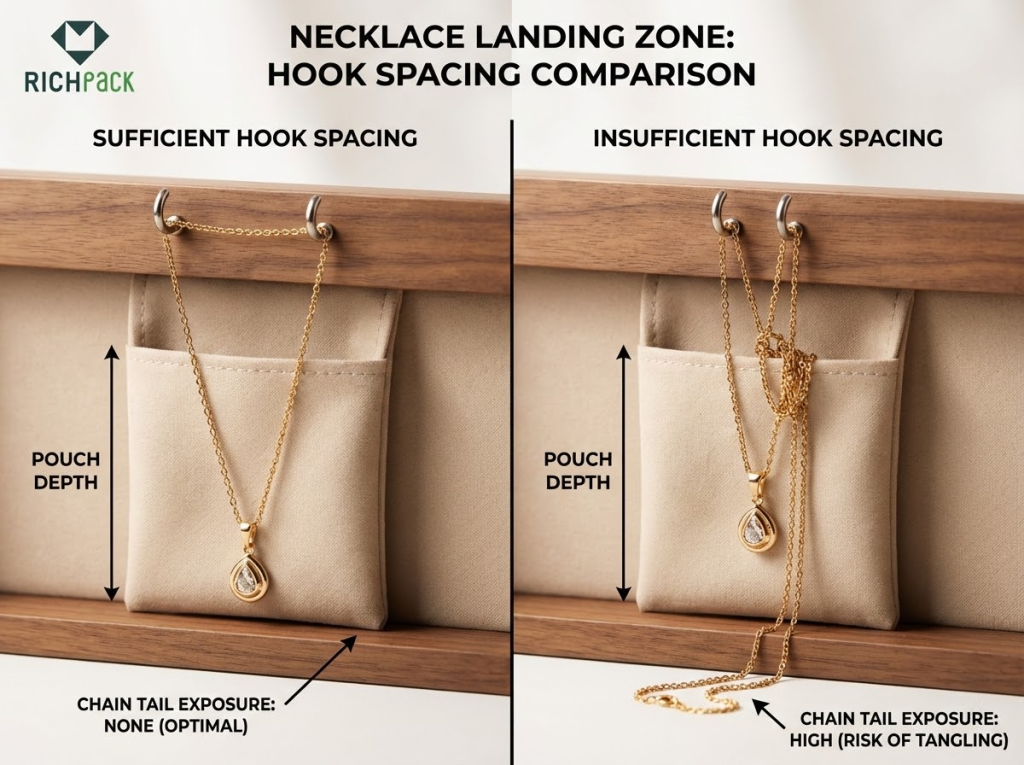
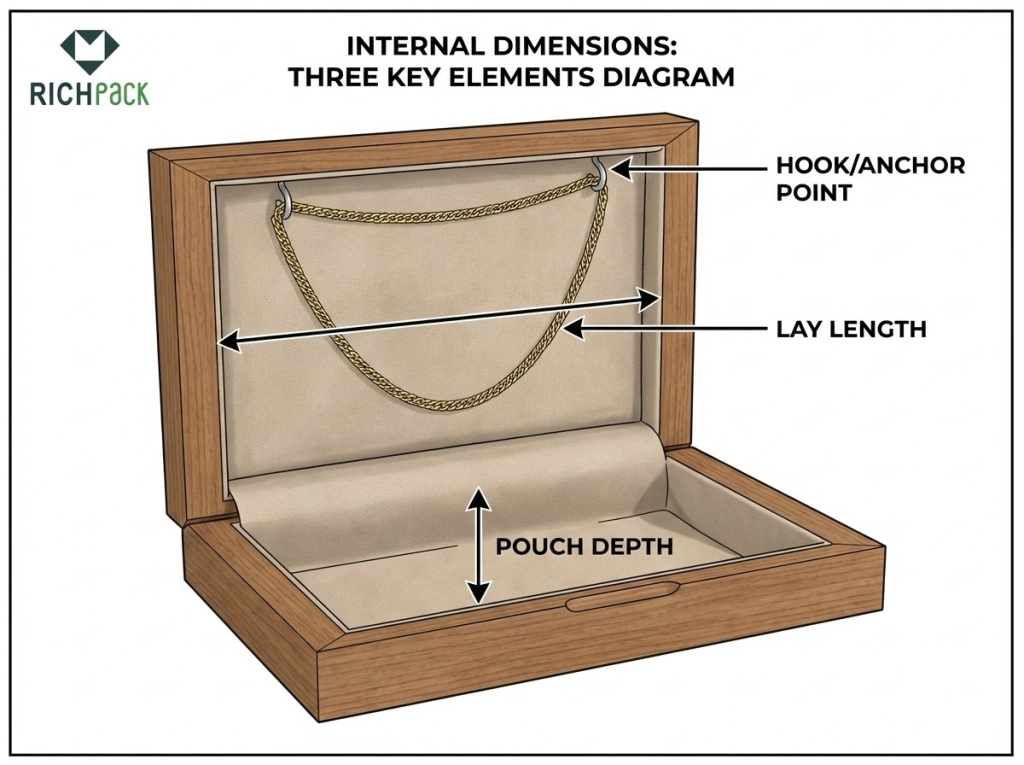
Hooks only stop tangles if you keep the chain tails in place. I always tell my clients that hook count is not the same as capacity. The width of your widest pendant and the chain size set the real limit.
Think about those layered sets with 2 to 4 chains. You might sell these as bundles or “build-a-look” SKUs. Your buyers expect these layers to stay separate when they open the box.
Layering fails when chains cross and build tension. I’ve found that good design relies on separation and tension control. You can use independent sleeves, routing slots, or compartments. These keep each chain on its own path.
Key specs:
Tradeoffs:
I only pick a box if it stops the failures I see daily. You want to avoid tangles when you grab a piece fast. I have seen too many scuffed pendants and broken clasps. Rough shipping can turn a neat layout into a knot pile.
These issues come up constantly in real-world use. My method uses clear, repeatable tests to fix them. I focus on how the box works, not just how it looks.
You only see real anti-tangle results after taking necklaces out many times. Staged photos do not show the truth. I use a simple test to check every box. You can try this too:
Does the chain tail slip out of its slot? If it does, you only have a display box. It will not stop tangles in the real world.
I’ve seen pendants get ruined in three main ways. Most damage comes from lining rub, tight lids, or shaking during shipping. I call these abrasion, pressure marks, and impact shift.
When you pick a supplier, ask how they test for shipping. Most good ones use standard tests like ISTA or ASTM. These checks make sure the box holds up during the ride to your customer.
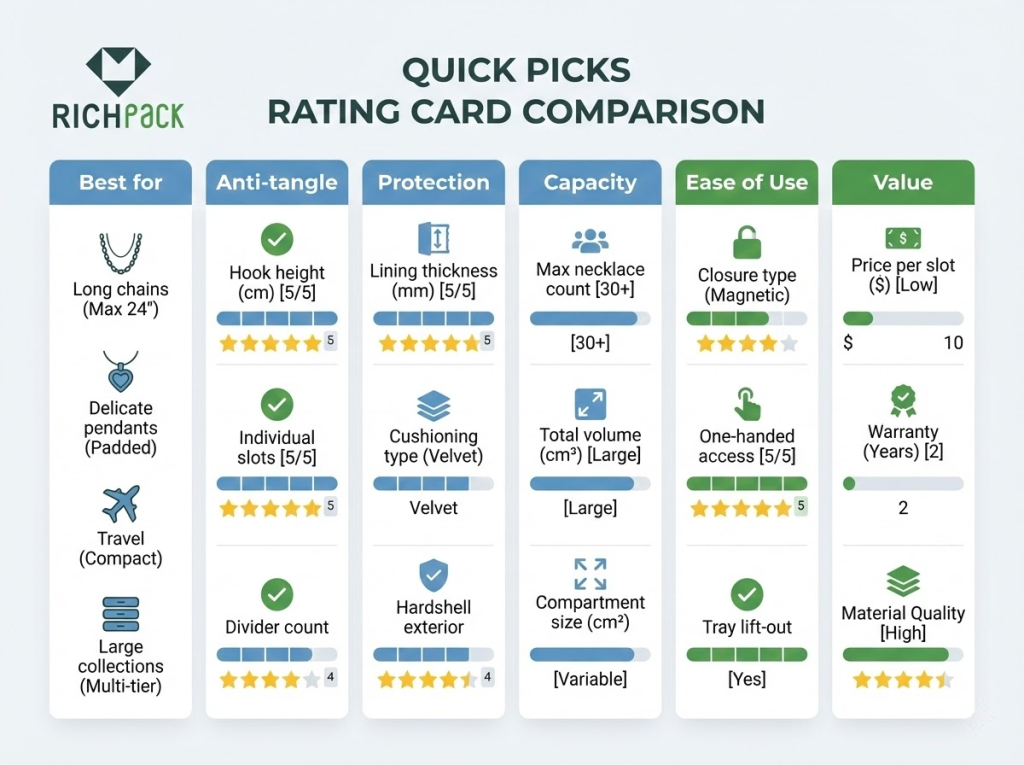
I score every necklace box on these six areas. This helps you compare them fairly.
I have found that people buy when they can see the details for themselves. You can:
To avoid bad surprises, ask your vendors for material data sheets. Request proof of color-transfer tests. I use AATCC standards to define what “no dye rub-off” really means. This keeps your velvet boxes and microfiber inserts safe for every piece of jewelry.
I never tell my clients a box “never tangles” or “never tarnishes.” Those big promises usually ignore how jewelry actually behaves in the real world. I’ve seen too many brands fail by overpromising on things they can’t control.
I prefer using clear “boundary conditions” when I consult on packaging design. For example, a design works only if the hook spacing matches the pendant width. I also point out when an insert fails because the pouch is too shallow. These honest limits help you make better buying decisions.
I can send over the exact scoring sheet and measurement checklist my team uses. This helps your staff apply the same high standards to your own product list. Tell me if you usually deal with long necklaces, travel kits, or gift sets.
When a necklace arrives tangled or scuffed, your customer blames you. They do not care about the shipping company. I have seen these small errors ruin brand trust overnight. You must protect your reputation before the box even leaves your hands.
I always tell my clients to treat the box like a complete system. You can stop most damage with four simple steps. Focus on separation, fit, lining, and how the package handles the trip. This approach keeps your jewelry safe and your customers happy.
“Anti-tangle” isn’t just a marketing label. I see it as a result of separation and controlled movement. If your design lets chains swing freely, knots will happen. This is really true for fine chains and layered sets.
I’ve found that controlling the chain tail is the key. Let’s look at what works best from my experience.
You can do a few quick checks before you buy. No lab is required for these.
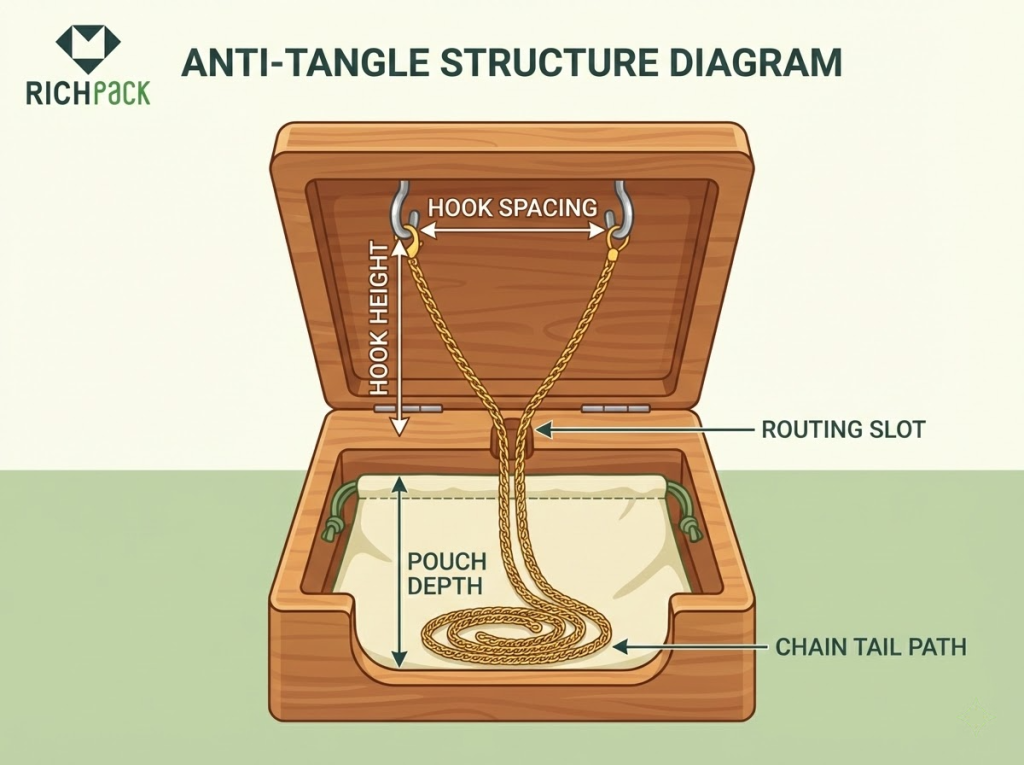
I always tell my clients that capacity isn’t just about the hook count. Real capacity means storing necklaces without any overlap. I find it works best when you size your boxes using real chain lengths and pendant widths.
Here is my go-to step-by-step plan for a perfect fit.
I use these basic specs as safe starting points. You can refine them later during your sampling phase.
If you are building a gift line, keep this in mind. A pretty fit often fails during transit. I always lock down movement with an insert, elastic, or strap.
I’ve seen most jewelry damage fall into three main areas. These are scratches, pressure, and impact shift.
What to look for:
A simple way to check transit safety:
Even the best boxes fail if they slow you down. This hurts your bottom line in subscription boxes and PR kits. Speed and steady work save you money.
I have seen great designs fail at the packing table. Ask these questions to see if your design works:
I always look for a few simple features to reduce mess.
I suggest a quick next step for your team. Make a one-page spec and a workflow checklist. List your hook spacing, pouch depth, and how you hold the piece. Do this before you ask for samples.
I often see buyers get hit by lining problems weeks later. These issues rarely show up on day one.
Watch for three hidden risks that ruin your product:
To stay ahead of these risks while meeting modern consumer demands, you should align your sourcing with the latest industry standards. Our 2026 Sustainable Jewelry Packaging Trends Report: Innovation, Materials, and Design for Ethical Luxury provides a deep dive into the next generation of safe, eco-friendly linings that prevent these common issues.
I use a fast, cheap check during the sampling phase:
Watch for things that speed up tarnish during storage:
You ship necklaces through parcel networks and warehouse partners. You aren’t handing these pieces to customers in a store. I’ve seen how rough this journey can be for a box.
Your pendants and plated chains will rub together while they travel. This constant movement creates knots and ruins the metal finish. I’ve found that friction is the main reason plated jewelry loses its shine.
Your packaging must survive kitting, packing, and the return process. It needs to stay strong through every step of the shipping chain. Looking good on a shelf is not enough for your brand. I always make sure boxes can handle the stress of a warehouse.
I see this design often works well because it keeps chains apart at the top. The bottom part stops jewelry from swinging. A pouch or strap keeps the tail from whipping during transit. This stops knots, snags, and metal rubbing.
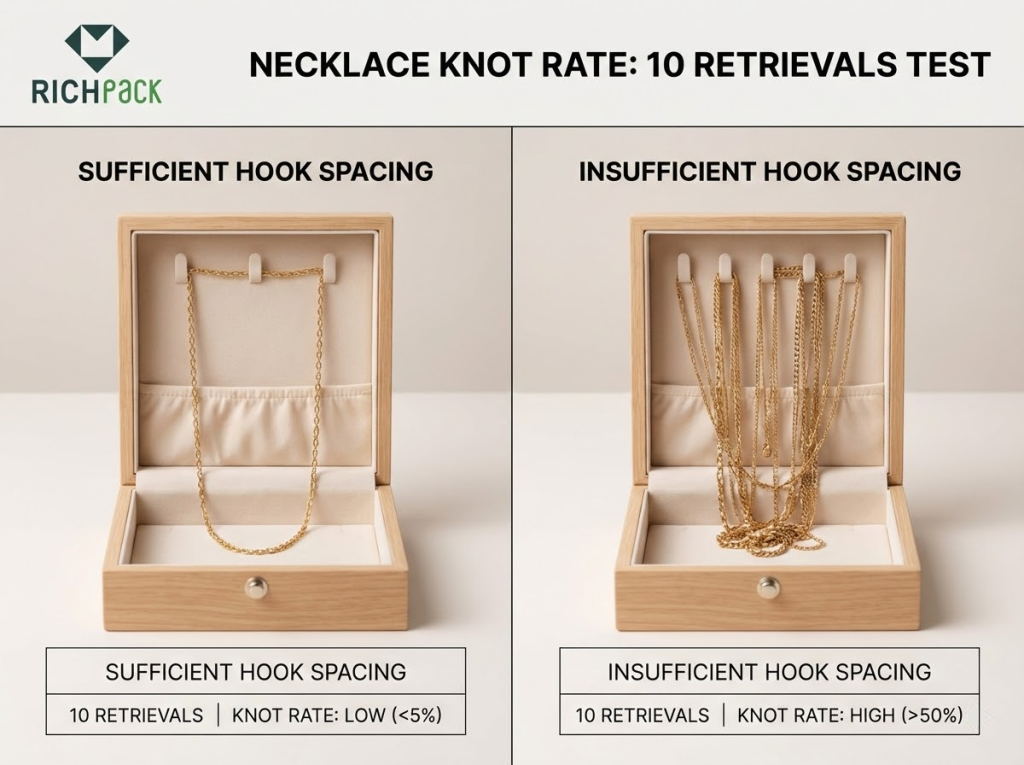
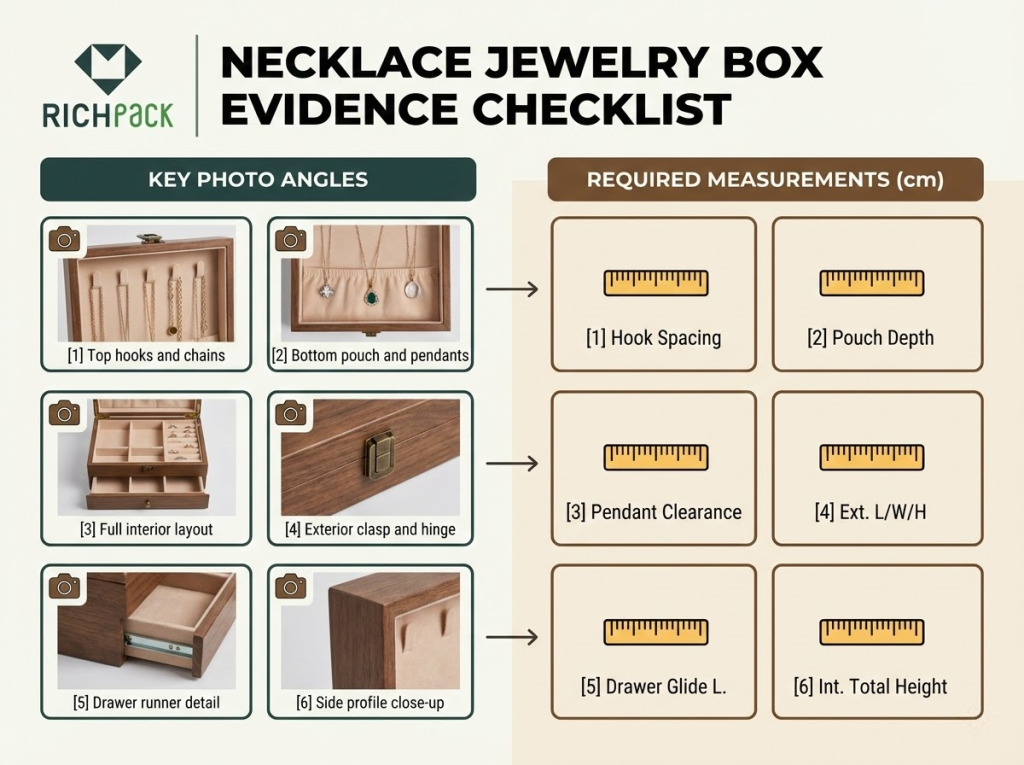
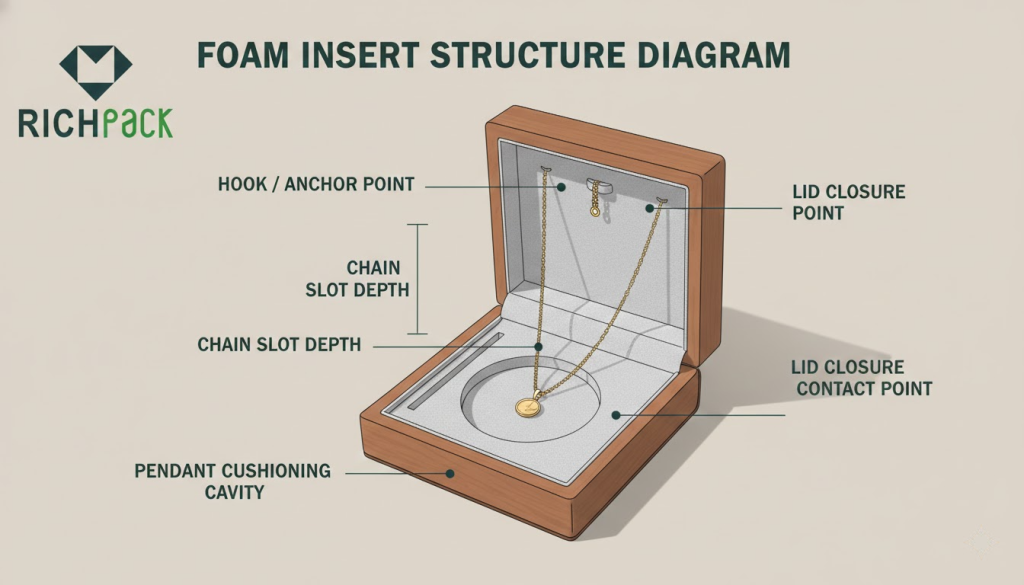
I usually see the same problem in my tests. Most hooks sit too close together, or the pouch is too shallow. Check hook spacing for pendant width and pouch depth for chain length. Ensure the hook opening stops clasps from popping off during vibration.
I always tell my buyers to ask their factory for a simple shake test. Shake five necklaces in a box for thirty seconds and record any knots. For large orders, use the ISTA 3A test from the International Safe Transit Association. This plan ensures everyone checks for tangles under the same shipping stress.
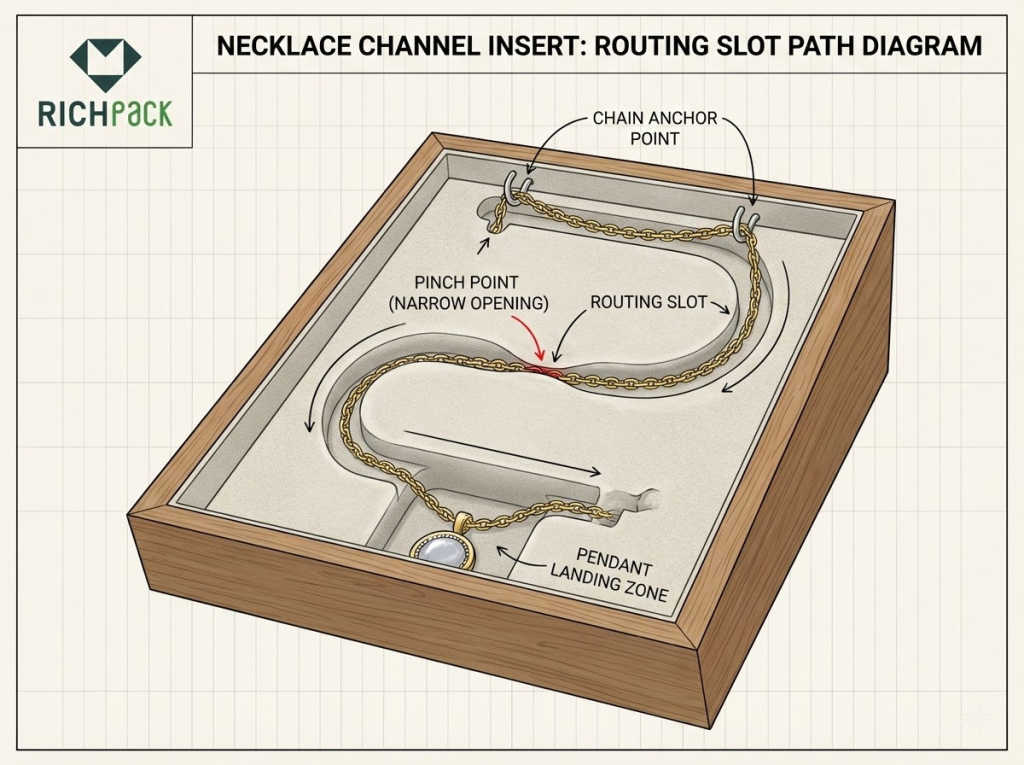
I’ve found channel inserts work best for thin chains. They make your packing process really fast. The slot keeps the chain on a set path. This stops tangles when your customers open the box.
I often see buyers run into two big problems. Sharp slot edges can scratch your plating. Also, dark linings might leak dye onto light metals. To fix this, I always ask for rounded edges. Make sure the channel fits your specific clasps, too. I also suggest asking for a colorfastness test like ISO 105-X12.
Here is my go-to trick for testing. Ask your vendor for two different prototypes. Get one with a wide slot and one tighter. Then, try packing your top ten items. You will see if big pendants pinch or if clasps get stuck. This helps your team pack items the same way every time.
I’ve found that compartments stop tangles by keeping pieces separate. This works great for necklace sets or subscription boxes. The real win is in your operations.
Packers drop items into specific spots, which cuts down mistakes. This also makes your quality checks much faster.
Now, let’s talk about a risk many people miss. Low vertical clearance can cause big problems. Lids and trays often squeeze your pendants.
This pressure creates a kink that turns into a knot. I always list compartment height in my specs. You also need a solid top padding plan.
Make sure your testing matches real shipping conditions. Many pros use ASTM D4169 to test for drops and shakes.
Actionable buyer tip: Here’s my go-to trick for your next sample. Add a “compression witness” step to your process. Pack your heaviest pendant and close the lid.
Apply gentle hand pressure on the box. Reopen it and look for pressure marks. Check for bent bails or chain kinks.
I’ve seen many brands struggle with tangled necklaces. Gravity is your best friend here. Hanging formats keep chains straight and apart. This works really well for long or layered pieces. I always recommend this for your back-of-house storage. It makes handling much faster.
Hanging designs often fail during shipping. Movement turns those straight lines into messy pendulums. You can still use this for your brand story. Just add a stabilizer like an elastic loop or strap. Segmented sleeves also help a lot. Ensure the outer box stops any side-to-side shaking.
Here is a tip for your next order. Ask for a chain-tail control point if you use polybags. A small tuck pocket works best. This keeps the tail from drifting. It stops chains from crossing each other during transit.
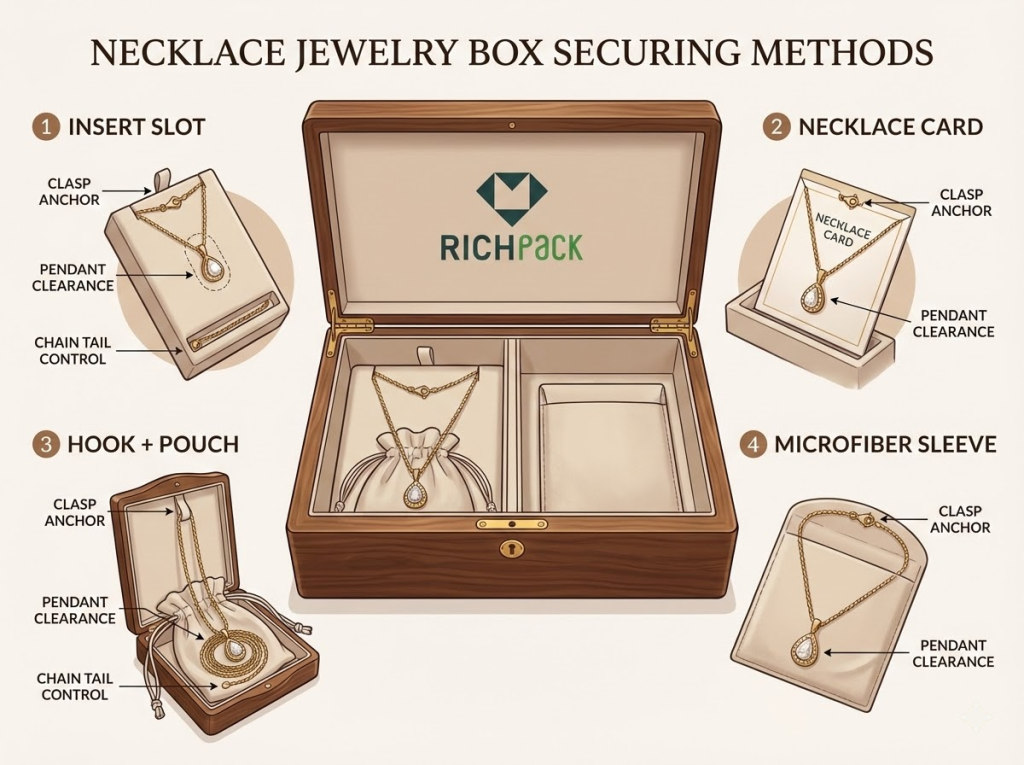
Cards and sleeves look simple. I’ve found they scale well when you sell many items. A card keeps the clasp in one spot while a soft pouch stops scratches. This keeps the pendant from hitting the chain.
I see one mistake happen too often. Teams forget to close the clasp, so the chain tangles anyway. I follow how people talk about travel tangles on Reddit. They always say to lock the tail and separate layers before moving.
You should write a short rule for your team. I use a one-line plan for every order. Tell them: “Clasp closed, pendant centered, tail tucked, sleeve sealed.” This one habit stops knots better than any fancy box.
I see many brands struggle with single necklace packing for e-commerce or PR mailers. You should avoid the mess of a full jewelry set layout.
Standard lobster clasps and extender chains cause most of the trouble. I’ve found these specific parts are not the fastest during shipping.
Your goal is a perfect unboxing moment right out of the box. No customer should spend time fixing jewelry at their table.
Tangled necklaces do not usually come from cheap materials. I found the real issue is too much slack inside the box. One loose part moving during transit ruins the look.
Try designing the interior like a small track. You need an anchor, a set length, and a pocket. This small change stops knots better than buying costly materials.
I always start with the chain length. Most buyers use names like choker, princess, or opera. These match the inch ranges in most guides.
I use simple logic when I make samples. This stops tangles without making the box too big. Here is the math I use.
I often test this with a paper ruler and a card. It is a quick way to check your work. If the chain overlaps twice, the box is too small.
Transit is where most tangles happen. Shaking and drops turn loose chains into knots. I always use ISTA tests to check for this. These tests mimic real shipping risks.
I also use ASTM standards for drop testing. This helps me find weak spots early. I’ve seen this save many brands from high return rates.
I use these shipping tricks often. They protect the jewelry without ruining the unboxing. These steps keep your products safe and look professional.
Place a soft cover sheet over the insert. Use tissue or vellum to stop the chain from moving. This simple layer keeps everything in place during the trip.
Lock the pendant in one spot. Use a deep pocket or a foam nest. I avoid using just a pretty lining for heavy pieces.
Look at packaging guides from carriers like FedEx. They show you how to handle drops and weight. Design your insert to keep the necklace still. This stops the piece from “walking” inside the box.
I can help you build a spec sheet for your best items. We will list pocket depth and anchor types. This helps you get clear quotes from suppliers. What chain lengths and pendant sizes do you sell most?

I see many kitting lines struggle with speed. This is the fastest way I’ve found to pack securely.
Do you pack hundreds of boxes every day? I recommend one simple quality check. Give the box a gentle shake before you close it. If the pendant moves, you need better interior control.
I always tell my clients that great anti-tangle inserts do two things. They stop the chain from sagging and keep it from moving around. When you remove that extra slack, you solve the problem.
Notice how most pro necklace cards are only a few inches wide. There is a good reason for this small footprint. The industry prefers tight anchoring over large, open spaces. Focus on routing the chain, not giving it room to move.
Most tangles happen when your jewelry is in the mail. Shaking and drops turn loose chains into knots. I often see teams use ISTA tests to fix this. They also check ASTM drop standards. This keeps your pieces safe during the trip.
Here are ways to protect your items without ruining the unboxing:
We can turn your top three items into a simple spec sheet. I will list the pocket depth and anchor type. This helps you get clear quotes from every supplier. Which chain lengths and pendant sizes do you sell most?
You ship your jewelry across many different climates. Most of your pieces are sterling silver or plated. Items often sit in storage for 30 to 90 days. This wait happens before your customer even opens the box.
I see tarnish complaints follow a very clear pattern. Customers say the piece looked great, but arrived dark. Others find small spots on the chain. In my experience, this rarely means you have a bad product. I usually find it is a microclimate issue inside your packaging. Humidity and sulfur gases get trapped right next to the metal.
Tarnish is usually a slow reaction. It is not a “bad product” problem. Wet air causes rust. Moving air and sulfur change the color of silver parts fast.
I always set a clear boundary with my buyers. Good storage lowers the chance of tarnish. But it cannot promise “zero tarnish” for long periods. Shipping and subscription cycles make this hard.
You must focus on the levers you can control. I look at three main areas. Control (1) moisture, (2) air flow, and (3) what materials touch the metal.
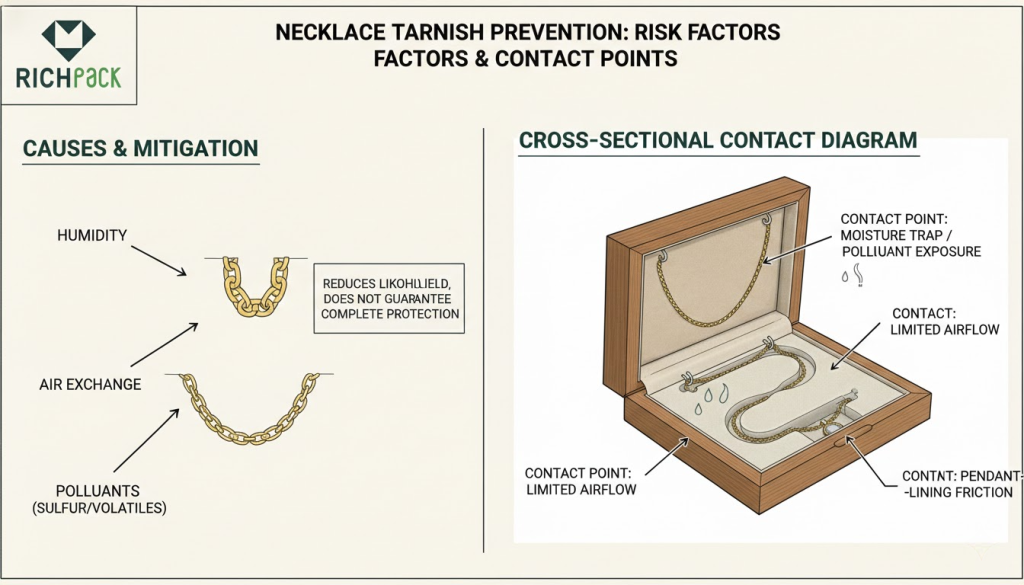
I treat anti-tarnish tools like supplies that run out. They aren’t permanent shields. I use strips, papers, or special cloth liners as a barrier.
Some films also work by soaking up bad gases. The seal of the box decides how well they work. An open box lets in too much fresh air. This makes the tools work much harder.
Next, let’s look at the necklace box specs. I want these to be buyer and factory-friendly.
I test samples exactly how your customers open them. I close the chain clasp first. Then I route it through the insert path.
I check if any edges snag the links. I also shake the box. This shows if the anti-tarnish strip stays put. This “snag test” beats a pretty render. It stops real complaints.
If you change just one thing, make it moisture control. I always aim for 30% to 50% humidity for silver storage. Keep your pieces in closed containers. This keeps out dust and harmful air that traps water.
Do (works in real packaging lines):
Don’t (common failure modes):
I see the same mistakes during audits that lead to customer complaints. You get into trouble when you mix “reactive neighbors” with open air. Here are the common issues I find:
Shipping jewelry across borders is a real test for your packaging. I’ve watched many shipments fail because of transit vibration. You need a setup that handles weeks of movement.
Fine chains are the most fragile part of your inventory. One long flight can turn a necklace into a knot. I’ve found that deep slits in the foam work best to keep chains tight.
Plated pieces also risk losing their shine from constant rubbing. I always suggest a soft microfiber lining or a small pouch. This layer stops the plating from scratching against the box.
You might also face moisture issues during long international trips. I recommend adding anti-tarnish tabs to every box. These tabs keep the metal bright and prevent tarnishing.
Don’t forget to test your outer shipping boxes for a snug fit. I tell my clients to use plenty of paper or cornstarch peanuts. This stops the jewelry box from bouncing inside the mailer.
Your goal is a perfect unboxing experience every time. These small changes help you avoid bad reviews and costly returns. Let’s make sure your jewelry arrives exactly as you intended.
I love using velvet when you need that instant premium feel. The soft pile creates a rich backdrop. It makes your metals and stones pop on camera and in displays. This is why I often suggest it for necklace gift boxes. Even simple designs look high-end with this fabric.
You will see the downsides after shipping and handling. Velvet holds onto lint and dust easily. Pressure from shipping can leave marks on the pile. Cheap velvet sheds fibers that get stuck in jewelry prongs. I’ve noticed these “crush” marks are a common buyer complaint. Shading happens whenever you disturb the pile during transit.
Practical buying tips (what I do during sampling):
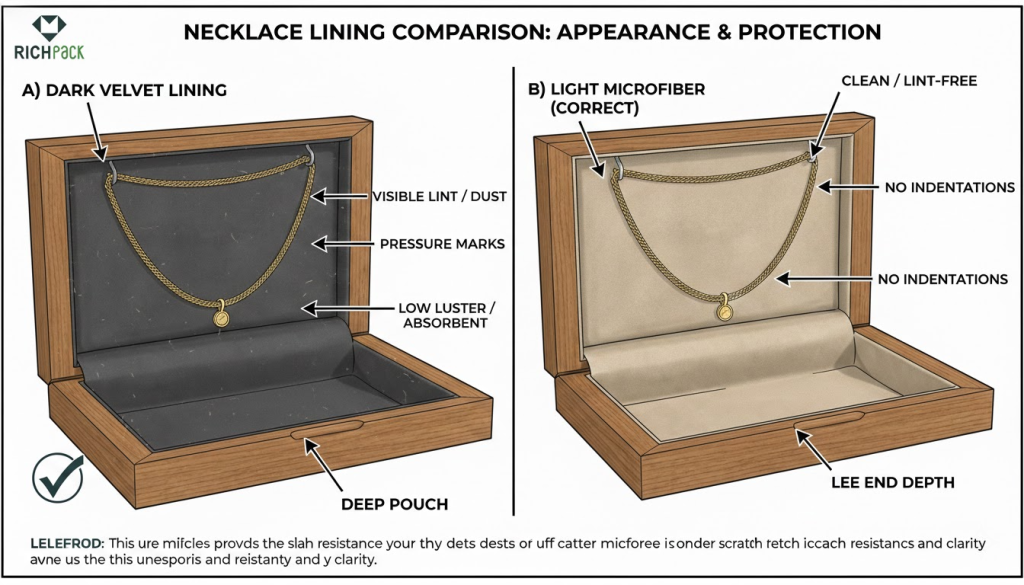
I’ve found suede-look and microfiber linings work best for daily use. They feel warm like velvet but hold up much better. Microfiber traps less dust. The smooth surface also stops micro-scratches.
This matters for pearls and thin chains. The jewelry slides easily instead of catching on the fabric. I always tell my clients to choose this for delicate pieces.
When you buy, don’t just look at the label. Focus on how the material actually performs. Ask your supplier for Martindale test results. This test checks for wear and pilling.
ASTM offers a specific way to test this. It gives you a clear way to compare vendors. You won’t have to guess based on touch alone.
Where suede/microfiber fits best:
I’ve found that a foam insert has one main job. It locks your necklace in place. Less movement means fewer knots during shipping. Tangles happen from too much slack, not bad luck.
Fit is the whole game. A wide slot lets the chain slide. If it is too tight, you get marks on the metal. I use foam that meets ASTM D3574 standards to ensure it bounces back.
Here are the specs I use to avoid surprises:
I’ve seen many B2B returns in my time. Most don’t happen because a box looks cheap. Usually, the lining ruins the product after unboxing. This is a common trap for new buyers.
You should watch for three main risks early on. I always check these before I sign off on any bulk order.
Here is my top rule for saving time. Treat the lining as a material that touches your product. It is not just a decoration. This shift in thinking stops claims and saves you money.
A great insert balances feel, stability, and safety. You want to lower your risk as much as possible. Perfection is hard, but we can get close. What is the biggest headache you face right now? Is it tangles, marks, or smells?
I often call these set-up boxes for retail or influencer gifts. You get a perfect lid angle and a solid hinge feel. This structure holds its shape and feels valuable in your hand. It also handles foil and tight wrap corners without any warping.
The tradeoff is shipping and storage. Rigid packaging takes up a lot of room in your cartons and warehouse. I see shipping costs rise fast for subscription or DTC brands. I recommend using ISTA transit tests early so you are not guessing.
Buyer checklist (what to ask your supplier):
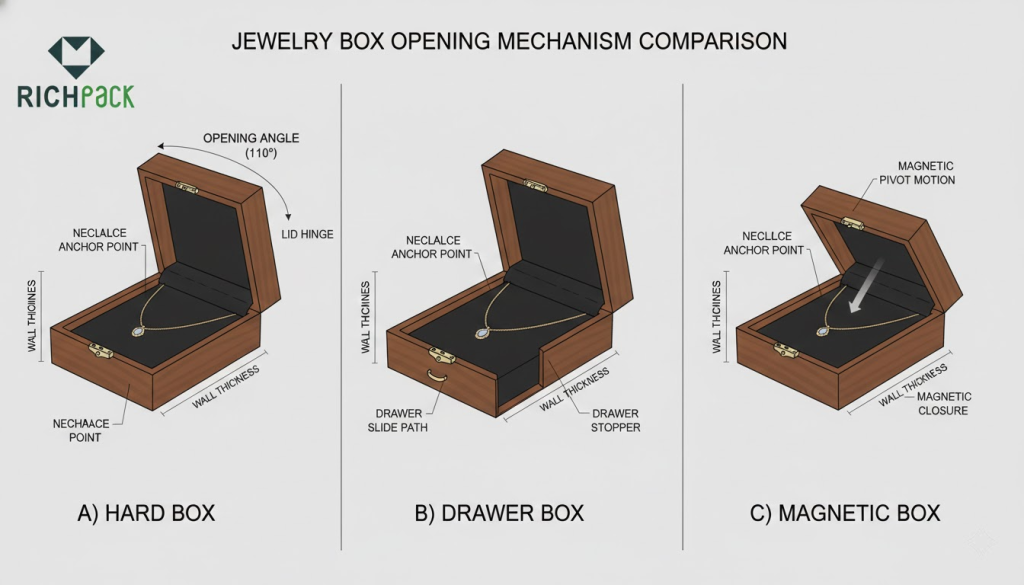
From my experience, drawer styles work well for desk storage and corporate gift sets. I like them for multi-SKU sets because they make sorting easy. Your customers can slide them open without a lid getting in the way. They also look great in photos for your brand story.
I often see people get the space wrong. If the drawer is too shallow, the pendant gets crushed and leaves marks. It is a math problem, not a fabric problem. Always test your actual pendant before you start production. If you feel any resistance, the height is wrong.
Here is how I set the right specs without making it too complex:
I’ve found that magnetic closures sell ease of use. They look sharp and modern for high-end gift sets. But magnets bring a real risk to your quality. Even a tiny error makes the lid float or look crooked. Then, your box no longer feels like a premium product.
You also have to worry about long-term wear. Constant opening and rough shipping can break down the box structure. This is common when the magnet is too big for the thin board. That is why I treat magnets as a working part. We set rules for the gap and feel after real shipping tests.
Here are my go-to tips to stop magnet issues:
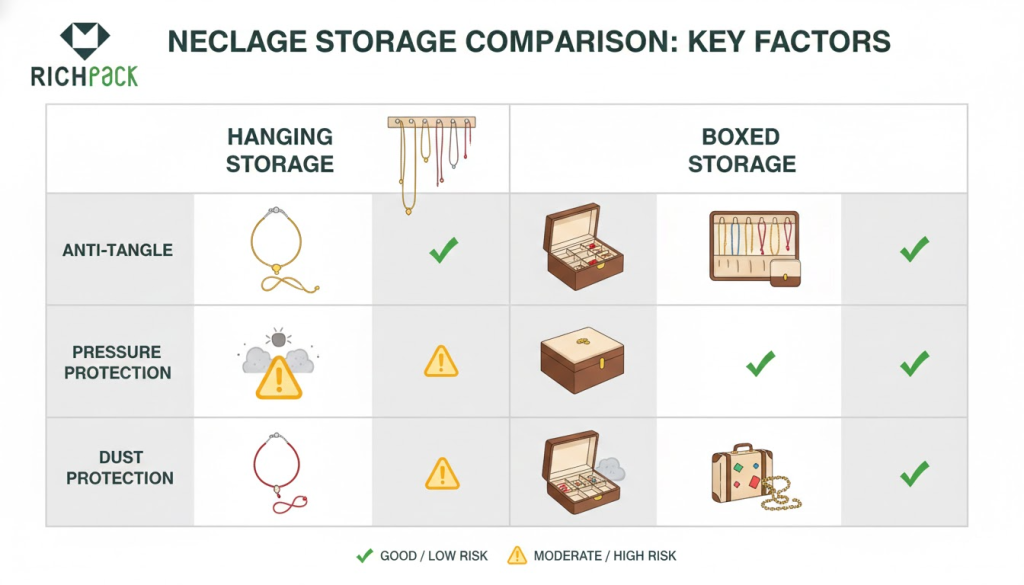
I tell my clients that hanging is the best way to stop tangles. It keeps your chains vertical and far apart. This simple trick stops knots from forming during daily use. I’ve found that jewelry pros also suggest using hooks or separate spots. Just make sure you close the clasps to keep things smooth.
If you are shipping items, a box is your best bet for protection. It keeps out dust and stops heavy items from crushing the jewelry. Hanging setups often fail during a bumpy delivery. Chains can snag or bend when they touch other items. If your buyers travel, give them a sturdy box with a good insert. This creates a much safer experience for your brand.
I always recommend stackable trays if you plan to grow your line in 6 months. You can just add more layers later instead of replacing your entire setup. These trays work for high-SKU brands, subscription boxes, or electronics accessory bundles. They keep your look the same and make picking much faster.
Most buyers miss how these trays actually fit together. If they slide, necklaces tangle, but tight trays just create clutter. I look for clear channels, even spacing, and a top layer that protects pendants from above. I close the stack, shake it, then check that every necklace stayed in its lane.
I’ve worked with many clients on this. I recommend necklace boxes for gifts and retail displays. You use them for short storage, too. Organizers are for long-term sorting and daily access.
Packaging focuses on unboxing and branding. I use rigid boards and inserts for cleaner lines. Organizers focus on speed with many trays and hooks. I see buyers mix these up and use weak protection.
Hooks stop tangles. But they only work if you close the clasp. You must keep the chain from sliding. I’ve seen this save hours of work.
Many clients run into the “loose clasp” trap. The chain slips off and knots in the base. It happens more than you think.
I always tell my team to close every clasp. You should store each piece alone. This stops tangles and keeps the finish smooth.
Give each necklace its own hook. Leave enough space so chains do not hit the pendants. I have found that this keeps your display looking sharp.
Long chains need extra room to hang straight. I always space hooks further apart to stop pendants from bumping. Layered sets need smart spacing to prevent tangles at the base. A good layout helps you avoid costly returns.
Quick sizing guide (starting point):
| Necklace type | Suggested hooks | Spacing note |
| 16–18 in chains | 3–5 | tighter spacing is OK |
| 20–24 in chains | 5–8 | increase hook-to-hook gap |
| 28+ in chains | 8–12 | prioritize vertical clearance |
I suggest using microfiber or suede-like linings for delicate chains. These fabrics stay clean. They won’t bleed color onto your plated pieces.
You need materials that do not scratch or shed lint. This matters most for pearls, fine chains, and gold plating. I always look for stable dyes.
In my production runs, I use a white cloth rub test. This spot’s color transfers early. I also use a tape-lift test to find loose lint. I never approve a lining without these steps.
Ask your suppliers for material reports. Get the formal papers when you need them.
I always suggest you pick a case that keeps every necklace apart. You need a design that holds the chain tight. It must stay closed while inside your bag.
In my experience, the best cases use small slots and a sturdy zipper. A fixed strap keeps the metal from moving or tangling. Most buyers look for small cases with soft suede inside. These special sections really help stop knots.
Buyer tip: Always close the clasps and keep every piece in its own spot. I find this simple habit works best for any trip.
I’ve found the “best” necklace box must fit your specific needs. Think about how people open it, how it ships, and how long it sits. Use rigid boxes for style, but lock chains in place to stop knots. To save money, right-size the box and simplify your inserts. For the planet, use FSC paper and remove extra layers. Smart buyers use testing rules like ISTA 3A or ASTM D4169 instead of guessing.
Tarnish and tangles are real risks you need to manage. I always run a “shake, open, and inspect” test on samples. If the clasp pops open or the chain slides, it will knot during shipping. For silver, avoid smelly glues and use tight seals for long-term storage. Using anti-tarnish parts also helps slow down silver tarnish in storage.
Just submit your email to get exclusive offers (reply within 12 hours)
 PREV
PREV