
You’ve spent months designing a stunning piece of jewelry — and then it arrives at the customer’s door rattling loose inside a generic box. That single moment can unravel every bit of brand trust you built.
A well-made jewelry box organizer insert solves exactly that problem. It keeps pieces secure, elevates the unboxing experience, and signals that your brand takes quality seriously at every level. Whether you’re a jewelry brand founder, a packaging procurement manager, or a boutique retailer, this guide walks you through how to make custom jewelry box inserts from scratch — covering materials, step-by-step methods, insert types by jewelry category, and when it makes sense to go custom versus off-the-shelf.
By the time you finish reading, you’ll know how to choose the right insert material, build compartments that actually fit your pieces, and design a packaging interior that reinforces your brand identity — not undermines it.
Most packaging conversations focus on the exterior — the box style, the logo placement, the unboxing ribbon. The interior gets treated as an afterthought. That’s a costly mistake.
A jewelry box insert is the first physical point of contact between your product and the customer’s hands. It determines whether a necklace arrives untangled, whether a ring sits proudly upright or tips sideways, and whether the overall experience feels like a luxury purchase or a disappointing one. According to a 2023 Dotcom Distribution e-commerce study, 40% of consumers said they would share a product image on social media if it came in premium or gift-like packaging — and the insert is a critical part of that interior experience.
Beyond aesthetics, inserts provide real mechanical protection. Without a proper foam or velvet cushion, delicate gemstone settings can chip against the box walls during shipping. Chains tangle. Clasps scratch surfaces. All of these outcomes lead to returns, negative reviews, and lost repeat customers.
Think of your insert as a silent salesperson. When a customer opens the box, the insert communicates price point, craftsmanship, and brand values before they’ve even touched the jewelry. A velvet-wrapped foam insert signals luxury. A clean, die-cut EVA foam tray signals precision engineering. A loose cotton pad signals that the brand didn’t think hard about the details.
For jewelry brands selling in the $50–$500 price range, the insert often accounts for just 5–10% of total packaging cost. But its impact on perceived product value is disproportionately large. Industry packaging consultants note that upgrading from a standard cotton filler to a custom foam-and-velvet insert can increase unboxing satisfaction scores by 30–40% in consumer testing, according to data published by the Packaging Digest trade journal in 2024.
Returns are expensive — both in logistics cost and brand reputation. A ring that arrives scratched because the insert didn’t hold it securely costs you more than the insert upgrade would have. Custom inserts for jewelry boxes that are cut to the exact dimensions of your pieces eliminate the movement that causes damage.
For e-commerce brands shipping hundreds or thousands of units per month, even a 1–2% reduction in damage-related returns can translate to thousands of dollars in recovered revenue annually. The insert is not a luxury — it’s a quality-control mechanism.
The best jewelry brands understand that the unboxing moment is a brand moment. A custom insert with your brand color, a subtle logo debossed into the foam, or a coordinated velvet color that matches your brand palette tells a coherent brand story. It shows customers that you considered every detail — from the design of the piece to the way it’s delivered.
This is why major fine jewelry brands like Tiffany & Co. and Cartier invest heavily in their interior packaging. The robin-egg blue satin interior of a Tiffany box is as recognizable as the box itself. You don’t need Tiffany’s budget to apply the same principle at your scale.
If you sell through physical retail channels — your own boutique, wholesale accounts, or pop-up events — inserts serve a display function too. A well-designed foam insert tray can double as a display surface, showing each piece upright and organized inside the case or on a table. This reduces setup time at events and keeps inventory organized between restocking cycles.
Sustainability is no longer a niche preference — it’s a purchasing criterion for a growing segment of jewelry buyers. According to a 2024 Nielsen IQ Global Sustainability Report, 66% of global consumers say they consider environmental impact when making purchasing decisions.
Modern insert materials have evolved to meet this demand. Recycled EVA foam, molded paper pulp, and FSC-certified cardboard inserts offer the same functional protection as conventional materials with a significantly reduced environmental footprint. Brands that communicate this choice on their packaging score higher on sustainability perception.
The material you choose for your custom jewelry box inserts affects protection, aesthetics, cost, and brand positioning all at once. Each option has a distinct profile.
Foam is the most widely used insert material in jewelry packaging, and for good reason. It can be precision-cut to any shape, absorbs shock effectively, and pairs beautifully with fabric overlays for a luxury finish.
There are three main foam types to understand:

The standard industry practice for premium jewelry packaging is to use an EVA or PE foam base, then laminate it with a velvet or suede surface. This combination delivers both structural protection and a tactile luxury finish — it’s the hallmark of professional jewelry packaging, according to packaging specialists at RichPack.
Velvet inserts are synonymous with fine jewelry presentation. The soft, plush surface prevents scratches on delicate metal surfaces and gemstones while creating an unmistakably premium look when the box is opened.
Common fabric choices include:
Fabric inserts are rarely used alone — they’re almost always layered over a foam or cardboard base that provides structural rigidity.
For brands watching costs closely or brands with strong sustainability commitments, cardboard inserts are a practical choice. Corrugated inserts and folded paperboard compartments can be die-cut precisely, and when covered with a paper velour or flocked surface, they achieve a cleaner look than their base material suggests.
Cardboard inserts are particularly well-suited for:
The limitation is durability. Cardboard inserts can compress over time and don’t absorb shipping shock as well as foam. For pieces above $100 in retail value, foam-based inserts are the safer investment.
Wooden inserts bring a warmth and artisan quality that no synthetic material can replicate. For jewelry brands with a natural, handcrafted, or heritage aesthetic, wood-lined compartments or solid wood trays create a strong brand impression.
Common approaches include routing out compartments in a solid wood base (like walnut or bamboo), then lining them with velvet or suede. The downside is cost — wood inserts require more labor and material investment, making them better suited for high-end custom orders, gift sets, or brand collectible packaging rather than everyday e-commerce shipping.
| Brand Tier | Recommended Insert | Finish |
|---|---|---|
| Entry-level ($20–$50) | PU foam or cardboard | Paper velour or plain |
| Mid-range ($50–$150) | PE foam | Velvet laminated |
| Premium ($150–$500) | EVA foam | Velvet or suede flocking |
| Luxury ($500+) | EVA foam or molded pulp | Satin, silk, or custom dyed velvet |
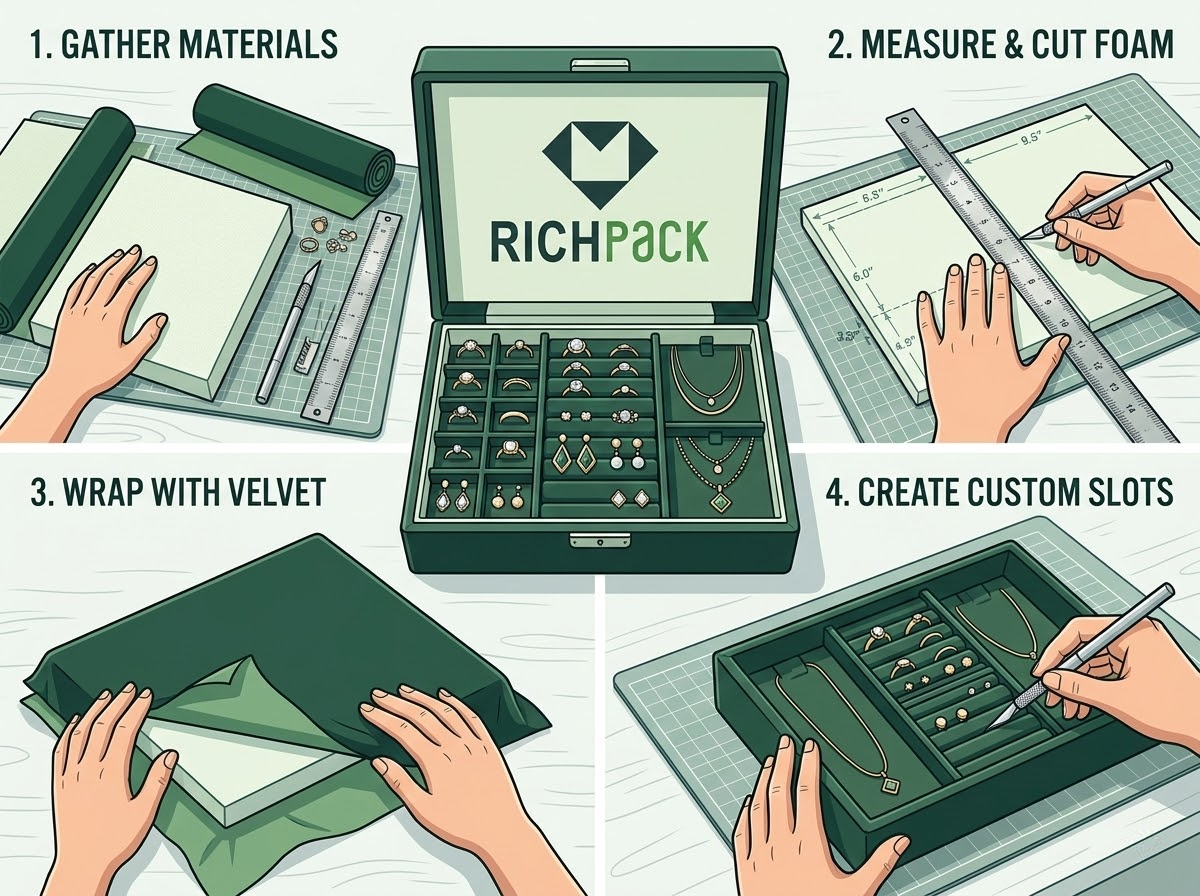
Before you start cutting foam or gluing velvet, gather the right tools. Using the wrong equipment is the most common reason DIY inserts look amateur — an imprecise cut or a bubble in the fabric surface immediately signals low quality.
Here’s what you’ll need for a basic DIY foam insert for a jewelry box project:
If you’re producing inserts for a production run rather than a one-off sample, these additional supplies make a significant difference:

This step-by-step guide covers building a standard custom jewelry box insert for a ring box and a multi-compartment tray. The same principles apply to earring inserts, necklace inserts, and bracelet trays — adjust dimensions accordingly.
Start by measuring the interior dimensions of your jewelry box: length, width, and depth. Do this in millimeters, not inches — millimeter precision matters when you’re fitting foam inside a tight-tolerance rigid box.
Write down three measurements:
Subtract 1–2mm from each dimension. This slight undercut ensures the insert drops in smoothly without forcing or bowing. If your insert is cut to the exact interior size, it will bind when inserting or create pressure that warps the box walls.
On paper or a simple design tool, sketch the compartment layout. Think about the actual pieces this box will hold:
If you’re designing a tray for multiple piece types, sketch divider placement and leave 5–8mm of foam wall between each compartment — enough to hold shape without using excess material.
Using your measurements and sketch, mark cut lines on the foam sheet with a pencil and a metal ruler. Cut the outer perimeter first using a straight, downward motion with the craft knife. Apply consistent pressure — don’t saw back and forth, which creates ragged edges.
For ring slots specifically: Mark the slit positions at equal intervals across the foam top surface. Using the craft knife and ruler, cut straight down 20mm deep at each mark. The slot should be narrow enough to grip the ring band (roughly 5–7mm wide) without requiring force to insert or remove.
A practical tip: Cut a test slot in a scrap piece of foam first and try your ring. The ring should slide in with light pressure and stand upright on its own without tipping.
Cut your velvet fabric approximately 15–20mm larger than the foam piece on all sides. This gives you enough fabric to wrap around to the underside.
Lay the foam face-down on the back of the velvet. Apply spray adhesive to the top face of the foam (which is now facing up). Flip the foam onto the velvet, pressing firmly to bond. Working from the center outward, smooth any bubbles toward the edges using your palm.
At the corners, make a small diagonal cut in the fabric to reduce bulk before folding. Apply glue to each edge, fold the fabric over, and press firmly. Use a bone folder or ruler edge to press the velvet into any slots or channels — this step determines whether the slot looks finished or rough.

For multi-compartment trays, cut thin strips of foam or sturdy cardboard (3–5mm thick) to serve as dividers. Apply fabric glue along one edge and press them upright into position inside the main foam base, spacing them according to your sketch.
If using cardboard dividers, wrap each strip in fabric before installing it — a bare cardboard edge pressed against velvet looks unfinished. The few extra minutes of wrapping each divider strip make a visible difference in the quality of the final result.
Drop the insert into the box and check:
Make adjustments, re-test, and finalize. This prototype becomes your template for production.
Different jewelry categories require different insert geometries. A ring insert will frustrate a customer if used for a bracelet; a necklace channel won’t secure a stud earring properly. Here’s how to approach each category.
The standard ring insert is a block of high-density foam (typically EVA or PE, 20–25mm thick) with parallel slits cut across the top. The slits grip each ring band, holding the ring upright at a slight tilt so the stone or setting faces the customer when the box opens.
Slot spacing matters: Leave 15–20mm between each slit to prevent rings from touching each other. For wide-band rings, cut slightly wider slits (7–9mm instead of 5–6mm). For fine engagement rings with tall settings, ensure the slot depth is at least 20mm so the band seats fully without the ring tipping.
An alternative is the “ring clip” — a C- or U-shaped rigid clip that grips the band and holds it elevated off the insert base. Ring clips are common in luxury ring boxes where the ring needs to be presented at a specific angle.
Stud earrings need a flat pad with small apertures (holes) for the posts, paired with a butterfly holder on the back to keep the earring flat and facing forward. The aperture diameter should match your typical post gauge — usually 0.7–1.2mm for standard earring posts.
For drop or dangle earrings, a shallow foam compartment (10–15mm deep) with a velvet base prevents the earring from folding or tangling. A small ridge of foam between compartments keeps pairs separated.
Earring display cards — thin cardboard cards with punched holes for earring posts — are a cost-effective alternative to foam trays for brands with a more editorial or minimalist packaging aesthetic.
Necklaces present the greatest insert design challenge because of chain length and pendant weight.
The two main approaches:
For shipping packaging (versus retail display packaging), the channel approach with a clasp-securing tab provides better transit protection.
The standard bracelet insert is a cushioned pillow insert — a foam pad wrapped in velvet that the bracelet wraps around, holding its circular form. The padding height should be matched to the bracelet’s inner diameter: bangles need a taller pillow than chain bracelets.
The C-clip insert is an alternative for rigid bangles — a rigid, C-shaped holder that grips the bangle band and holds it vertically or slightly elevated. This style is common in fashion jewelry packaging, where visual impact at the point of sale matters more than shipping protection.
For chain bracelets, flat foam pads with small clasp-securing tabs (either a small slit or a snap tab) prevent the chain from shifting or tangling during shipping.
Jewelry sets — ring and earring pairs, necklace and bracelet combinations — require a coordinated tray design where every piece sits in its designated compartment without touching adjacent pieces. This is where custom inserts for jewelry boxes provide the clearest advantage over off-the-shelf options: generic trays won’t match your specific SKU dimensions.
When designing set trays, arrange pieces in the order they’d be worn or in a visually balanced layout. Place the most prominent piece (typically the necklace or the engagement ring) at the center or top. Add 3–5mm foam walls between every compartment to prevent contact.

A generic foam insert says nothing about your brand. A custom-branded insert — even with a subtle logo embossed or a coordinated color choice — tells customers that you’ve designed every layer of their experience intentionally.
The most immediate branding decision is color. Velvet inserts are available in a wide range of colors. Choosing a velvet that matches your brand’s signature color — deep navy, forest green, blush pink, jet black — creates a cohesive brand experience when the box opens.
This doesn’t need to be complicated. Even switching from a generic white cotton filler to a precisely matched velvet in your brand color immediately elevates the perception of the unboxing experience.
EVA foam can be debossed with a custom die — your logo or wordmark pressed into the foam surface at a depth of 1–2mm. The result is a subtle, tactile brand mark that’s visible when the jewelry is removed from the box.
Debossing on foam requires a metal stamping die, which involves a tooling cost (typically $150–$400, depending on logo complexity). This cost is amortized over production runs of 500+ units, making it cost-effective for brands at scale. For smaller runs, screen printing directly onto the foam surface is an alternative at a lower tooling cost.
For brands with strict color standards, fabric suppliers can dye velvet to Pantone specifications on custom orders. This is particularly relevant for luxury brands where the insert color is part of the brand identity.
A second option: custom-printed fabric labels or hang tags placed inside the insert — a small card bearing your logo, care instructions, or a brand message, nestled into a dedicated slot in the tray. This adds branding without the tooling cost of die debossing.
While not inserting components themselves, tissue paper in a brand-specific color paired with a grosgrain ribbon pull (a small ribbon tab that allows the customer to lift the insert from the box) completes the branded interior experience. The ribbon pull is both functional and elegant — it solves the awkward moment when a customer digs their fingernails under a snug foam insert trying to lift it.
For gift sets and collector-grade packaging, a false bottom below the insert — concealing a care cloth, a certificate of authenticity, or a personalized note card — adds an element of discovery to the unboxing experience. This small detail is consistently cited in unboxing video comments as a highlight moment.
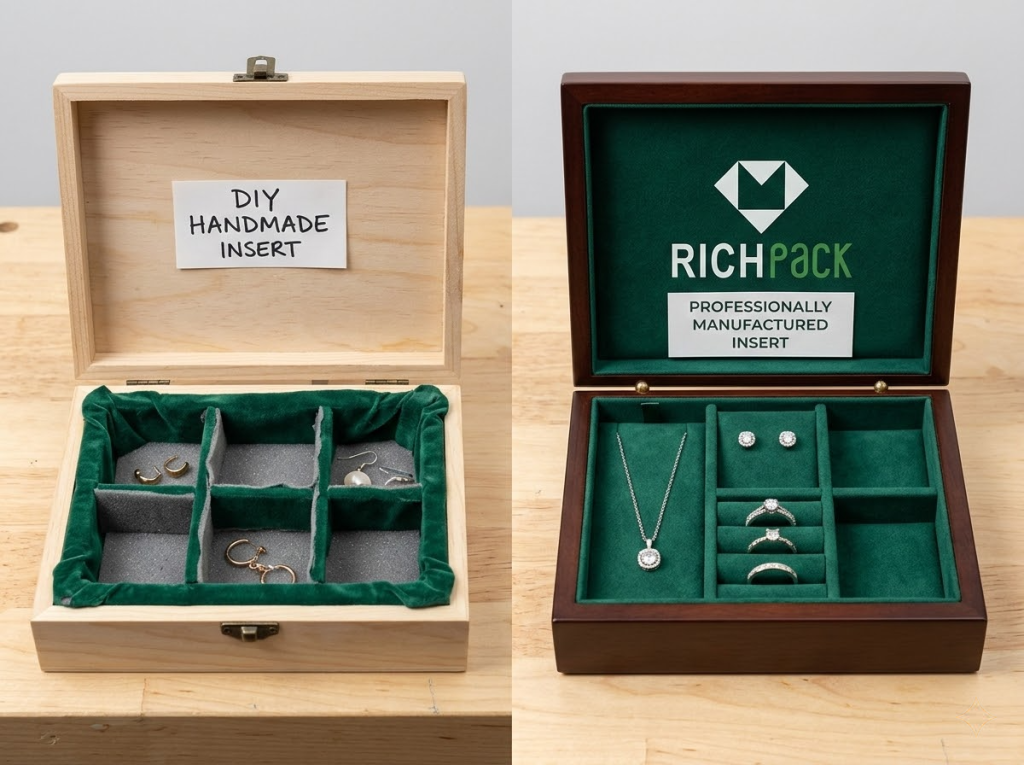
This is the decision most jewelry brand founders and packaging buyers eventually face: do you build inserts in-house, or work with a manufacturer?
The honest answer depends on your production volume, brand positioning, and internal resources.
DIY insert fabrication is practical for:
The limitation is time. A single DIY foam-and-velvet ring insert takes 20–40 minutes to build well. At 50 units, that’s 20–30 hours of labor — labor that could be spent on design, customer acquisition, or production. At 200 units, it’s not operationally viable.
Once your monthly order volume reaches 100+ units per SKU, professional manufacturing almost always makes financial and operational sense. Manufacturers bring:
Before requesting quotes from manufacturers, prepare the following:
1. Interior box dimensions (in mm): Length, width, depth
2. Piece dimensions: Measure your actual jewelry pieces — ring band width, necklace chain length, earring stud post length
3. Desired material: Foam type (EVA/PE/PU), fabric overlay, color
4. Branding requirements: Logo debossing, custom velvet color, ribbon pull
5. Annual volume estimate: Manufacturer’s price based on volume tiers
6. Sustainability requirements: Recycled materials, FSC certification, plastic-free constraints
Getting this information organized before your first supplier call shortens the quoting process significantly and signals that you’re a serious buyer.
A cost-effective middle ground: order precision-cut foam insert bases from a manufacturer, then do your own fabric wrapping and branding in-house. This approach gives you the dimensional consistency of manufactured foam at scale while keeping your branding flexible — you can swap velvet colors seasonally or add custom labels without reordering the entire insert.
For brands that want a completely integrated solution — box, insert, ribbon, tissue, and outer packaging all designed and produced together — working with a full-service custom packaging provider removes the coordination burden. A packaging partner that handles the complete interior and exterior build ensures that the foam insert fits the box precisely, the velvet color matches the box liner, and the ribbon pull is the right length. When different components come from different suppliers, small mismatches compound into a packaging experience that feels uncoordinated.
Experience reveals a short list of mistakes that consistently undermine custom insert quality. Avoid these, and the gap between amateur and professional results closes quickly.
Measuring the box interior is step one. But the equally important step is measuring the actual jewelry pieces that will live in that insert. Ring slots cut too narrow will force the band and potentially damage a delicate setting. Necklace channels cut too shallow won’t hold the chain flat and secure. Always measure both the box and the jewelry before cutting foam.
Standard white craft glue (PVA) soaks into foam and velvet, leaving visible stain marks that degrade the finish. Hot glue creates lumps under velvet that are visible and tactile. The reliable choices are spray adhesive (3M Super 77 or equivalent) for large foam-to-fabric bonds, and fabric-specific glue for edges and channels. Test any adhesive on a scrap piece before using it on your finished insert.
Velvet has a pile direction — cut pieces with the pile running in inconsistent directions, and the insert will look patchy and unprofessional under light. Always cut velvet pieces with the pile running in the same direction (typically toward the front of the insert, away from the viewer).
This is the most common measurement error: the insert is cut to fill the box interior depth without accounting for the space the lid needs to close flush. Measure the interior depth, then subtract 1–2mm to ensure the lid closes without pressure. If you’re adding a ring or bracelet that protrudes above the insert surface, account for that height in your calculations.
Jumping straight from sketch to production run without building one prototype is an expensive mistake. A single prototype reveals fit issues, adhesive problems, and design gaps that look fine on paper. Build the prototype, photograph it, test it with actual jewelry pieces, then commit to production.
EVA foam with velvet flocking is the best all-around choice for most jewelry brands. It offers precise cut dimensions, excellent shock absorption, and a luxury presentation finish. For eco-conscious brands, molded paper pulp or recycled EVA with a velour cover is a strong alternative. The right material depends on your price tier, brand aesthetic, and production volume.
Cut a piece of high-density foam (EVA or PE, 20–25mm thick) to fit your box interior minus 1–2mm on each side. Mark parallel slit positions across the top face, spaced 15–20mm apart. Cut each slit 20mm deep and 5–7mm wide using a craft knife and a metal ruler. Wrap the foam in velvet, pressing the fabric into each slot using a ruler edge, and secure the edges with spray adhesive. Drop into the box and test with actual rings.
EVA foam is denser, more durable, and provides a smoother, more refined surface — it’s the preferred choice for premium and luxury jewelry packaging. PU foam is softer, more flexible, and less expensive, making it suitable for everyday jewelry boxes and lower price-point packaging. For production packaging where quality consistency matters, EVA is the better investment.
Custom foam inserts for jewelry boxes typically range from $0.30 to $2.50 per unit at production volume (500+ units), depending on material, complexity, and finish. Simple PU foam inserts with a basic velvet cover sit at the low end; complex EVA foam trays with CNC die-cutting, custom velvet color, and logo debossing sit at the high end. Requesting quotes from 2–3 manufacturers with your exact specifications gives you accurate pricing for your project.
Yes. Felt is a practical, cost-effective alternative to velvet that still protects jewelry surfaces from scratches. It’s easier to work with than velvet (no pile direction to manage, minimal fraying) and is available in a wide range of colors. The tradeoff is that felt reads as a slightly more casual material — it lacks the visual depth and richness of velvet. For mid-range jewelry packaging, felt is a legitimate and often overlooked option.
Keep velvet inserts away from rough surfaces, direct sunlight, and moisture. For light surface dust, use a soft lint roller or a dry microfiber cloth — brush gently in the direction of the pile. Avoid spray cleaners, which can mat the pile and leave residue. Store inserts in a clean, dry environment away from sharp objects before inserting jewelry. For customers, include a brief care note with the packaging if your jewelry collection includes active-wear or daily-use pieces.
Most custom foam insert manufacturers require a minimum order quantity (MOQ) of 500 units for standard designs, and 1,000+ units for complex shapes with custom die tooling. Some suppliers offer lower MOQs (100–300 units) for simpler insert designs using standard foam cuts. If your volume is below 500 units, a hybrid approach — manufactured foam bases with in-house fabric finishing — often provides better economics than a full custom run.
A well-designed jewelry box organizer insert is one of the highest-impact, lowest-cost investments a jewelry brand can make. It protects your pieces during shipping, elevates the unboxing experience, and reinforces your brand identity at the moment that matters most — when a customer opens the box for the first time.
Whether you’re building inserts by hand for small-batch custom orders or working with a manufacturing partner to produce thousands of precision-cut foam trays, the principles are the same: measure accurately, choose the right material for your brand tier, wrap with care, and brand deliberately.
The inside of the box tells as much of your brand story as the outside. Make it count.
Have questions about custom packaging inserts for your jewelry line? Share your specific insert challenge in the comments — we’d love to help you find the right solution.
Just submit your email to get exclusive offers (reply within 12 hours)
 PREV
PREV