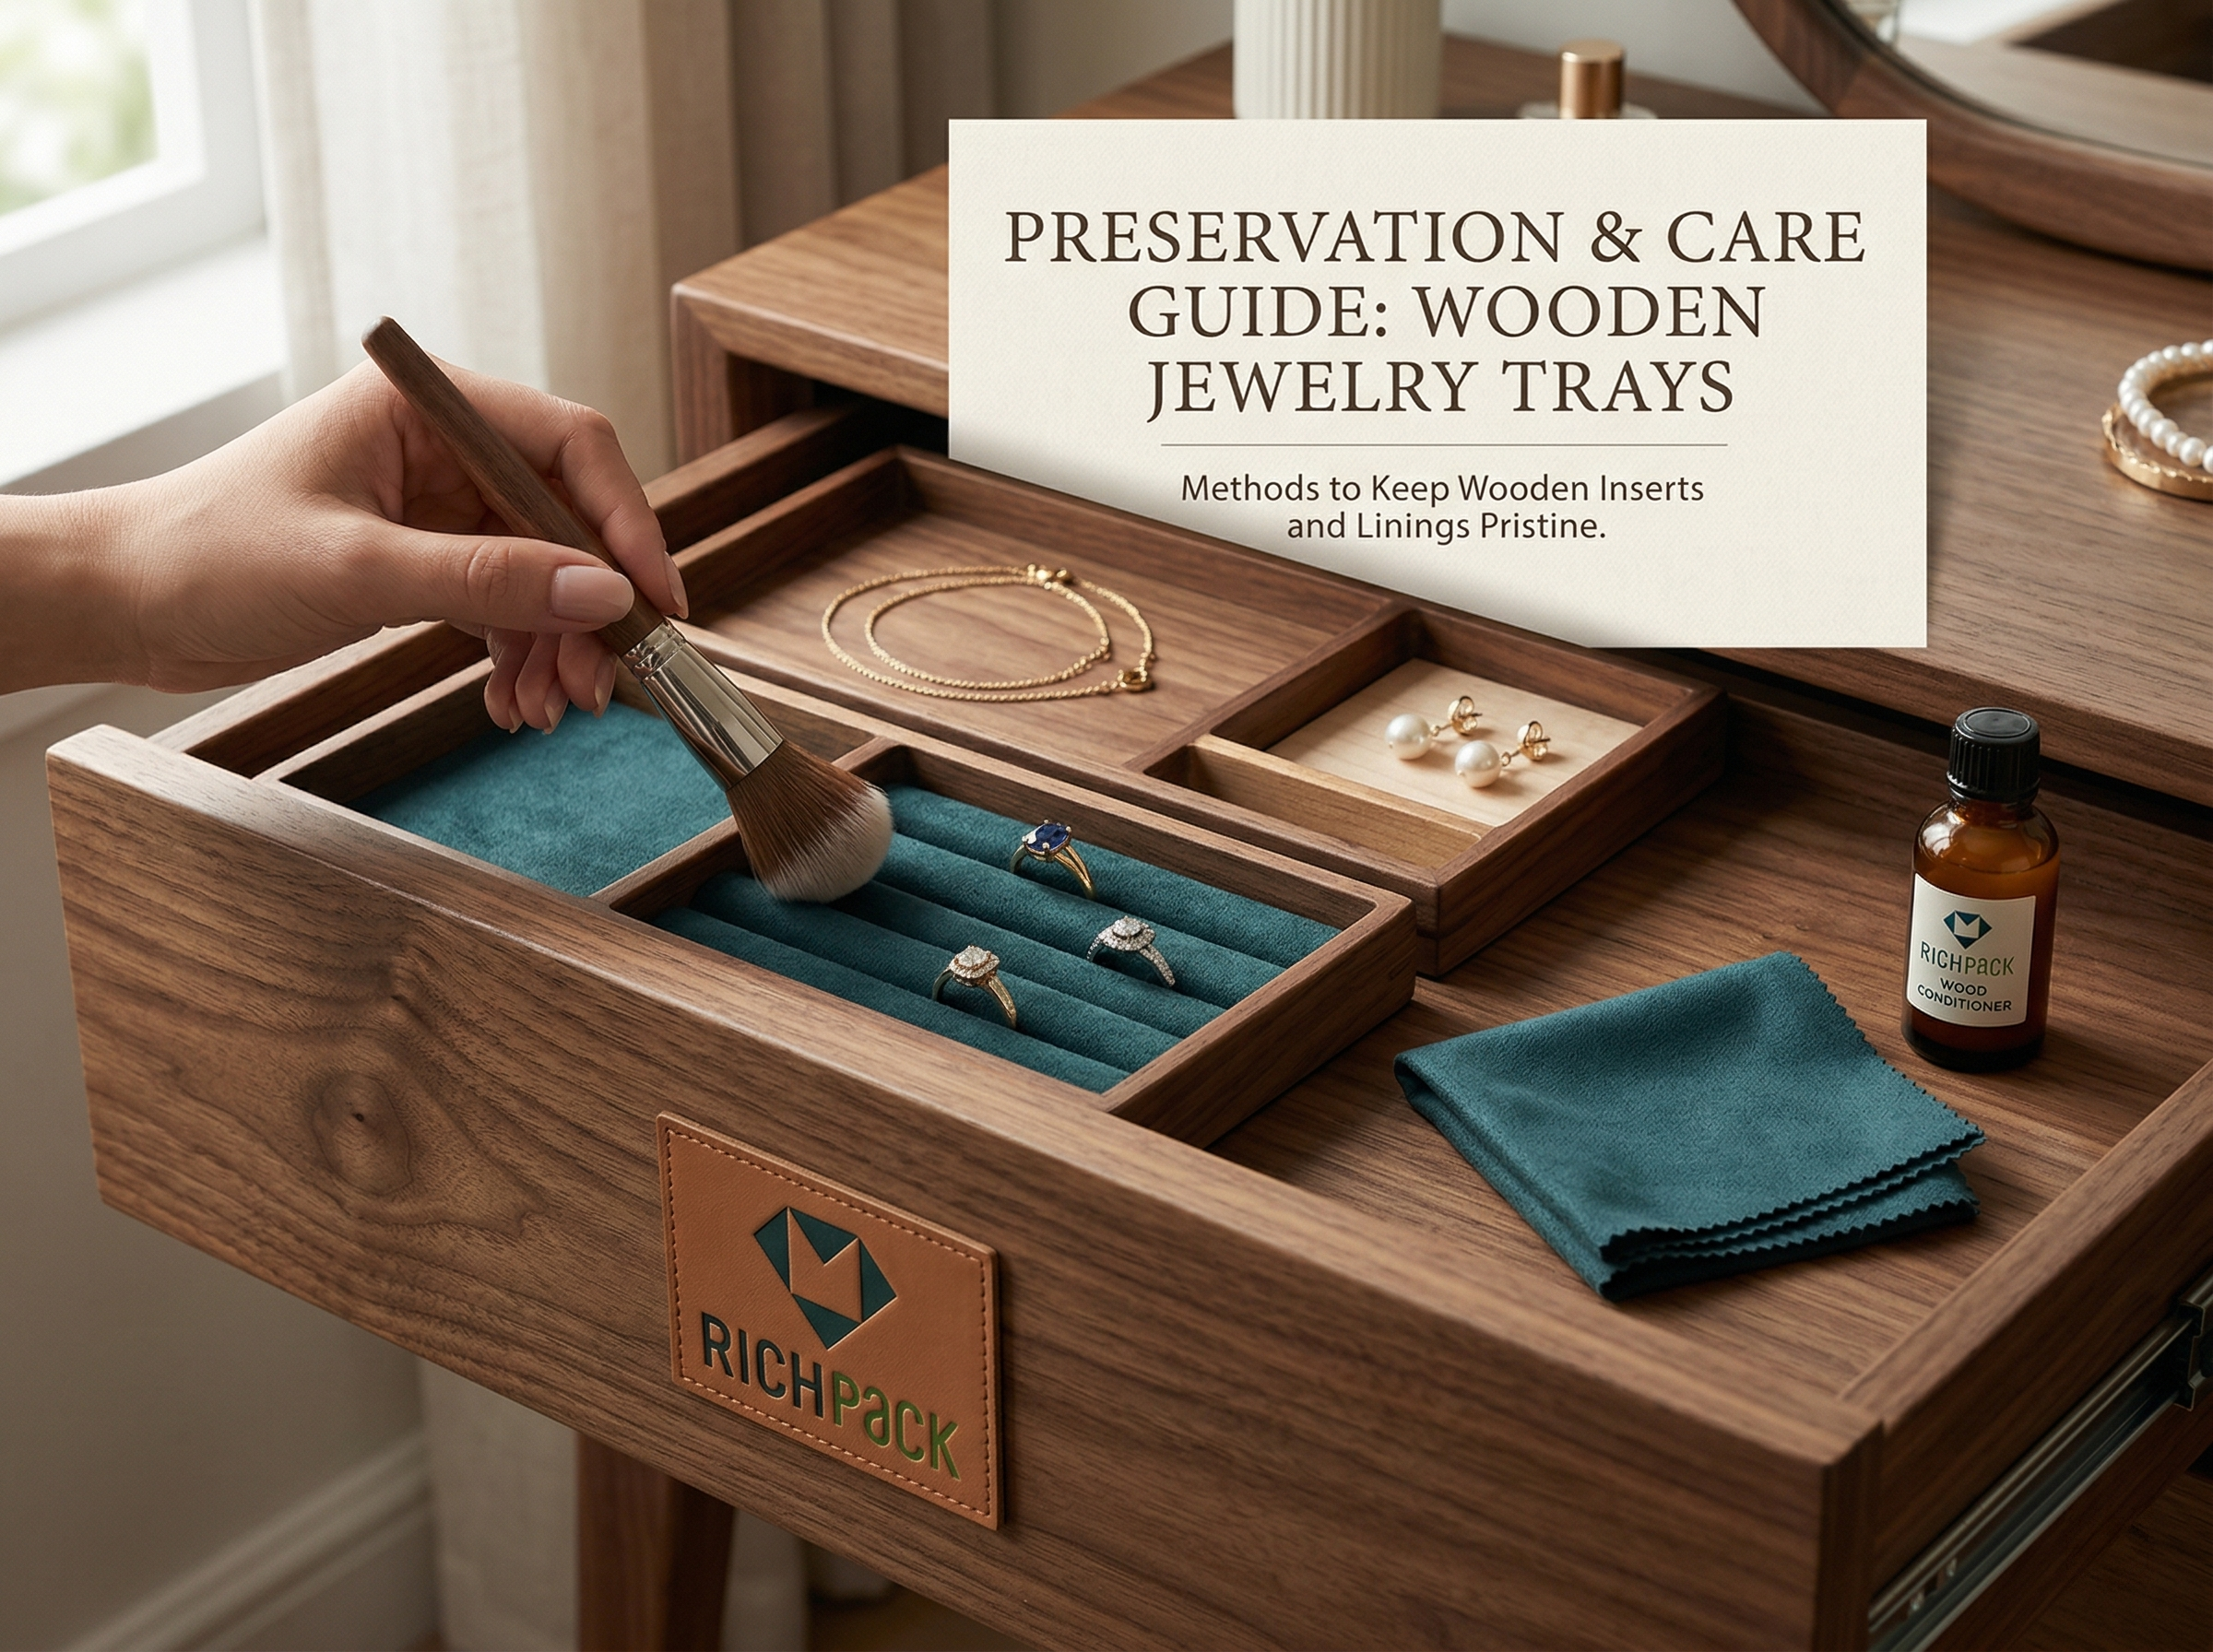

Wooden jewelry drawer trays last longer when you clean them gently, keep moisture under control, and inspect them before small surface issues turn into structural ones. If you run a boutique, manage a chain retail program, or build display systems for jewelry brands, good maintenance does more than protect wood. It protects presentation quality, drawer fit, and the premium feel customers notice right away.
In my experience, the fastest way to make a fine jewelry display look cheaper is not bad lighting. It is a tired tray with dust in the corners, faded finish, rough edges, or sagging compartments.
This guide breaks down how to clean, store, inspect, and maintain wooden jewelry drawer trays the right way, including custom jewelry trays for drawers and locking wooden jewelry drawer trays used in higher-security display programs.
A wooden jewelry drawer tray is not just a storage insert. It is part of the selling environment. It supports how rings, earrings, pendants, and bracelets sit in the drawer. It affects how clean the display looks. It also affects how customers read the value of the jewelry placed inside it.
A scratched or cloudy surface pulls attention away from the product. That matters in luxury retail.
When the wood finish loses clarity, even high-value pieces can look less refined. Fine jewelry performs better against a clean, quiet background. A tray that looks dry, dusty, or uneven makes the whole drawer feel older than it is.
Wood moves because wood reacts to its environment. That is the basic rule many teams overlook.
Wagner Meters explains that wood is hygroscopic, which means it gains or loses moisture as relative humidity changes. When that shift happens unevenly, wood can swell, shrink, or warp. In a jewelry drawer, even a small change can affect tray alignment and drawer fit.
Compartment integrity matters more than many buyers expect. Once the dividers begin to shift, product placement becomes inconsistent.
That creates daily friction for staff. Rings lean. Earrings lose alignment. Pendant sections stop looking intentional. Over time, the tray no longer supports clean merchandising.
A jewelry drawer tray should sit flat and move smoothly. If it starts rubbing, catching, or rocking, the problem is often bigger than surface wear.
In many cases, the issue is moisture movement, tray distortion, or a poor fit between the insert tray and the drawer cavity. That is especially important with custom jewelry trays for drawers, where tight tolerances are part of the visual and functional design.
Preventive care is cheaper than emergency replacement. That is true for single trays and even more true for multi-store programs.
A simple cleaning and inspection routine can stretch tray lifespan, reduce rushed reorders, and prevent partial display downtime. If you manage dozens of drawers across several stores, those savings add up fast.
Luxury presentation depends on consistency. Customers may not describe a tray in detail, but they notice when the display feels sharp, soft, clean, and precise.
I have seen this in packaging and display work again and again. The tray is not the hero, but it shapes the stage. If the stage looks off, the product feels less special.
Most tray damage does not come from one dramatic mistake. It comes from repeated small mistakes.
That is why maintenance works best when teams understand the damage patterns first. Once you know what causes failure, daily care becomes much easier to standardize.
Moisture is one of the biggest threats to wooden jewelry drawer trays. Too much water can lead to swelling, surface stress, seam movement, and long-term warping.
This does not only mean visible spills. It also includes damp cloths, humid storage rooms, wet countertops, and repeated exposure to hand moisture during daily handling. If a tray feels cool and slightly damp after cleaning, it has already been exposed to too much moisture.
Heat dries wood out and can stress both the finish and the structure. In retail settings, this often comes from display lighting, warm windows, heating vents, or poor storage near equipment.
When heat exposure repeats over time, the finish can fade, and the wood can become brittle. That is when corners begin to feel rough, and edges lose their clean look.
Direct sunlight is a finish killer. It can fade color, dry the surface, and create uneven tone across the tray.
This matters most in window displays, open consultation drawers, and sample kits that sit near natural light. Some darkening is normal with natural wood. Uneven fading is not.
Dust looks harmless until it mixes with friction. Fine particles can act like a light abrasive, especially when staff slide jewelry, wipe the tray too aggressively, or drag pieces across the surface.
This is one reason a quick dry dusting step matters so much. You are not just cleaning for appearance. You are removing the grit that slowly wears the finish down.
Many teams damage trays while trying to sanitize them. That is the trap.
Strong sprays, alcohol-heavy cleaners, abrasive pads, and unknown polish products can dull or soften the finish. Bob Vila recommends starting with the mildest safe cleaning approach and testing on a hidden area first. That is a smart rule for any jewelry drawer tray, especially when the finish specification is not fully documented.
Repeated rubbing creates wear in predictable places. Drawer edges, corners, divider tops, ring slots, and high-touch sections usually show damage first.
Friction can also come from the tray itself. A generic insert that shifts inside the drawer will wear faster than a custom-fit tray that stays stable.
Good cleaning is simple, but it needs discipline. Instead of chasing deep cleaning every time, build a repeatable low-risk routine.
The goal is to remove dust, skin oils, and minor residue without soaking the tray, stressing the finish, or pushing debris into the lining.
Cleaning alone will not keep a tray stable if the environment keeps working against it. This is where many retail teams lose the long game.
A tray can look fine after cleaning and still fail early because the store, stockroom, or transport environment is wrong.
Stable humidity matters more than perfect humidity. Wood performs best when the environment is consistent.
According to Wagner Meters, interior wood products often perform within a moisture content range of around 6 percent to 8 percent, depending on the end-use environment. The practical takeaway is simple. Avoid repeated swings in humidity. That is what causes expansion, shrinkage, and warping pressure over time.
Do not store trays near damp walls, recently cleaned counters, sinks, or back-room areas with poor moisture control.
Even if the tray is inside a drawer, the environment still affects it. Moisture in the room eventually becomes moisture in the wood.
Keep trays away from heaters, hot lighting, sun-warmed glass, and any location with constant thermal stress.
I recommend treating jewelry display lighting as part of the care plan, not a separate issue. If a drawer sits below a hot spotlight every day, maintenance needs to account for that exposure.
Avoid long periods of direct sun. This applies to open displays, tray staging tables, and storage near windows.
A small amount of natural aging is normal in wood. Sharp color contrast between one side of the tray and the other usually means the environment is out of balance.
Strong airflow dries wood unevenly. That includes HVAC vents, open doors, active air returns, and shipping areas with constant draft.
APL Boxes Wholesale and other wood-care sources point to airflow as a real issue, and I agree. Many teams focus on humidity and forget that aggressive airflow can make one side of a tray dry faster than another.
For stock trays, backup trays, or seasonal display units, add simple protection. Use dust covers, lined storage cartons, or silica gel in the surrounding storage system when appropriate.
That does not mean sealing trays into damp containers. It means giving them a cleaner, more stable storage environment.
Conditioning helps when a tray looks dry, tired, or slightly dull. It hurts when teams use the wrong product or use too much.
That is why finishing identification matters. A tray should look refined, not greasy, cloudy, or sticky.
Most luxury wooden jewelry drawer trays fall into one of a few finish categories. The exact formula may vary by supplier, but the care logic usually follows the same pattern.
You do not need a lab test to make a practical first judgment. Start with simple observation.
In my experience, the biggest finish-care mistake is assuming all wood trays want oil. Many luxury trays do not. Some only need gentle cleaning because the protection is already built into the sealed top layer.
Care should match the finish, not just the wood species.
Less is better. A small amount of the right product usually gives a cleaner result than a heavy application.
Martin and MacArthur note that even natural oils can create buildup if overused. That matches what I have seen in display maintenance. Excess product attracts dust, dulls the look, and can make the tray feel sticky.
Use manufacturer-recommended conditioners, waxes, or polishes whenever possible. If no guidance is available, stay conservative.
In most cases, a neutral wood-safe product is a better choice than a heavily scented furniture spray or an aggressive all-purpose cleaner. If the tray supports a luxury display, appearance matters as much as protection.
Do not condition on impulse. Set a schedule based on use level.
A heavily used boutique display may need a visual review every month and conditioning only when the finish starts to look dry. A low-use sample room may go much longer. The point is to respond to the condition, not the habit alone.
Look for dullness, a dry feel, faded edges, or rough spots where hands touch the tray most often. Those are the moments when light conditioning may help.
If the tray still looks smooth, even, and well sealed, leave it alone. Not every tray needs product just because time has passed.
If the tray shows cracking, seam movement, bubbling finish, or visible warping, stop using polish as a fix. That is not a polishing problem anymore.
At that point, you need a repair, refinishing review, or replacement decision. Trying to polish over structural issues only delays the right action.
Material structure changes the maintenance risk profile. Two trays can look similar on day one and age very differently in actual retail use.
Solid wood trays usually offer stronger craftsmanship value and better long-term repair potential. They can often be touched up, refinished, or refreshed more convincingly than lower-end constructions.
At the same time, solid wood reacts more visibly to humidity swings. If the environment is unstable, solid wood is more likely to show movement through expansion, shrinkage, or warping pressure.
Veneer trays use a thin real-wood layer over an engineered core or panel. A well-made veneer tray can still look premium and stay dimensionally stable.
The maintenance difference is important. Veneer surfaces are less forgiving if the top layer gets deeply scratched or sanded through. Once that thin wood layer is damaged, repair options are narrower.
An oil finish usually gives a more natural hand feel and can be refreshed more gently over time. A lacquer finish usually gives a more polished and sealed luxury appearance.
The trade-off is simple. Oil-finished trays may need more finish-aware maintenance. Lacquer-finished trays may need less conditioning but more caution with cleaners and friction.
If your tray program is used heavily, moved often, or rolled out across many stores, finish and construction choices should support easy maintenance from the start.
Instead of choosing only by appearance, choose by appearance plus upkeep. That is how you reduce maintenance costs over the full life of the display.
Inspection is the simplest way to protect the tray’s lifespan. It turns maintenance from reactive to preventive.
You do not need a long audit. You need a short checklist used consistently.
Corners take impact first. Look for chips, rub marks, finish lift, or softening along the edges.
These small failures often spread. Catching them early is much easier than fixing a tray after the corner starts opening up.
Inspect every divider and compartment for looseness, movement, or shape change. This is especially important in trays used for rings and studs, where positioning needs to stay exact.
A tray can still look clean and still be failing structurally inside. If compartments no longer hold product cleanly, maintenance needs to move beyond surface care.
Turn the tray over when possible and check the base. If the bottom is uneven, bowed, or damp-looking, that is a warning sign.
Wikipedia’s summary of wood warping is helpful here. Distortion often starts with uneven movement. If the base changes shape, flat drawer performance usually follows.
Inspect velvet or fabric lining for loose fibers, crushed sections, fading, powder, dust buildup, or adhesive release.
These problems matter because jewelry presentation relies on material contrast. A clean wood frame with a tired lining still looks under-maintained.
If you use locking wooden jewelry drawer trays, inspect every moving or securing part. Check lock action, hinge points, closure alignment, and any hardware connection between the tray and the drawer system.
Security trays are not harder to maintain in theory. They just have more failure points. That means the inspection standard has to be tighter.
Watch for new side gaps, drag marks, rocking, or resistance during opening and closing. Those are early signs that the tray is moving out of tolerance.
This is one area where custom tray systems usually outperform generic inserts. A correct fit reduces movement, friction, and long-term wear.
Not every damaged tray should be thrown out. Not every worn tray should be saved, either.
The smart move is to match the response to the failure level.
Light scratches, edge rub, or minor touchpoint wear can often be corrected with a small local repair. This works best when the structure is still sound.
Use a conservative approach. The goal is to restore a clean visual read, not create an obvious patch.
If the tray is structurally stable but the finish looks tired across the full surface, refinishing may make sense.
This option is stronger than routine conditioning. It should be handled with finish compatibility in mind, especially for trays used in luxury merchandising.
Replace trays that no longer sit flat, no longer fit the drawer correctly, or visibly affect product presentation.
Once warping changes how jewelry sits or how the drawer operates, the tray has crossed from a cosmetic issue to a functional issue. At that point, replacement is usually the smarter business decision.
A damaged lining can ruin the visual effect of the whole drawer. If the fabric is shedding, permanently stained, flattened, or lifting from the base, replace or rebuild it.
This matters even when the wood is still good. In many jewelry displays, the lining is what frames the product first.
If a generic tray keeps shifting, wearing unevenly, or failing to support your product layout, the real fix may be a custom one.
This is where custom jewelry trays for drawers make a strong business case. Better fit, better compartment planning, and better material choices usually lead to easier maintenance and better long-term consistency.
If you operate multiple stores, standardize tray dimensions, material specs, finish type, and care instructions. Do not let each location guess.
In my experience, inconsistency is one of the main reasons tray programs age badly. A standard tray program with a standard care plan looks better for longer.
The best maintenance plan is the one your team will actually follow. Keep it short, visible, and easy to repeat.
A strong SOP reduces avoidable damage and keeps display quality consistent across staff and locations.
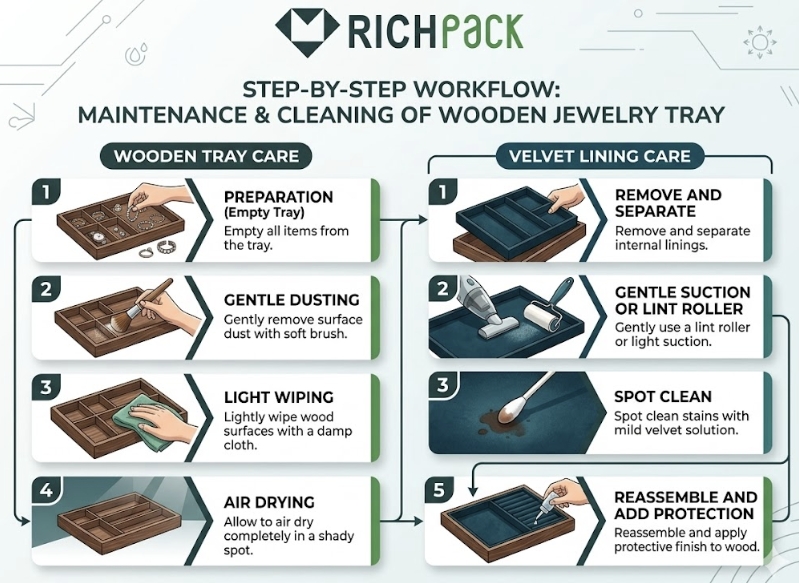
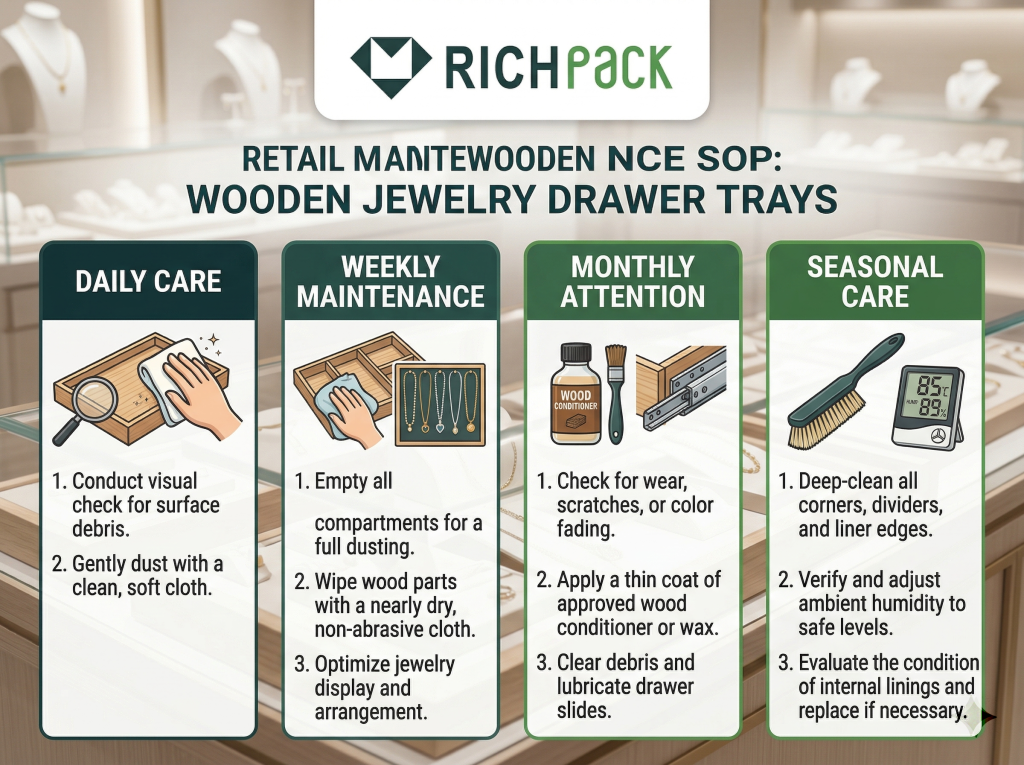
Use a soft, dry cloth or brush to remove dust. Clear loose particles from compartments. Wipe visible fingerprints from the wood if needed.
This should take only a few minutes per drawer. That short habit prevents the buildup that later requires deeper intervention.
Review corners, compartment shape, lining condition, and drawer movement once a week. Log anything unusual.
This is also the right moment to catch tray shift, light fading, or early surface wear before it becomes obvious to customers.
Do a more thorough clean each month or based on traffic level. Use the low-moisture cleaning method, inspect the finish, and review whether any tray needs localized care.
For busier stores, monthly may not be enough. For quieter showrooms, it may be more than enough. Adjust to real usage.
Review tray condition when humidity patterns change. Summer moisture and winter dryness stress wood in different ways.
This is especially relevant for stores in climates with strong seasonal swings or aggressive indoor climate control.
Train staff on what to use, what to avoid, and what warning signs to report. Show them the correct cloth, the correct motion, and the correct amount of moisture.
A one-page visual guide works well here.
Ask your packaging or display supplier for care guidance, finish specifications, replacement planning, and tray material details.
A supplier that understands both design and aftercare is easier to work with over the full life of the program. That is especially true for custom drawer inserts and branded retail packaging systems.
Not all maintenance problems are maintenance problems. Some are design problems.
A tray that was never properly fitted, properly finished, or properly specified will usually cost more to maintain over time.
A custom-fit tray moves less. That means less rubbing, less edge stress, and better drawer performance.
It also means a cleaner look. Tight, intentional spacing makes the display feel engineered instead of improvised.
Custom programs give you more control over wood species, lining material, finish system, hardware, and divider design.
That control matters because maintenance performance starts with material selection. Some trays look good on day one but age badly because the finish or lining was chosen for price instead of use conditions.
A well-designed tray protects the jewelry and the tray itself. Compartment depth, edge treatment, lock mechanism design, and lining choice all influence wear.
This is especially true with locking wooden jewelry drawer trays, where the tray must balance security, usability, and presentation quality.
Consistency is one of the strongest reasons to choose custom jewelry trays for drawers in chain retail.
When every store uses the same tray spec, cleaning is easier to train, replacement is easier to plan, and the brand experience stays more stable across locations.
Custom systems make replacement more predictable. You know the tray size, the lining type, the finish, and the intended use.
That removes guesswork when one unit needs to be refreshed or rebuilt. It also shortens downtime.
A good tray does more than hold product. It supports how the customer experiences the brand.
When the fit is right, the finish stays refined, and the maintenance plan is realistic, the tray becomes part of a premium brand system instead of a background accessory.
Light dusting should happen daily or as needed in active retail settings. A more careful wipe-down can happen weekly or monthly, based on traffic, product handling, and how quickly dust and residue build up.
Yes, but only in a controlled way. Use a barely damp cloth, not a wet one, and dry the tray immediately. Too much water can stress the finish and increase the risk of swelling or warping.
The safest answer is the product recommended for that tray’s specific finish. If guidance is unclear, use a conservative wood-safe conditioner or wax sparingly and test it first in a hidden area.
Usually, I would not make that the default choice for a luxury jewelry tray unless the supplier explicitly approves it. Many consumer furniture sprays can leave residue, create unwanted shine, or react badly with lacquer and other delicate finishes. For premium display trays, a finish-compatible product is the safer option.
Use a soft dry brush, lint roller with very light pressure, or a low-suction vacuum attachment to lift dust and lint. Do not soak velvet with water or wipe it like wood. If the fabric is stained, test any cleaning method in a hidden area first.
Treat the wood and the lining as separate materials. Wipe the wooden frame gently, then use a soft brush or low-suction vacuum method for velvet or microfiber sections to avoid crushing the pile.
Start by checking the sheen, feel, and supplier specs. Sealed finishes like polyurethane or lacquer often look and feel like a protective film over the wood. Oil-finished trays usually feel more natural and may show dry areas faster. If you are not sure, avoid adding oil or wax until the finish is confirmed.
Replace it when it no longer sits flat, fits poorly in the drawer, damages presentation quality, or has lining and structure issues that routine maintenance cannot solve. At that point, repair usually costs more than it saves.
Wooden jewelry drawer trays stay beautiful when teams keep the routine simple and consistent. Clean lightly, control humidity, inspect early, and act before cosmetic wear turns into structural damage. If your current setup still creates fit issues or uneven wear, it may be time to upgrade to custom jewelry trays for drawers that are easier to maintain and better aligned with your brand.
 PREV
PREV