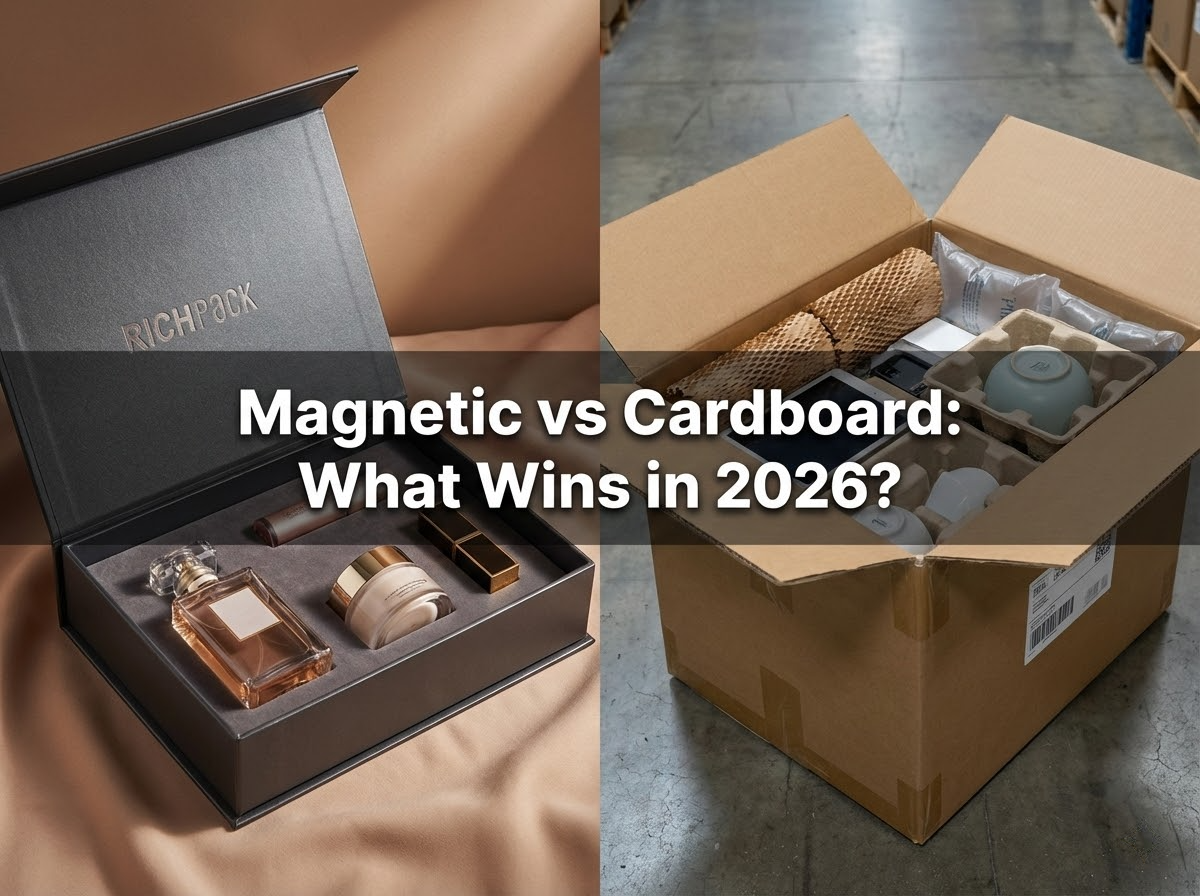

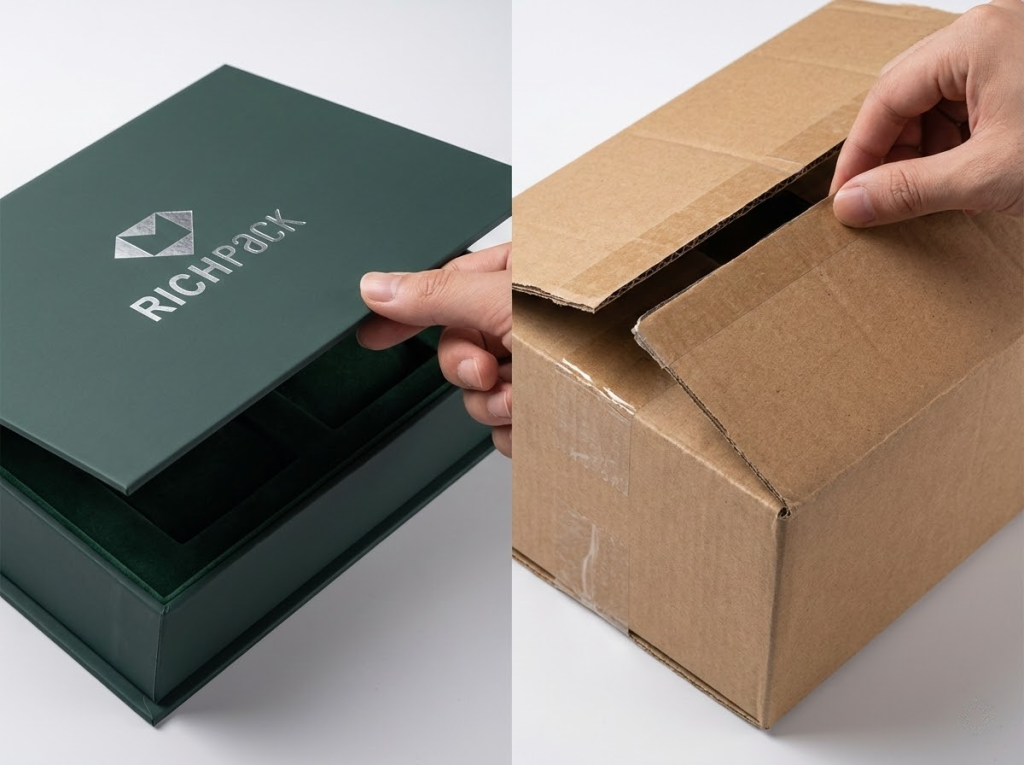
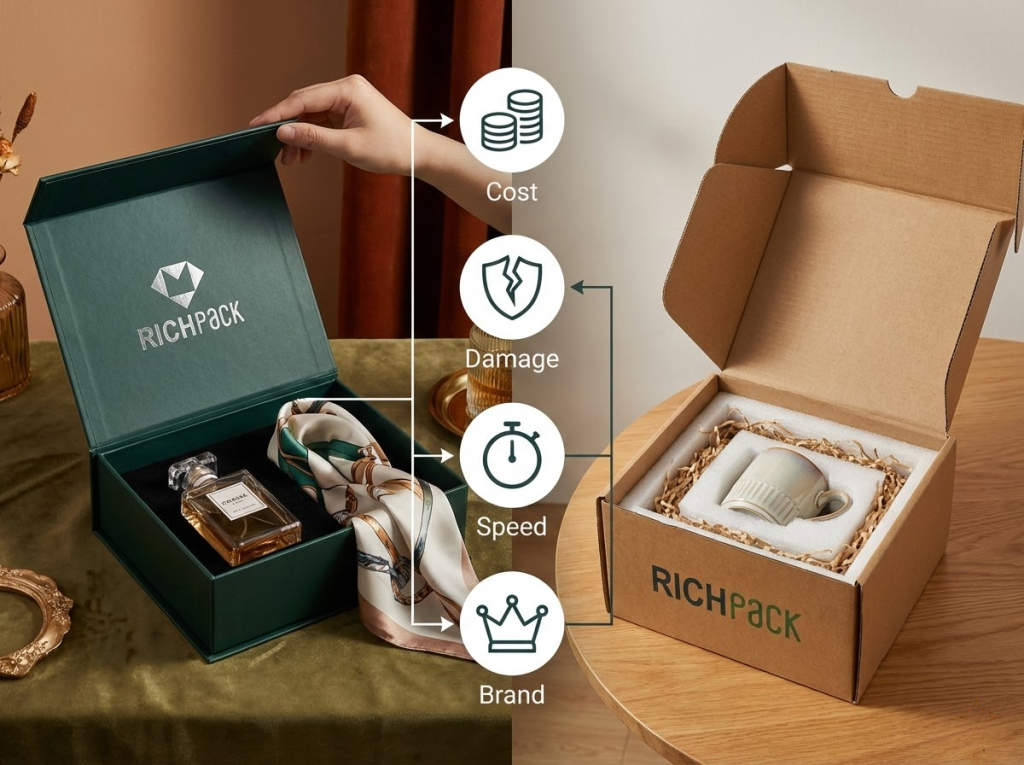
I’ve helped numerous jewelry brands leverage custom magnetic boxes to captivate customers. These boxes convey luxury and create authentic connections during unboxing. Customers often keep them rather than dispose of them, keeping your brand visible in their homes over time.
Standard cardboard boxes are ideal for fast shipping and minimizing costs. I use these when a client needs to safeguard goods and save money. They protect your items as they travel through the mail. Choose these if you want to control your budget.
Now, let’s look at how these two choices compare. I will also explain the true meaning of the word “cardboard.” My goal is to help you pick the right box for your specific needs.
No one wants a box that looks good but breaks during shipping. I’ve seen brands lose money because boxes arrived late or cost too much.
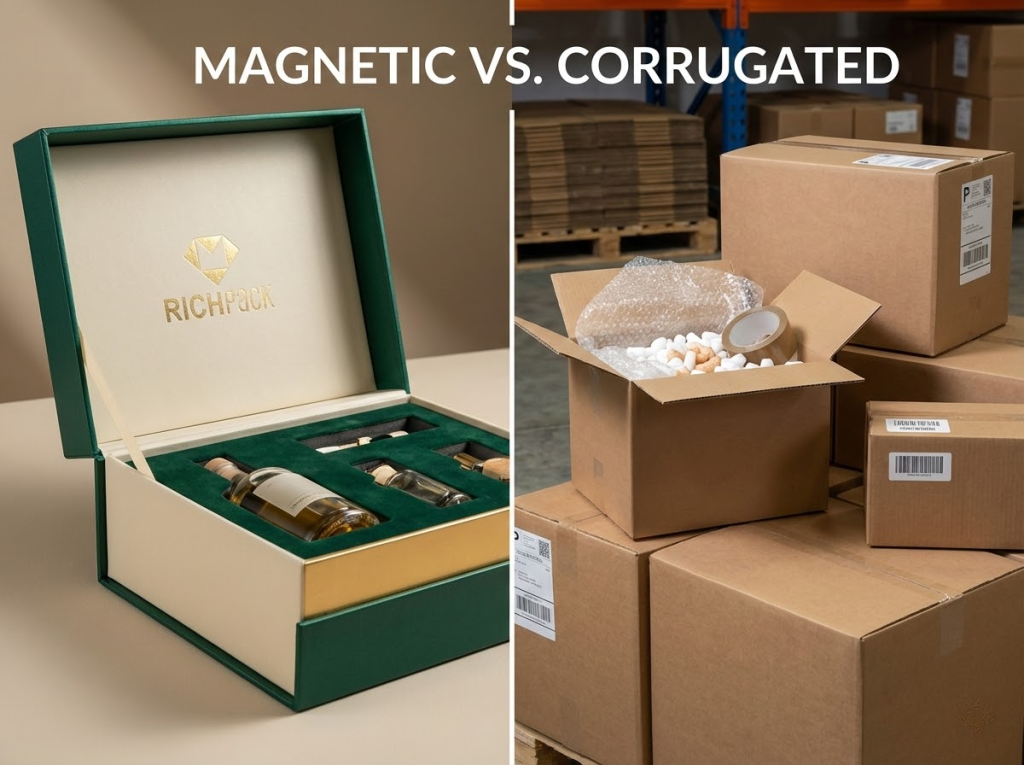
I pick magnetic gift boxes when brand feel and reuse matter most. Cardboard boxes work better for shipping safety and speed. They also help you scale faster.
Use this step-by-step plan to pick the right box for your product.
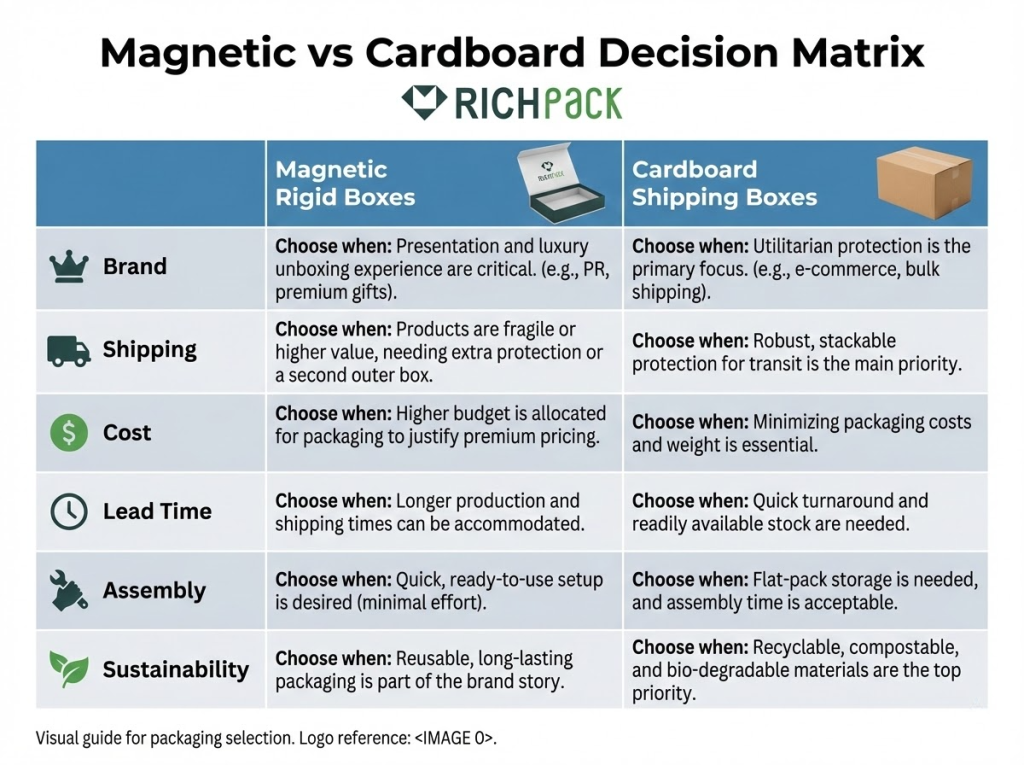
| Decision Factor | Custom Magnetic Gift Boxes | Cardboard Boxes |
| Primary Job | Premium unboxing + reuse | Shipping protection + low-cost scale |
| Unit Cost Drivers | Board + magnets + hand work + wrap/finish | Flute/board grade + die-cut + print coverage |
| MOQ | Often higher for custom parts/finishes | Often lower for standard sizes/styles |
| Lead Time | More steps → longer if you add special finishes | Faster when you use standard dielines and stock board |
| Branding Impact | Strong “gift” signal; keeps shape | Good print area; weaker “luxury” signal |
| Transit Safety | Needs an outer carton for shipping | Corrugated shippers/mailers handle drops better |
| Storage & Freight | Bulkier; folding rigid can help | Ships flat; stacks well |
| Sustainability Proof | Depends on coating/glue + paper proof | Easier recycling story if materials stay |
| Typical Risk | Scuffing, magnet shift, lid gap, re-quotes | Crush, corner dents, weak “gift” feel |
Pricing breaks when your details are unclear. This leads to re-quotes, delays, and too many samples. From working with many brands, I know these gaps waste your time. I see the same missing fields cause most quote swings.
You must list the inside size and the box style. Tell them if you want a lid or a flap. Give them the board thickness and the finish, too. I always include the insert type and the quantity.
Next, share the ship-to country and your target ship date. Send these facts right at the start. You will stop the back-and-forth on MOQ and lead times. This is my trick for getting firm quotes fast.
I’ve noticed magnetic closures always feel more like a gift. The lid snaps shut perfectly every time. It keeps its shape well on a retail shelf. This clean alignment makes a great first impression.
Standard cardboard works for branding but lacks structural weight. I usually see the luxury feel fade without extra layers. Try adding a sleeve or a custom insert to fix this. These small additions help the box feel much more expensive.
Put your logo right where hands touch the box. The top lid or front panel works best for brand recall. Always check the artwork on a physical sample first. You want to be sure everything lines up before you print thousands.
Returns and damage usually cost you more than the actual box. I’ve seen this drain profits for many clients. You need to prioritize durability over looks during transit.
Corrugated mailers handle drops and heavy pressure very well. I find magnetic rigid boxes often fail without extra help. They usually need an outer carton and corner guards to arrive safely.
I always tell my clients to ask for a formal test plan. Make sure it follows well-known standards like ISTA 3A or ASTM D4169. This is the best way to check how your shipping containers really perform.
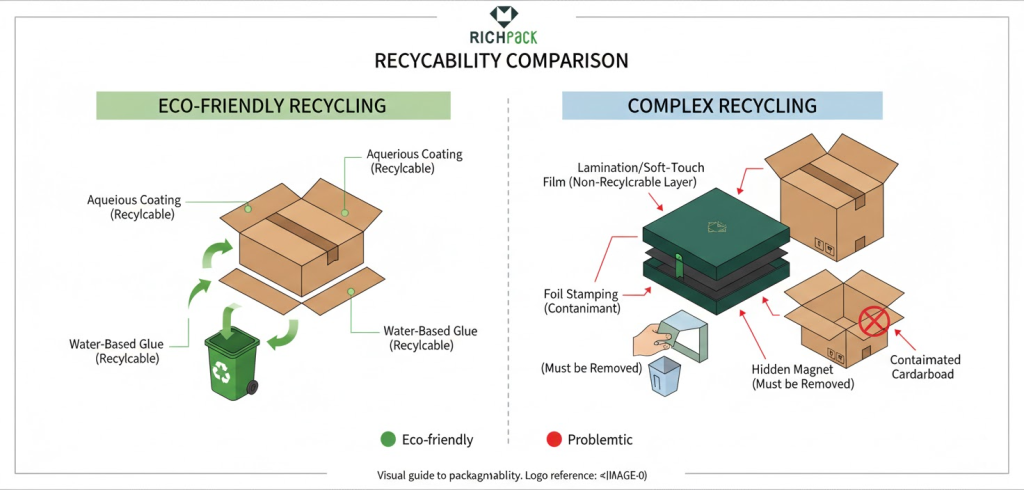
“Recyclable” is a tricky word in our industry. Heavy lamination and certain coatings make recycling hard in real life. Aggressive glues also create big problems for recycling plants. I’ve seen these small choices ruin a brand’s green goals.
FSC-certified paper requires a clear paper trail. You need a chain of custody for every order. Your documents must match the claims on your packaging. I find this step keeps you safe during audits.
My Action Checklist:
I suggest magnetic closure boxes for high-value jewelry. These boxes look great on shelves. Customers usually keep them for a long time. Use an outer carton for direct shipping to protect the finish.
I recommend corrugated mailers for most electronics. They protect your goods from high drop risks. Only add a presentation layer for extra value. This keeps your costs down where it counts.
Use cardboard mailer boxes for subscription services. These boxes stack well and save you money. I find that they make packing much faster. This setup helps you scale your business.
Pick magnetic boxes for your PR gifts. They look great in photos and videos. I always sign off on a finished sample. This stops scuffs during the unboxing moment.
Picking a pretty box is not your main risk. I’ve seen damage and returns ruin a launch. These problems kill your brand image.
You also face hidden labor and storage costs after the purchase. These costs hit hard if you aren’t ready. I find that many brands miss this part.
Use the options below to pick the right system. Make sure it fits your product and how you ship. Keep your budget in mind, too.
Then, lock in your choice with clear details. I always use a test plan to keep things safe. This is how I help my clients avoid big mistakes.
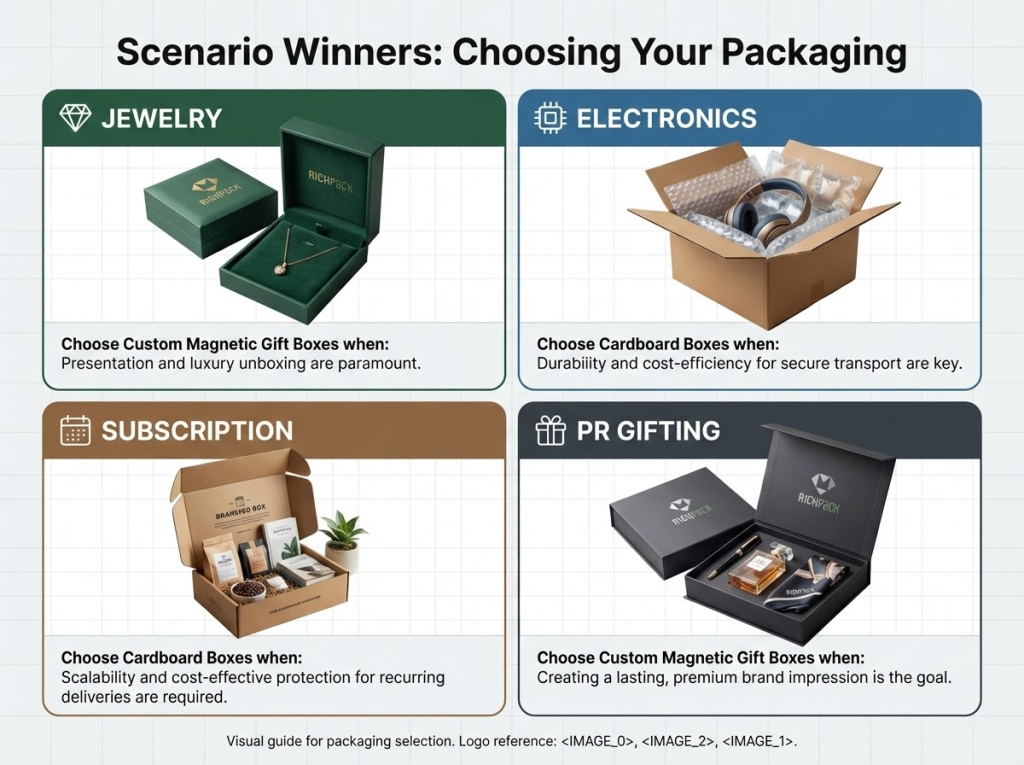
I recommend magnetic gift boxes when the unboxing sells the product. They work best for fine jewelry, watches, and VIP kits. The closure feels solid and quiet.
You can add foil or deboss without it looking cheap. I’ve found that people often keep these boxes. This keeps your brand in front of them for longer.
You must plan for real-world shipping issues early on. These boxes usually need outer cartons and corner guards. In my daily quoting, I always ask about your shipping method first.
I also check where the boxes go and the pack count. This simple step stops the “it only looked good in photos” problem.
Here is my go-to plan to lower your risk right now:
I recommend cardboard boxes when speed and low costs are your top priorities. This choice works best for e-commerce shipping, subscription kits, and high-volume product drops. Corrugated mailers protect items well during delivery and stack easily. They keep your unit costs down while letting you launch new items quickly.
In my experience, brands often struggle with thin boards that dent or crush. A box can look nice,e but still fail during transit. If your item is fragile, I suggest upgrading to double-wall corrugated strength. Make sure you control the space so the product stays still.
I use these quick steps to help my clients reduce shipping risks:
I see teams get stuck all the time. They look at the unit price but ignore the total cost. I recommend you rank decisions in a specific order.
Follow this path: brand goal, ship risk, budget, lead time, assembly time, and sustainability proof. This works for jewelry, electronics, subscription services, and PR gifts.
Try this simple scorecard I use with my clients. It takes about 10 minutes. Give each point 0 to 2 points.
I always tie these choices to a real testing plan. This keeps things objective.
For parcel delivery, I suggest looking at ISTA 3A. It shows the bumps of normal shipping for your items. For larger systems, I use ASTM D4169 as my step-by-step plan.
I see many buyers ask for “cardboard boxes” and get the wrong quote. They often end up with weak boxes or a bad unboxing feel. This happens because “cardboard” means too many different things. It could mean corrugated, paperboard, or rigid greyboard.
From my experience, I recommend a simple fix for your next order. Start by naming the exact box type first. Then, you should lock in three key specs. Focus on the wall type, board thickness, and the box style.
In my pre-production checks, I often see teams approve a “cardboard” sample. Later, the box crushes during shipping. This happens because they used paperboard instead of corrugated. You will win much faster if you align these terms before you pay.
I’ve spent years testing packaging for high-end brands. Corrugated boxes use a wavy fluted layer between flat liners. This flute keeps your products safe during drops. FEFCO defines the common types, such as A, B, C, and E. I often suggest double or triple walls for extra strength. This really changes how much weight the box holds.
When you ship items, ask for a specific FEFCO code. Code 0201 is a very common style for shipping. Using these codes helps you get matching quotes from different suppliers. It keeps your comparisons clear and simple.
You can put these tips to work today. Start by asking for the specific flute and wall type. I suggest mentioning your shipping lane, like local or cross-border.
You should also ask for an ECT test. This test uses the ISO 3037 standard to check edge strength. It ensures your boxes won’t fail when stacked in a truck. This is my go-to move for avoiding storage damage.
Most gift boxes are just thin paperboard or folding cartons. I know they look great and pack fast. They won’t survive a rough shipping trip alone.
These work well for subscription kits and retail sets. I use them for light items with a custom insert. Always place the gift box inside a larger shipping carton.
Loose fits and weak corners happen often. I avoid this by using a detailed spec sheet. Ask for the board caliper and the closure style. List your insert material, like EVA, foam, or paper pulp.
I build rigid setup boxes using greyboard wrapped in printed paper. This method creates a “book cover” texture and very sharp edges. You get a high-end feel that customers notice immediately.
These boxes cost more because they require a lot of handwork. My team has to control the wrap tightly to keep it perfect. I also add extra protection to the packing so the boxes do not get scuffed.
This style is great if you sell jewelry, watches, or PR gifts. It really works when you want that premium look. Just make sure you plan your shipping system early. I always map out the inner box, wrap, and outer carton before we start.
You usually pick between two types of magnetic gift boxes. One stays rigid and ships as a full box. The other is a flat-pack style that folds into shape. I see most brands choose flat packs to save space.
Flat packs really cut down your storage and shipping costs. This is a big win if you ship to many countries. It also helps when you need to store stock for big sales.
When you order these, I always check three things first. Ask your supplier about the magnet size and where they put them. You must test how they open and close. I’ve found that even a tiny shift in the magnet ruins the fit.
From my years in packaging, I’ve seen how magnetic lids and flaps act differently. Lid boxes need a snug fit and very stable corners. Book-style flaps are different because they rely on the hinge. The magnets must also line up perfectly along that long edge.
To avoid surprises, I always tell my clients to put two things in writing. Put two specific acceptance points in your contract. Include your closure gap and magnet alignment tolerances. Make sure you test both on your physical sample before mass production.
From working with many brands, I know a late delivery hurts. But a cheap first touch kills repeat sales. I see brands lose points from lid gaps and scuffs on day one. Loose inserts also ruin the feel right away.
I’ve found that magnetic gift boxes work best for ritual and reuse. Simple cardboard boxes win on speed and cost. You need a clear pass or fail checklist for look and build. This ensures your box feels right in a customer’s hands.
Here is my go-to trick for custom magnetic gift boxes. Ask for a finish swatch kit and one working sample. Test it with your real product before you lock the order. This small step saves you from big mistakes later.
I’ve found that magnetic closures feel high-end when they click shut perfectly. The lid must sit flat with a straight line.
In my experience, production issues usually stem from magnet placement or messy glue. Board warping also creates a crooked look.
I use these three checks for every sample:
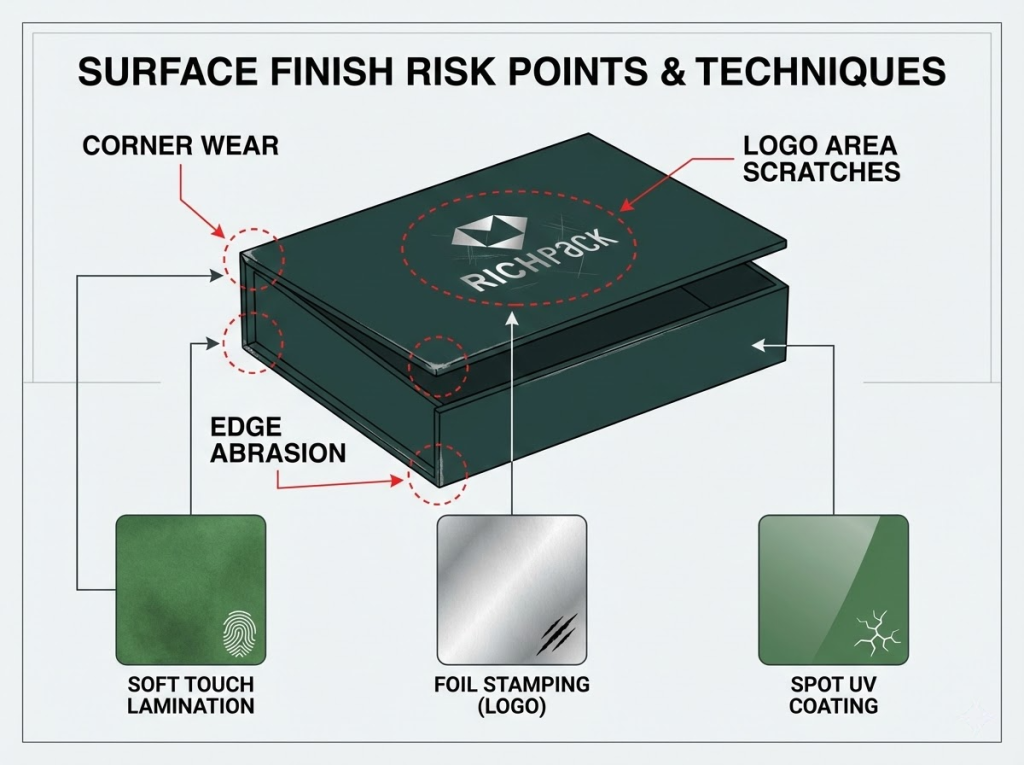
Your logo only helps people remember you if it stays sharp. I’ve noticed hands rub the center lid the most. Try the spine or inside lid instead. These spots usually last much longer.
Foil edges often lift or embossing gets crushed. Rigid boxes show off-center logos more than paperboard does. I call these the common fail points. You want to avoid these early on.
Keep your logo rules very simple. I use one file and one size for everything. Set one rule for the distance from the edge. Then, pick just one finish like foil or spot UV.
Ask your supplier for a position proof if you are in a rush. Make sure they use the actual wrap paper. Using a different paper stock will give you the wrong look.
I use soft-touch lamination, hot foil, and spot UV to boost value. These look great, but scuff easily. Fingerprints lead to many returns. I see this happen often with high-end brands.
Lower this risk by protecting the finish during shipping. I always add tissue wrap or a polybag. Use a sleeve if boxes touch in a warehouse. This keeps your packaging looking fresh for the customer.
In my builds, soft-touch usually fails at the edges. I use a simple step-by-step plan to stop scuffs. We use corner protection and keep packing areas clean. I also tell my team: never drag boxes on a bare table.
Always ask for photos under direct and side light. Side light shows scuffs that normal photos miss. This trick helps me catch errors before you ship. It saves you time and money.
Your insert keeps the product safe and creates that “snap-in” feel. I’ve found that a bad fit makes your whole box feel cheap.
Foam and EVA hold their shape well. I love how velvet looks high-end. Just watch out because it hides loose cuts until the product shifts.
Give your supplier two specific numbers to avoid rework. Send the product size and its tolerances. Then, tell them if you want a snug or loose fit.
Choose an insert that loads fast if you pack at scale. I’ve seen slow packing become a huge hidden cost. This hurts you long before material prices do.
Most color issues start with vague specs. Bad printing is rarely the real cause. Telling a factory you want “navy” means nothing. Every website and screen shows navy differently.
I always tell my clients to use PMS (spot color). Use this when your brand color must stay exact. Switch to CMYK if you need lower costs and more speed. I find CMYK works well when small shifts don’t hurt you.
Now, let’s talk about proof control. My go-to trick is using ISO standards for print checks. Most top packaging teams rely on ISO 12647-7 and ISO 12647-8. These rules set the bar for your proofing workflow.
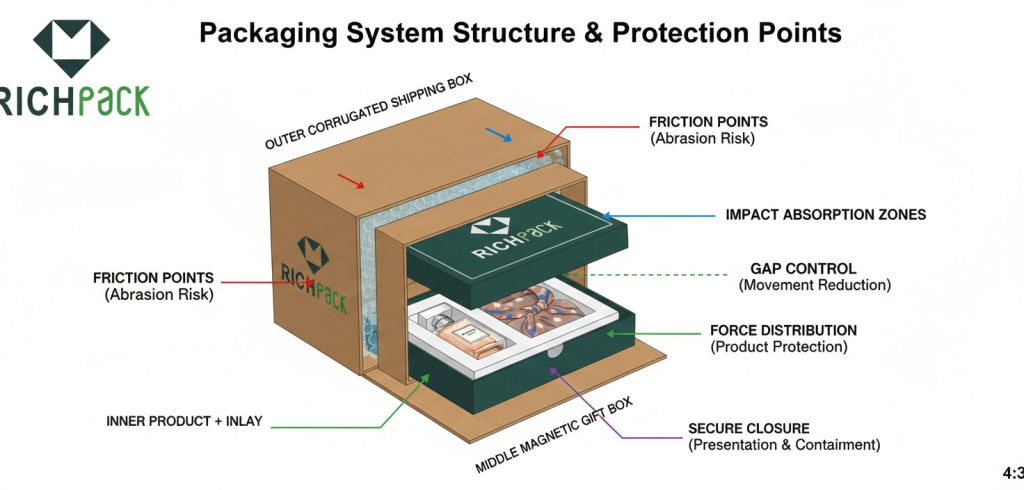
When you ship via parcel carriers, your boxes take a beating. Individual boxes get tossed and dropped constantly. Your gift box must stay retail-ready. No dents or scuffs are allowed.
I’ve seen many brands fail this test. Here is my plan for you. Use a sturdy outer shipper box. This box acts as a shield.
It takes the hits so your gift box stays perfect. Make sure the fit is very snug. Movement causes crushed corners and damage.
I recommend using custom foam inserts. These inserts stop all internal shifting. They also absorb hard shocks during transit.
Wrap fragile items in soft tissue first. This prevents fine scratches on the surface. Now your orders will arrive in mint condition.
I’ve found this works best when you need to stop shipping damage. Your gift box makes the sale. But your shipper saves the product.
Corrugated cardboard acts like armor for your goods. It handles drops and stacking better than retail boxes. Use it when the risk is high. This includes fragile items, long trips, or peak seasons.
Do you see crushed corners or top dents? I suggest you use a stronger board grade first. You can also tighten the box size or add corner blocks. Try these steps before you change the gift box design.
Now, let’s look at some quick wins for you:
I’ve found that mailer boxes work well because the locking structure spreads force across the panels. In my experience with DTC brands, a right-sized box always beats a big shipper with extra fill. If you see dents, look at the air gaps or weak edges. It is seldom the print quality that causes the issue.
Here is a rule I use on my packing lines. Give the box a shake. If you hear things moving, you will see damage later.
I recommend fixing this with a tighter dieline or snug inserts. Even simple paper pads work better than just adding more tape.
I often see rigid magnetic gift boxes fail weirdly. This happens a lot with soft-touch or foil finishes. They survive the drop but arrive with scuffs and rub marks.
You should treat the gift box like a finished piece of art. I always add an outer carton as a shield. This sacrificial layer takes all the hits so your box stays clean.
Here is how I usually spec these for my clients. I use tissue or poly bags to stop rubbing. I add corner guards and a tight shipper to stop movement.
This matters most for custom magnetic gift boxes. The whole point is that premium look. One scuffed lid can ruin the brand value you paid for.
Stop guessing and start testing. I recommend using ISTA 3A for your parcel shipments. It mimics how carriers handle small to mid-sized boxes. I’ve found this prevents most shipping headaches.
If you handle pallets or stacking, look at ASTM D4169. This covers the whole trip from the warehouse. I also use ASTM D642 to test box compression. These standards help you avoid crushed products.
Ask your lab or supplier for these specific details. This makes your results easy to repeat.
I’ve worked with many brands on this exact choice. Don’t view paper boxes and magnetic boxes as an “either/or” for shipping. I always recommend a mix. Let the magnetic box handle your branding and fit. Use the outer box to take the hits during transit.
This method usually cuts your total costs. I see fewer returns and less rework this way. It protects your bottom line by stopping shipping damage. Your customers get a perfect product every time.
Share your product size and weight with me. Tell me your shipping method and the unboxing feel you need. I’ll map out a simple “box plus shipper” plan for you. I can also give you a price range and the right test standards to follow.
“Recyclable” only counts if local plants can actually process the materials. I’ve seen the FTC crack down on broad claims lately. They warn against labels that mislead people who cannot recycle items nearby. Always check what happens to your box after it hits the bin.
I recommend finishes that keep paper easy to repulp. Aqueous coating is my go-to because it is water-based. It keeps the natural paper feel without adding a plastic layer. I also use water-based glues instead of heavy solvent lines.
Some features make recycling much harder for your customers. Avoid plastic film, glitter, and heavy UV coatings. Even full-coverage foil can stop the process. If you use magnets, plan for easy removal. I suggest using peel tabs or minimal glue points.
I always run a “tear-and-peel” test during the sample stage. We check the bond at the seam and closure. If the paper rips too early, I reduce the glue area. I might switch to a lighter tack instead. This ensures the box disassembles cleanly for the sorting line.
Buyers want more than a simple “we are FSC” slogan. From my experience, they want to see the real details. They need to know which paper or part you used. FSC rules focus on tracking materials through the whole supply chain. You need a solid paper trail, not just a label.
Here is what you should lock down before you print:
Treat the FSC mark like a high-value asset. I always tell clients to get label approval first. Keep a record of your final artwork file. Link it directly to your certified material order.
From working with many clients, I’ve found “made with recycled content” won’t cut it. I’ve seen buyers flag vague claims as misleading. You must state the exact percent and the specific part. The Green Guides demand clear and specific wording.
I recommend using simple templates for your sales team. They can copy and paste these.
Do not let one line cover the whole pack. This is a common RFP trap. I see this when brands compare custom magnetic gift boxes and cardboard. They often assume “recycled” means everything.
I’ve seen reuse beat “single-use recyclable” many times. This happens when your box gains value over time. You get a better return when people keep it. They use it for storage, gifting, or display.
I recommend this for high-ticket jewelry and PR kits. It works great for creator unboxing videos, too. I’ve found this works best when you focus on a few details.
First, you must prioritize durability. I look for strong hinges and scuff resistance. You also need a neutral style. People reuse clean designs more than busy graphics.
Make sure you pick the right size. Too much space wastes material and raises shipping costs. Now, let’s look at how to prove this strategy.
I suggest you run a small pilot program. I always track damage rates and return complaints. Ask your VIP buyers for feedback on their “keep rate” too. This shows you if the higher cost pays off.
I know you need premium rigid boxes for international shipping. Your branding must look the same with every reorder. I’ve seen how quickly colors shift if you aren’t careful.
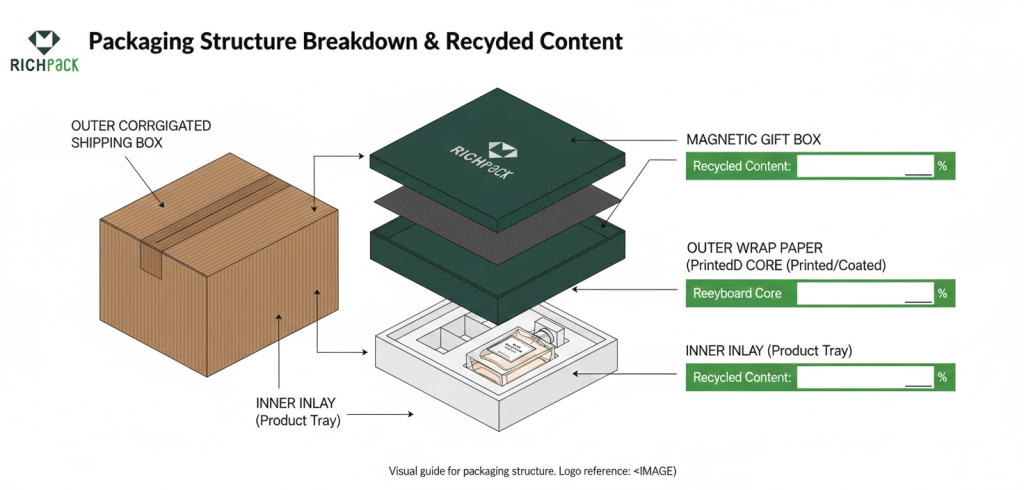
Your mix likely includes Magnetic Gift Boxes and simpler Cardboard Boxes. I usually add foam, EVA, or velvet inserts for my clients. The goal is a retail-ready finish that feels high-end.
You need a workflow that cuts down on time zone rework. I use this to stop “quote surprises” after the sampling stage. It keeps your budget on track from day one.
Failed custom box projects rarely happen because of bad luck. I’ve found it’s usually due to missing specs or vague approvals. Often, the quality standard only exists in your own head.
My procurement checklist turns Magnetic Gift Boxes into a steady project. It makes sure the quote matches the actual build. Your sample will match the quote, and the shipment will match the sample.
I’ve found that good prices start with good data. To compare quotes fairly, you must give every supplier the same details.
Many brands just ask for a “black magnetic box with a logo.” This leads to five different designs and five different prices.
I made this RFQ checklist to help you get clear bids. Copy and paste these specs into your next quote email:
| RFQ field | What to specify (quote-ready) |
| Box size (ID/OD) | Internal + external dimensions, unit (mm/in), and how you measure (lid closed) |
| Structure | Rigid set-up, book-style, lift-off lid, drawer, shoulder/neck, fold-flat magnetic, etc. |
| Board/paperboard | Greyboard thickness (mm) or caliper; wrap paper type; paper grain direction if critical |
| Outer finish | Matte/gloss lamination, soft-touch film, aqueous coating, anti-scratch needs |
| Printing | Pantone vs CMYK, coverage area, proof requirement (digital proof vs press proof) |
| Logo process | Foil stamping, emboss/deboss, spot UV, silk screen; location + size |
| Magnet system | Magnet size/grade (if known), magnet position, polarity pairing, closure force preference |
| Insert | Insert material (EVA/foam/velvet blister), cut style, tolerance needs for product fit |
| Quantity | MOQ, target order qty, and annual forecast (affects tooling + price breaks) |
| Destination | Country/ZIP, ship mode (air/ocean), cartons per pallet preference |
| Lead time | Required in-hand date + acceptable window; peak-season constraints |
| Compliance docs | Material declarations, test reports you expect |
Practical tip from production: I’ve seen “magnet location” omitted more than anything else. When the factory guesses, the lid can sit proud or skew, and you end up reworking inserts to “hide” a closure problem. One line in the RFQ—“magnet centerline X mm from edge”—prevents that entire chain.
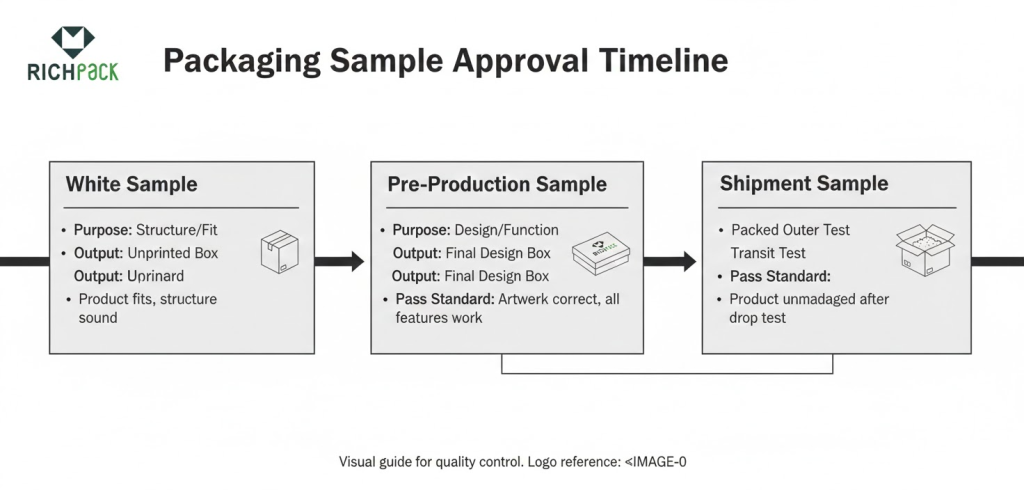
Sampling isn’t just about getting one box in the mail. I’ve found it works best as a staged control system. When you skip stages, you usually pay for it later. You might face delays, high remake costs, or a bad unboxing.
I use a simple three-step plan for premium packaging.
White sample (structure sample)
Pre-production sample (PPS)
Shipment sample (production pull)
This staged plan keeps your timeline risk low. I find this works best when you work with overseas factories. It helps you hit your marketing launch dates every time.
Stop calling it “high quality.” That is not a specification. Your QC sheet needs clear defect limits. Two people should agree on the same result even on a bad day.
I usually suggest using AQL sampling plans for basic checks. Most buyers follow ISO 2859-1 standards for this. It keeps things objective.
Performance items like glue strength need a specific test method. I look to ASTM D903 for peel and stripping strength. It is the standard for adhesive bonds.
Now, let’s build your list of acceptable defects. Focus on what actually hurts your brand or how the box works.
Start with color variation. Define your comparison point, like a Pantone reference or an approved proof. Mark where it matters most, like the logo versus the inside.
Next is alignment. Set a maximum limit for logo misregistration. Check the pattern seams carefully.
Scuffs and scratches are next. Define the lighting you want inspectors to use. Focus on high-contact zones like the lid top and corners.
Glue issues or delamination can ruin a premium feel. Make sure the glue lift is zero at the lid edges and seams. Use a simple manual peel test. If your supplier has the gear, cite ASTM D903.
Magnet issues are common. Set an alignment tolerance in millimeters. Check the polarity and make sure the lid sits perfectly flush.
Look for corner dents or crushing. A reject is anything visible at arm’s length. Watch for broken edges or anything that stops the box from closing.
Here is my best tip. Add one specific line to your QC sheet. Tell the factory they must send photos and a defect count before shipping. This stops you from finding bad news after paying for customs.
A supplier can be “good” but still fail your project. I use scorecards to make my choices clear and easy to repeat. I’ve found this works best when you need to launch fast.
A practical scorecard categories list:
The lowest price often costs the most later. Remake time and late shipping kill your budget. I use these scores to defend the best value to my team.
I’ve seen too many projects stall because of messy email chains about defects. Emails usually just waste your time.
I always use a clear grid to keep the team, factory, and QA on the same page. It keeps your production fast and accurate.
| Problem | Likely cause | Quick check | Fix (fast + permanent) |
| Scuffing on the lid top | Soft-touch film marks easily; no protective interleaf; carton rub | Rub test with tissue; check pack-out spacing | Add tissue/interleaf; switch to a more scuff-resistant finish; adjust carton dividers |
| Humidity warp/lid twist | Paper grain wrong; moisture imbalance; storage conditions | Measure warp after 24h conditioning; check grain direction | Specify grain direction; add conditioning step; improve sealing + storage controls |
| Magnet misalignment | Magnet pocket shift; jig inconsistency; polarity error | Measure offset in mm; polarity match test | Add positioning jig; define alignment tolerance; add 100% polarity check |
| Edge lift/glue failure | Wrong adhesive for coating; short press time; dusty surface | Inspect lift zones; peel check at seam | Change to compatible adhesive; increase press time; surface cleaning step |
| Logo off-register | Artwork version mismatch; setup drift | Compare to the approved proof; check the file version | Lock file control; add “golden sample” at line; first-article approval |
I’ve helped many brands pick the right packaging based on what they value most. If you want a great unboxing feel, I recommend a high-end box with magnets. For the best shipping protection, I’ve found that strong shipping boxes work best. If you need to keep costs low, simple cardboard boxes are your best bet.
When it comes to being eco-friendly, I look at the hard facts. You must check the glue, the coatings, and the FSC scope. I also look at the recycled content and where it comes from.
Just submit your email to get exclusive offers (reply within 12 hours)
 PREV
PREV