
Have you bought premium watch boxes only to find scratches a week later? I’ve found that this usually isn’t just bad luck. It happens when slots are too close together. Large watches need 60 mm or 70 mm of space between centers.
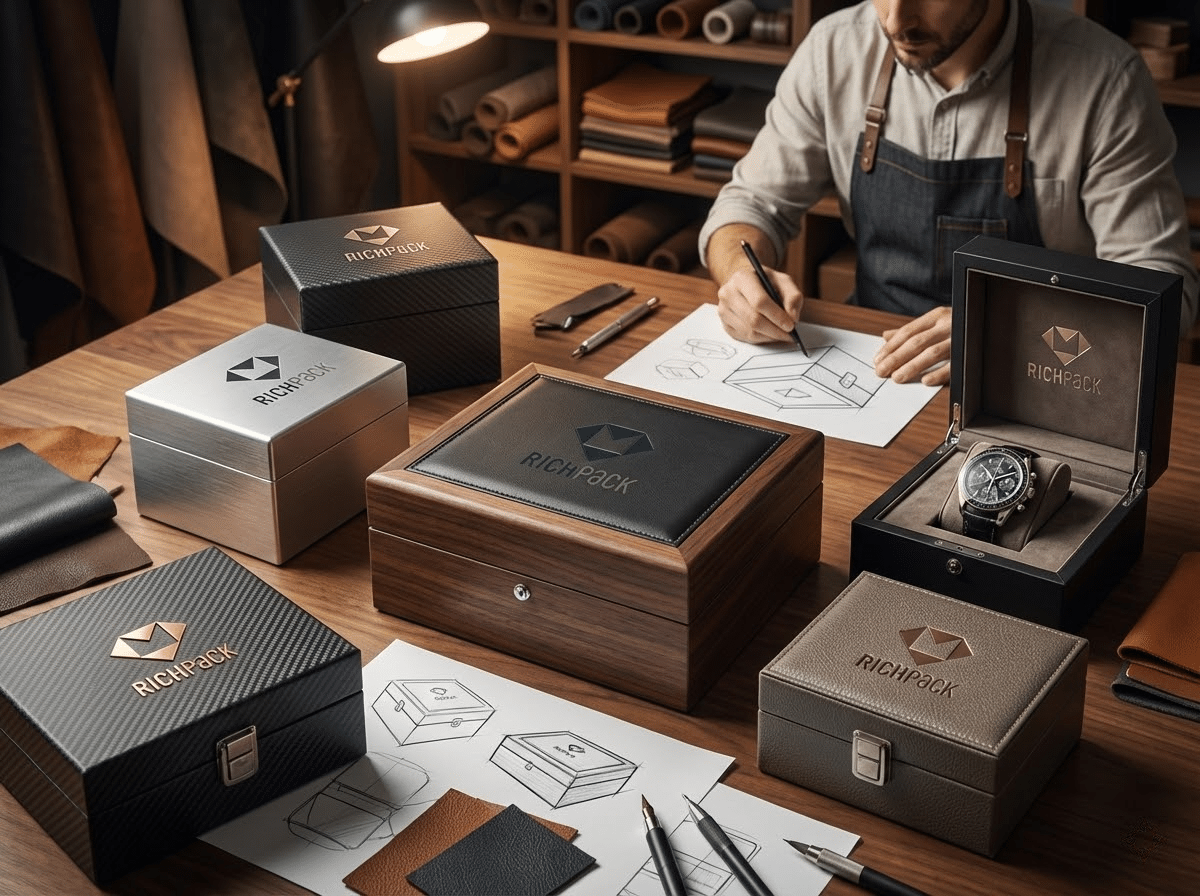
A watch jewellery box in men’s stores showcases watches and accessories in soft zones. The best custom boxes balance fit, protection, and your brand style. I start with 60 mm spacing, or 70 mm for large watches. Measure the lug-to-lug length because case diameter alone often misleads.
Before customizing your watch and jewelry box, it’s important to understand the key areas you should consider. In this article, we will show you how to customize the best watch and jewelry boxes for men from several aspects.
“Best” only works when you can actually measure it. Let me be clear. If your goals stay vague, the box might look good in a photo. But it will likely fail you during daily use.
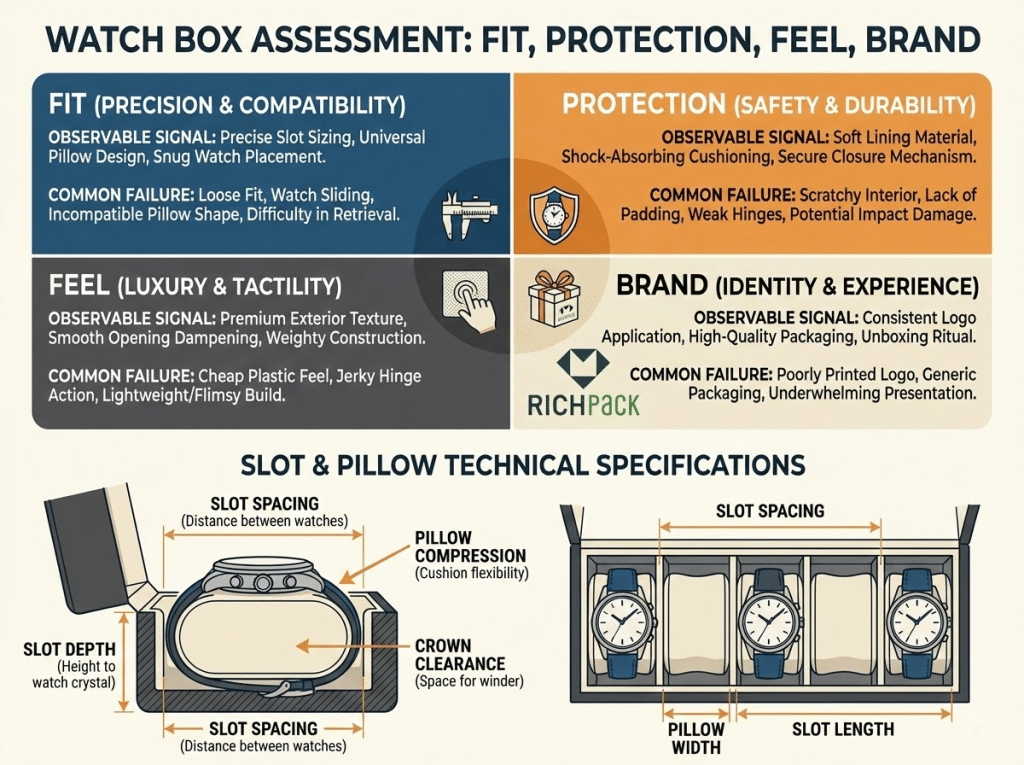
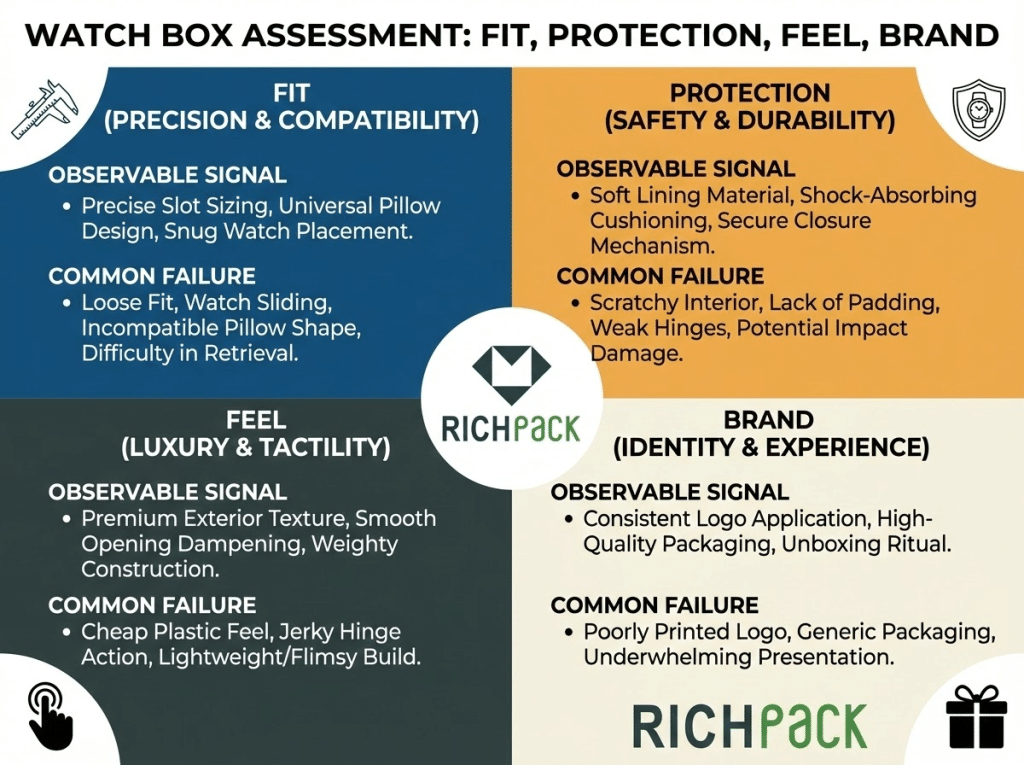
Tight slots or crowns scraping dividers are common. Lids that don’t fit right are another issue. I define “best” with four criteria: Fit, Protection, Feel, and Brand.
Once you set these standards, every design choice gets much easier. It makes your decisions very easy to justify.
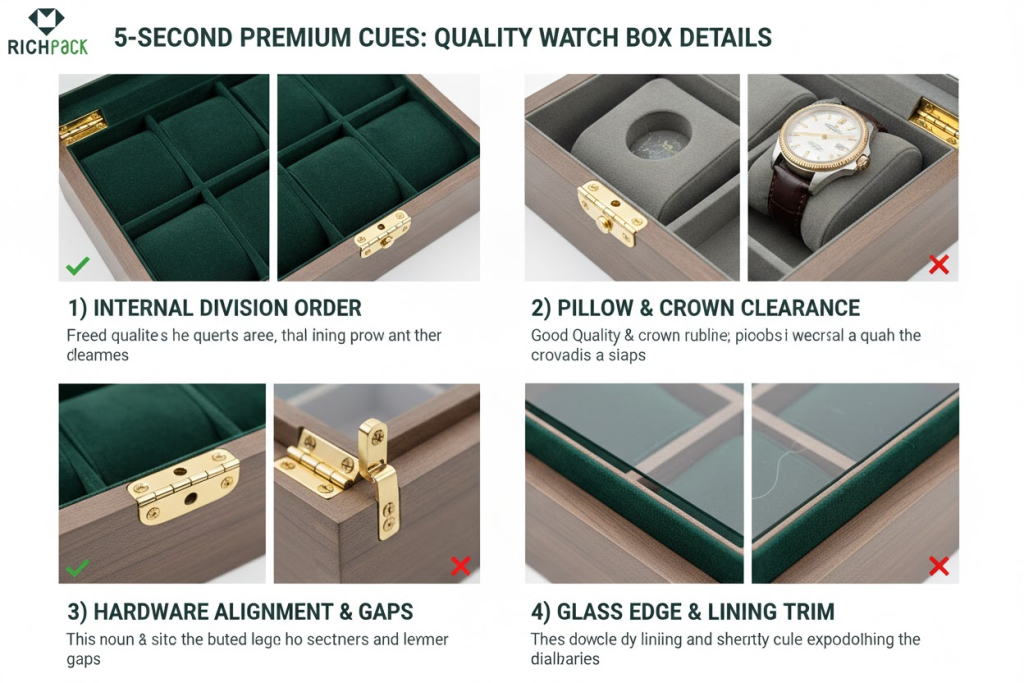
I use a simple system to judge any watch box. You can spot quality by looking at three areas. Check the standard, look for signals, and avoid common failures.
Bad slot spacing ruins many great designs. I see this fail often as modern watches get larger. You must focus on the lug-to-lug length rather than just the case diameter. If that length is over 50 mm, crowns hit dividers and kill the luxury feel.
I always test these dimensions during the prototyping stage. I place a real watch inside and check for 3–5 mm of top clearance. If you see pressure marks on the lining, your depth or pillow height is wrong.
I see people search for the “best watch box” every day. Most buyers actually mean very different things. If you offer the wrong type, returns will spike. Your reviews will say, “looks nice, but doesn’t work.”
This works best for visibility and fast access. I always tell clients to check for glass glare. Dust control is a “feel” issue that ruins the design.
Pick this type for long-term protection. I’ve found that many brands ignore humidity control. If the interior traps a bad smell, it stops feeling premium.
These are great for daily routines with straps and tools. Watch out for layouts that turn into messy trays. You don’t want your brand to look like clutter.
This choice focuses on capacity and a uniform look. I notice collectors always check the pillow sizes. They will see if one slot fits differently from the next.
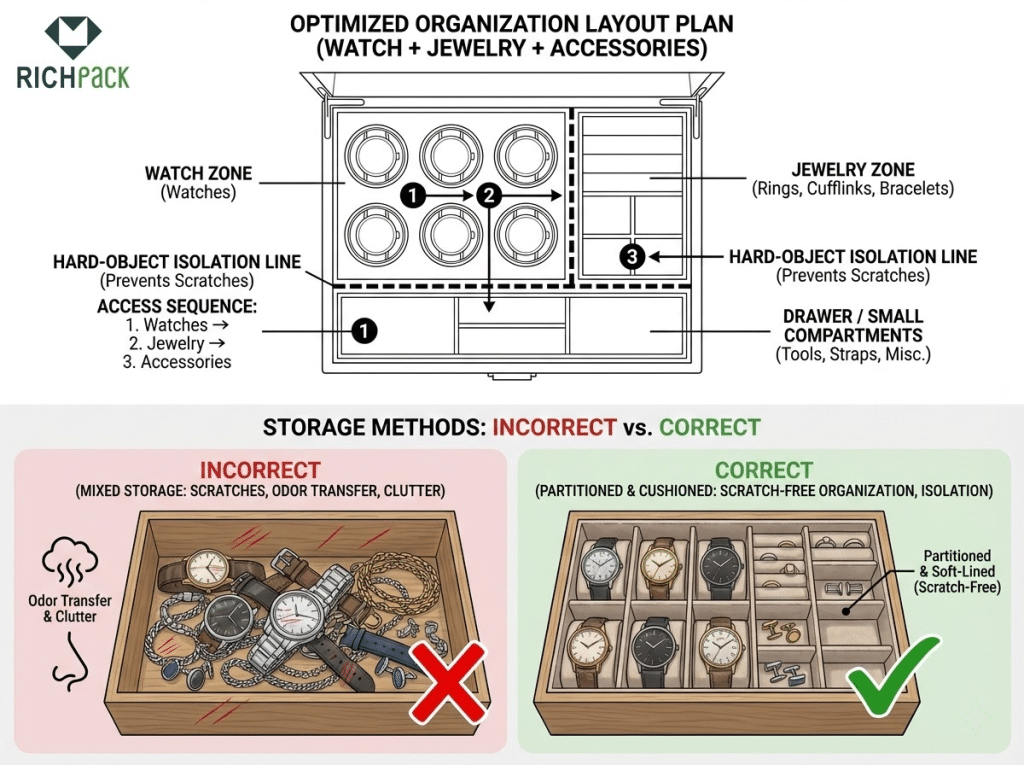
Professional tip: A combined box for jewelry and watches works well. It fits rings, cufflinks, straps, and sunglasses. But you must keep the zones separate and clean. If everything shares one big space, the protection fails immediately.
A watch box with a drawer adds real value when it solves daily problems. It should not just be an extra feature. I often tell my clients to focus on use.
Think of it as “store this to avoid that.”
Staying straight and moving quietly makes a drawer feel high-end. I check for these first. A drawer that sticks or sits crooked feels cheap. This ruins the box even if the outside looks great.
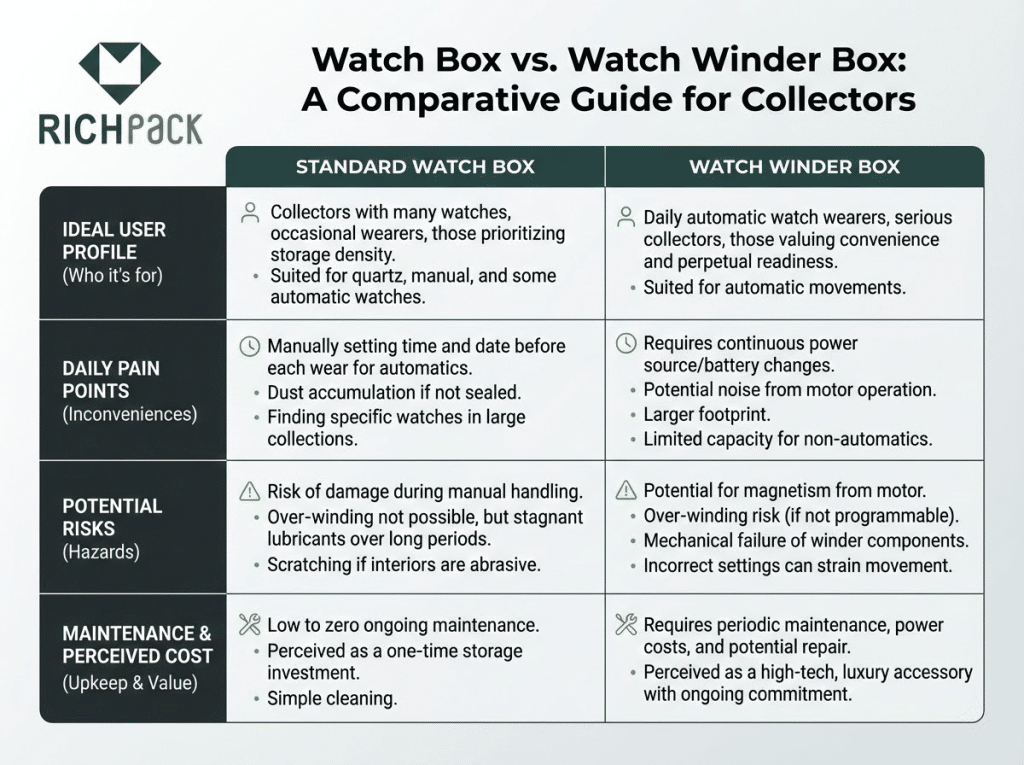
I see this question all the time. People search for the “best” option, but really wonder if they need a winder. Let’s keep this simple for your clients.
I’ve noticed many buyers make a common mistake. They assume a winder feels more “luxury” by default. In my experience, winders only help if the owner hates resetting the time. It really shines for watches with complex settings that take time to fix.
Here is my go-to trick for building trust with your customers. Tell them to check the brand’s care manual first. Every movement is different. Some brands have specific rules for storage that you should follow.
Most men’s watch boxes fail for one clear reason. They solve the wrong daily problem. I see this often when helping brands launch new lines.
I always design from the storage moment backward. First, I lock in the capacity and zones. Then, I add extras that meet your best standards. I focus on fit, protection, and feel to build your brand.
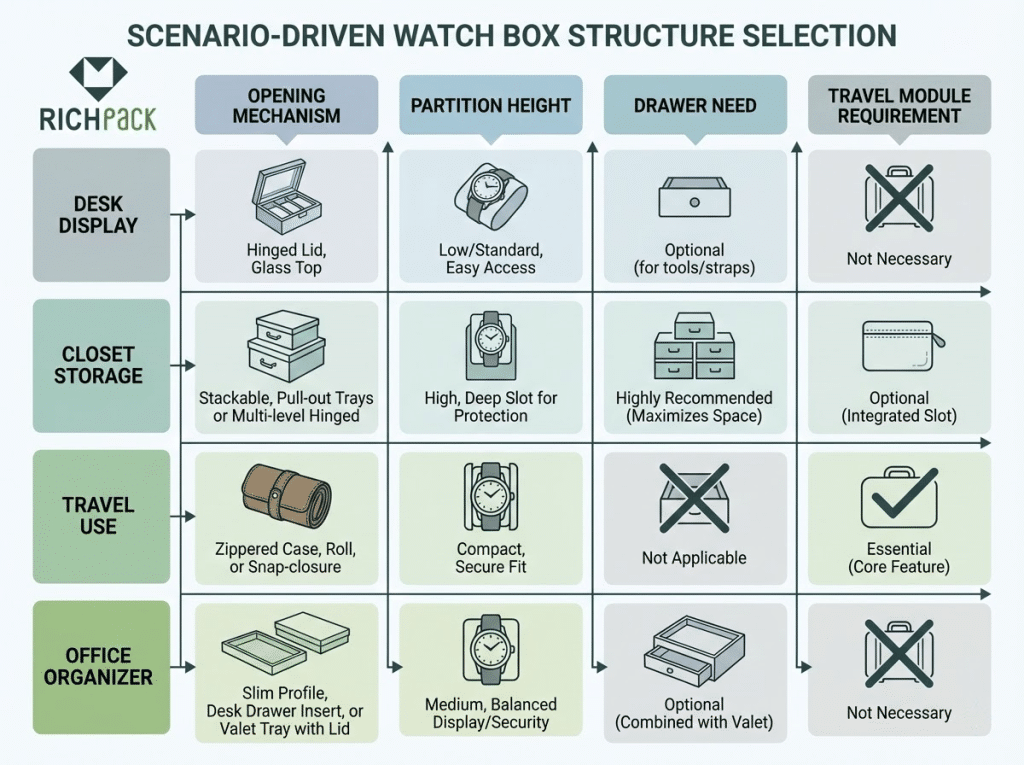
One box can feel high-end on a desk but messy in a closet. I’ve found that desk use needs fast access and a clear top view. Closet storage works best with dust control and a small size. For travel, I focus on crush resistance and quiet interiors.
Start by picking the main home for your box. This choice decides the opening style and divider height. It also tells you how much space the layout needs.
Here is how I map scenarios to layouts:
Space matters more than just a count. It sets the slot width and lid height. I see watches hit each other when the math is wrong. Most “cheap” boxes fail because they cram too much in. Tight pillows and crowded slots cause real rubbing for your customers.
I use a few simple rules to keep layouts clean:
If you want a fast start, build one “hero SKU” first. Pick one size and one look to start. You can grow the line from that single plan later.
I’ve found that a great men’s box must solve three main problems. It needs to stop scratches, bad smells, and messy piles. I always ensure the layout feels planned, not like a random tray.
Here are the zoning rules I use:
Masculine design is about clear signals. It’s much more than just picking a dark color. I always aim for a look that sits well on a desk. It must also match your brand in photos.
Try using fewer colors and a steady material flow. From my experience, this creates the best result. Here is how I build that look for my clients.
Practical cue stack:
Authority hint (don’t guess): Don’t guess on the small details. I always match colors and logos to your official brand guide. Use your Pantone or CMYK codes. This keeps your packaging from looking off-brand.
I always tell my clients that add-ons must serve a real purpose. If you add features just to look “premium,” the box feels cluttered. Good design feels natural and intentional.
I’ve found these options work best:
Now, let me share my favorite way to spot a cheap box. I call it the five-second desk test. Try to open the box and grab a watch with one hand. If the box moves or feels clunky, your add-ons are likely hurting the brand.
I’ve seen how accessory pairings change the layout of a box. Most buyers want space for their daily gear, like straps or sunglasses. This keeps their items from getting lost in drawers. I often suggest valet-style trays for travel papers. It makes the box feel useful, not cluttered.
Here are two layouts I find work best:
My clients always ask about fit pressure. Users worry that tight cushions might damage their watches. I hear this a lot from collectors who care about long-term care. It is a major pain point you should address.
Serious fans often measure their watches to ensure a perfect fit. They want enough space so items never touch. Start your design by looking at the watch size and the closing path. This is the foundation of a great travel case.
Your buyer feels the structure before they see the watch. I’ve seen poor builds ruin even the best materials. Lids shouldn’t bounce, and magnets must not drift.
A bad box feels cheap and often breaks during shipping. You need a structure that stays aligned and feels quiet. This matters most when the box serves as both display and storage.
Let’s look at how I pick structures that actually last. I always focus on builds that protect the watch and impress your customer.
I always look for three things when choosing a box structure. First, the lid must close perfectly square every time. Second, the box should not twist when you press it. Third, the opening motion must feel smooth and steady. Most high-end boxes use thick chipboard for that solid, heavy feel. This “quiet weight” is what your buyers really want.
I recommend this for brands that want a big “reveal” moment. It works well for gifts and store displays. Watch out for hinge alignment and lid “bounce.” If the pins shift, the lid will rub against the edges. I find the lid should stay open at a steady angle. If it snaps shut or flops back, the hinge is wrong.
This style gives you a clean look and a very stable shape. It has fewer moving parts to worry about. You must get the friction fit just right. Too tight and it scuffs the edges. Too loose and it feels cheap during shipping. Try lifting the lid slowly with one hand. If the base moves too, the fit is too tight.
I use this when a client needs a great hand feel. The inner panel also offers extra space for your logo. Keep an eye on magnet drift and noisy snaps. These boxes only feel high-end if the flap lands perfectly. The closure should feel secure, but stay quiet. A loud click can make the box feel like cheap hardware.
This style creates a neat “valet” feel for your customers. It works best for sets with extra straps or cards. Watch out for friction and uneven gaps on the sides. These boxes add real value if the pull motion stays smooth. I test this by pulling the drawer halfway out. It should stay put without sliding open or shut.
Here is a trick I use during sampling. I run a “quiet-open” check in a silent room. I open and close the lid ten times. I listen for any squeaks, clicks, or rubbing sounds. If it makes noise now, it will get worse later. Your customer will notice these small flaws very quickly.
Good closures build trust. Your buyer feels it right away. They hate loose lids or weak magnets. A bad snap ruins the whole look.
It feels high-end when the flap sits flat. The alignment must stay the same every time.
Weak magnets fail. If they sit off-center, the wrap might lift. You will see bumps near the corners.
I treat magnet placement as a full system. Don’t just “add magnets” and hope. These boxes use rigid board with a clean wrap. Any small error shows up fast.
Matches matter. I love leather wraps with metal snaps. They look great together.
Avoid noisy snaps. They should not leave dents on your lid either.
A good lock stays quiet. It sits right in the middle. It never snags.
Sloppy work kills the vibe. Even a tiny tilt makes the box look cheap.
Close the lid now. Run your finger along the seam. It should feel smooth and straight.
Press down on two corners. The lid should stay still. It must not rock.
Try opening it with one hand. You should not need a second hand to hold it. That is how I test quality.
I’ve seen glass lids help sell watches instantly. However, they bring two big headaches: keeping surfaces clean and managing breakage risks.
The display benefits are clear. You get better shelf presence and easier retail sales. Plus, your product photos look much sharper.
On the flip side, glare and fingerprints become real issues. Dust shows up fast under bright lights. I’ve found that glossy finishes make smudges look even worse. I suggest picking matte surfaces to hide those tiny scratches.
Make it work:
Only use glass if your customer wants a desk display. It does not make sense for simple closet storage. Think about where the buyer will actually put it.
You need a solid plan for cleaning. I always include a microfiber cloth or anti-static wipes. Adding a dust lip inside the frame also keeps things tidy.
Watch your edges closely. A sharp or rough glass edge feels cheap and ruins the look. A smooth, protected edge shows you care about quality.
I often see buyers struggle with this specific choice. They want something that stays safe in a bag but looks great on a desk.
Watch Roll:
Travel Watch Box (Hard Case / Structured Case):
Here is my rule of thumb for your clients. If they pack watches in large luggage, I suggest a structured case. A roll works best when they want to travel light and can carry it carefully.
I see travel boxes fail when brands focus only on being slim. They forget about load paths. Your box must survive pressure from heavy luggage. It should do more than just stop scratches.
Key features for a high-end travel build
Fix these common travel design flaws.
Most men’s watch boxes fail because of the insert. I see this all the time. A fancy shell cannot fix a bad pillow or a lining that stains. Your goal is for the watch to stay still and stay safe.
I based these tips on modern men’s watches. They usually have larger cases. You likely need a mix of display and daily use. I want to help you get that luxury feel.
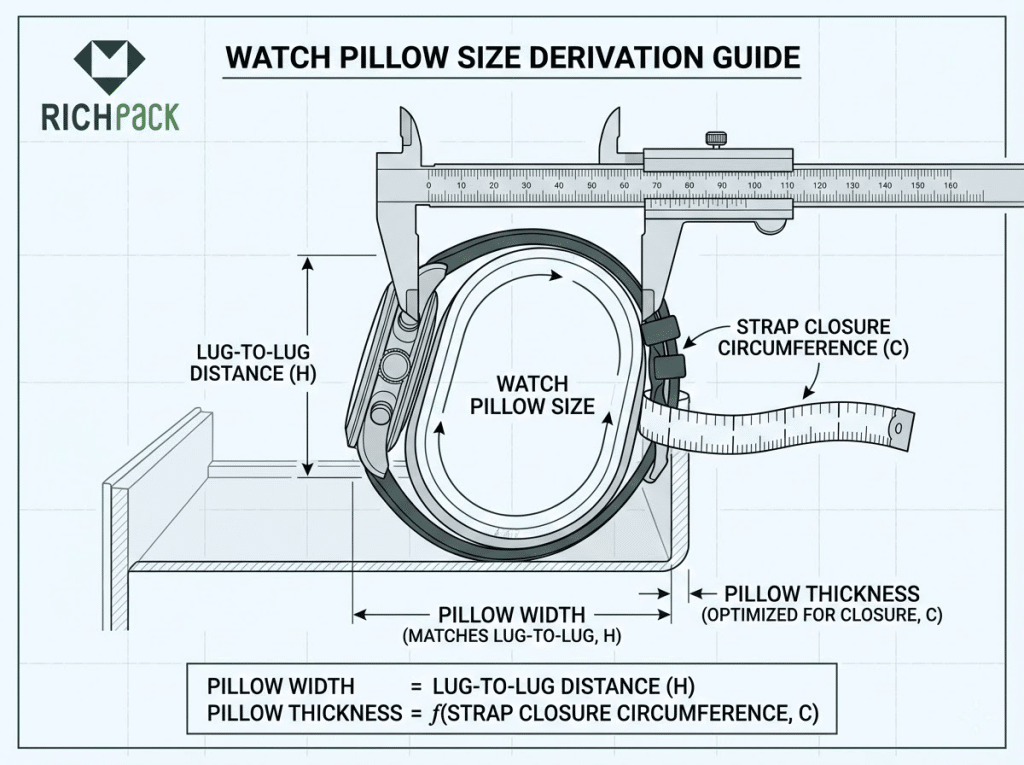
Your watch pillow must match real wrist sizes. It is not just about the slot count. I find the pillow must support the watch head well. It keeps the strap closed without adding stress points.
I always start with lug-to-lug measurements instead of case diameter. Modern watches are quite large today. This size range often pushes insert sizing harder than most people expect.
You should design for two specific closure types. Metal bracelets need a flat and wide contact area. Leather or rubber straps can handle more compression. However, they will show creases if you tighten them too much.
I use one quick rule to prevent customer returns. Your pillow should let the watch close naturally. The clasp should not “spring back” when you open it. If the bracelet snaps open, your pillow is too wide or stiff.
Here is a practical detail from my production work. I always do a “two-finger lift” test on samples. You should be able to slide two fingers under the watch head. Lift it without hitting the side walls. If you have to pinch the case, you are risking micro-scratches.
Bad depth ruins the user experience. The watch sits too deeply, or the crown rubs. I find this makes taking the watch out hard. I treat depth as a comfort tool, not just a hole.
Start with your tallest watch. I always add extra room for the thickest piece. This stops the lid from hitting the glass. Some guides suggest adding extra room instead of a tight fit.
You must leave room for the crown. If it hits the wall, the watch will turn. This leaves marks on the metal over time. I use a small side groove to stop this.
Design for an easy exit. Add a small finger scoop if the watch sits deep. This lets the user lift the pillow first. They should not have to pull on the case.
Now, let’s look at a simple plan for your team. It goes Problem, then Cause, then Fix. It makes the goal very clear.
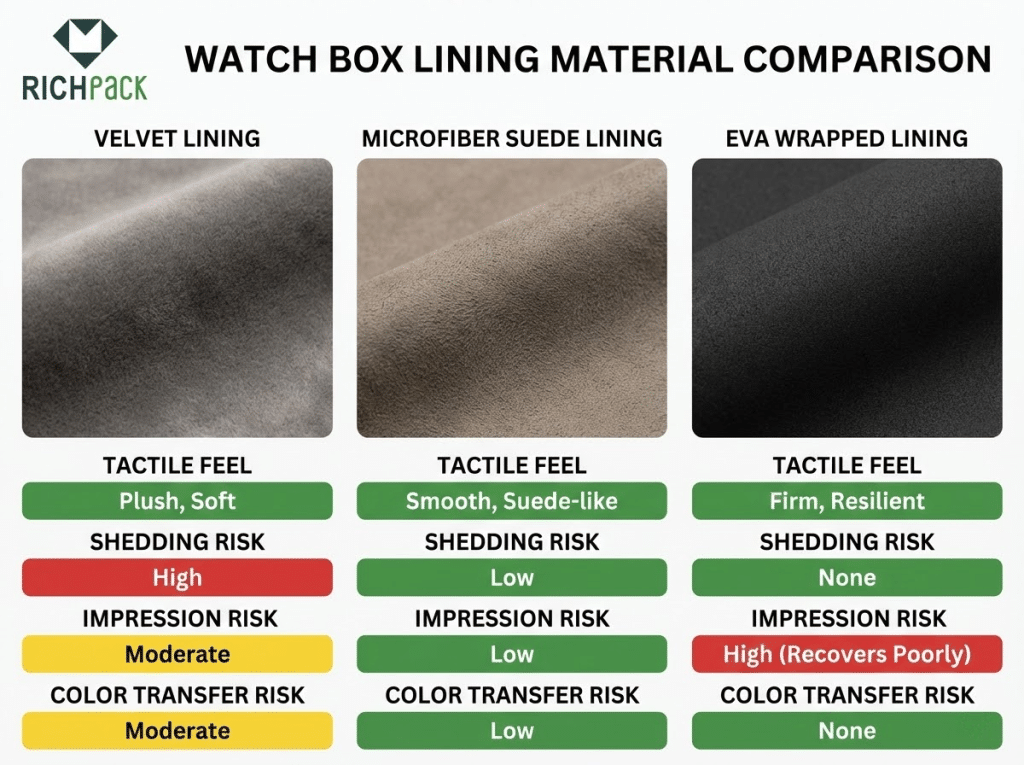
I’ve found that “soft” doesn’t always mean “safe.” The best lining stops scratches and does not shed. It stays colorfast against steel, PVD, and light dials.
Use these quick checks to pick your materials:
| Lining Option | What It Does Well | Common Failure to Prevent |
| Velvet (short pile) | Plush feel, gift-ready look | Fiber shedding, crush marks, dye rub on light items |
| Microfiber Suede (Alcantara-style) | Low lint, consistent texture, strong “luxury touch.” | Heat/pressure glazing, cheaper grades can pill |
| EVA + Wrapped Fabric | Best shape control, stable geometry | Hard edges telegraph through if the wrap is thin |
You can do these checks without a lab. I use them to catch quality issues early. A bad smell makes a watch feel cheap to your buyers.
Next, you may want a formal spec for your team. I suggest using the ISO 105-X12 standard. This measures how well materials resist rubbing and staining. It is a smart way to protect your brand.
I’ve seen that mixing watches and jewelry often leads to scratches. You need an insert that stops items from moving around. Your design should keep things neat without being hard to use.
Here is my favorite test for any box. Tilt the box 30 degrees. If an item moves, you need a tighter slot. You could also use a soft cover or a pocket.
I’ve seen how removable inserts can quickly make a single product feel custom for every buyer. You also avoid the risk of getting stuck with one size that only fits certain watches. This approach keeps your inventory lean and versatile.
Even the best-looking inserts fail if they come loose. I have seen brands lose their luxury feel just because of a weak bond. This small detail is where your product truly wins or loses.
I give my factories a clear rule to follow. Tell them the insert must not move during a firm shake test. No edges should lift, nothing should rattle, and no hard spots should be near the watch.
A great insert does three things well. It holds the watch tight, stops scratches, and keeps everything neat. Right now, which part of your design is the biggest risk: the pillow fit, crown space, or the lining?
A luxury watch box wins or loses in that first close-up moment. Your buyer might love a digital design but reject the real sample. I’ve seen this happen when edges feel soft or hardware clicks. Sometimes the box just smells wrong.
I always help my clients focus on one simple goal. You must pick materials that look and feel expensive. These parts must also stay stable during shipping and storage. This is how I ensure a high-end result for every brand.
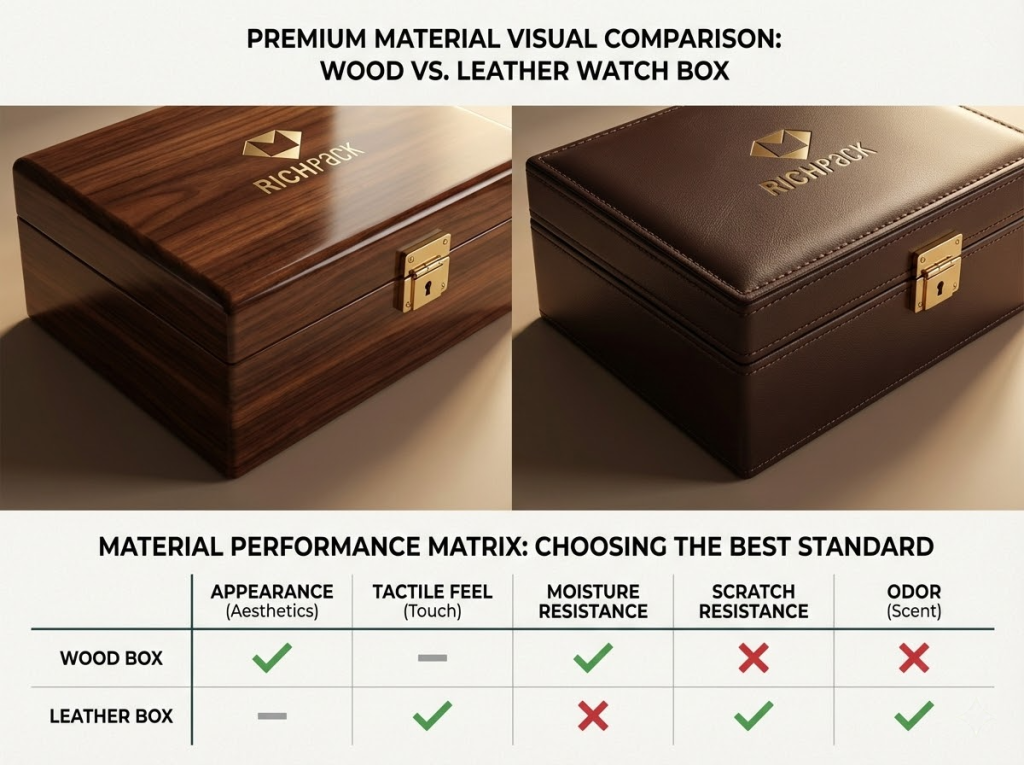
I’ve seen both work well for watch boxes. Each material signals luxury in its own way. But they can both fail if you aren’t careful.
How they feel (and why buyers care):
Wood tells a story of heritage and long-term collections. I find it looks best in photos with a high gloss. It feels like a solid piece of furniture.
Leather wraps feel like modern luxury when you touch them. They feel warm and like a personal accessory. This choice feels less like a cold cabinet.
Maintenance + durability trade-offs (the stuff that triggers returns):
Humidity is a big risk for wood boxes. The wood can warp, or the lid might stop fitting. Leather wraps can bubble if the glue gets damp.
High-gloss wood shows tiny scratches very fast. Textured leather hides scuffs much better. But you may see wear on the corners over time.
Wrapped boxes use glue and foam that can smell bad. Wood finishes also have a scent. I find wood odors are easier to fix with fresh air.
Pick based on your “Best” standard (practical guidance):
Choose wood if you want a classic heirloom feel. Use a solid finish for a strong retail look. I recommend this for high-end brands.
Pick leather if you want a great touch during unboxing. It hides scuffs better than wood does. I suggest premium PU with very tight edges.
Wrapped boxes are better if you need to restock fast. It is hard to match natural wood grain at scale. This helps you keep colors the same.
Buyers often search for a Watch Jewellery Box Men’s for gifts. This usually means a clean and masculine look. Either material works if the small details stay sharp.
Most people call a box “cheap” because of the edges. The main panel rarely causes this issue. A clean wrap makes your box look like a real piece of gear. It looks solid, not rushed.
I see buyers judge boxes in three seconds using these standards:
Here is my checklist for a box that looks expensive:
I use one simple trick when I check samples. Run a clean microfiber cloth along every edge. Use light pressure. If the cloth snags or pulls color, the edge is not ready. You may need to fix the paint or the base material.
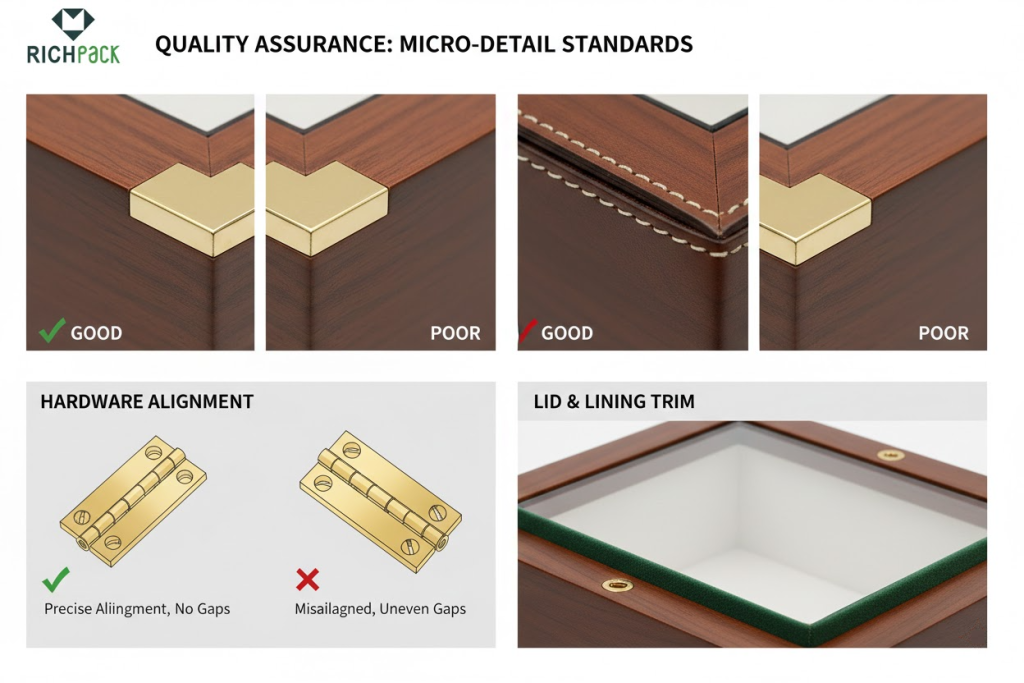
Hardware makes luxury feel solid. If it scrapes or sits crooked, a nice wrap won’t save it. I’ve found that this ruins brands more than anything else.
These parts often fail in the real world:
Next, I always check these QC points:
Include these checks in your RFQ. I add them to every sample note. This stops bad surprises after your first shipment arrives.
I’ve seen brands lose customers over small details like a weird smell or a damp feel. These issues lead to those dreaded reviews about stained straps or spotted metal. Here are the common symptoms I look for and how to fix them.
Now, let’s look at how you can test these boxes. You can use these simple actions to check your quality right now:
I’ve found that moisture management is not optional. Experts suggest keeping indoor humidity between 30 and 50 percent. I recommend you fix any moisture issues fast to prevent mold.
Global sales turn “nice” materials into “documented” materials. I find it best to keep this simple: avoid risk and confirm proof.
I recommend you avoid these common compliance headaches:
Here is how I confirm quality without a legal mess:
I can send you a one-page QC checklist for your hardware and finishes. Just let me know if you want that swatch board layout for your team.
Real luxury comes down to small details like tight edges and stable materials. Are you more worried about bad odors, scuffs, or moisture damage right now?
Branding works best when it feels like a choice. I see many brands make it look like a cheap promo. You want to avoid that “free gift” at all costs.
I’ve found that the wrong logo method ruins a high-end box. It happens when the logo style fights the material surface. Picking the wrong spot also makes it look low-quality.
I’ve spent years matching logos to materials. Here is my quick test for each method. I will show you the best use and the most common failure.
My Sampling Habit: I always ask for a “logo finish board” using the real materials. Then, I do a dry rub with a soft cloth. I also tried a tape pull and opened the box 20 times. This shows me what gets scuffed before we start the full run.
Men look at watch boxes in two main steps. They see the outer box on a shelf. Next, they feel the brand when they open it. I suggest you match where you put the logo to this flow.
Keep the outside look very clean. I like placing a small logo on the lower-right lid corner. You could also put a light mark on the front edge. This makes the box look designed rather than a promo item.
Make the inside the real hero of the box. Place your logo in the center of the inner lid. A clean metal plaque on the frame also works well. I find this pays off because your customer sees it up close.
Watch out for the cheap gift box feel. Too many logos on the sides, and the lining looks like a handout. I follow one simple rule for my clients. Use one main logo and one small touch on the dust bag.
Are you making boxes for both retail and gift orders? Then you should keep the outside neutral. Let the inside of the box tell your brand story. This balance works best for high-end buyers.
I see luxury brands make mistakes here. They use text that is too long or loud. I suggest a “quiet” approach. Keep it short and place it carefully.
When you use initials, keep them short. Stick to two or three characters. Give the text plenty of space. I avoid placing text near edges where the material pull is high.
Next, I always put engravings on parts that already look expensive. I use the clasp plate or the inner frame. Do not just drop text on a flat surface. It needs to feel like part of the design.
I also follow a strict font rule. Use only one font style that matches your brand system. I never mix scripts with block fonts. If you feel unsure, use a card insert.
Here is my rule for your brand. If you think the text is too loud, it is. I suggest you shrink the font size. Move it to the inside or use a card. This makes the gift look more classy.
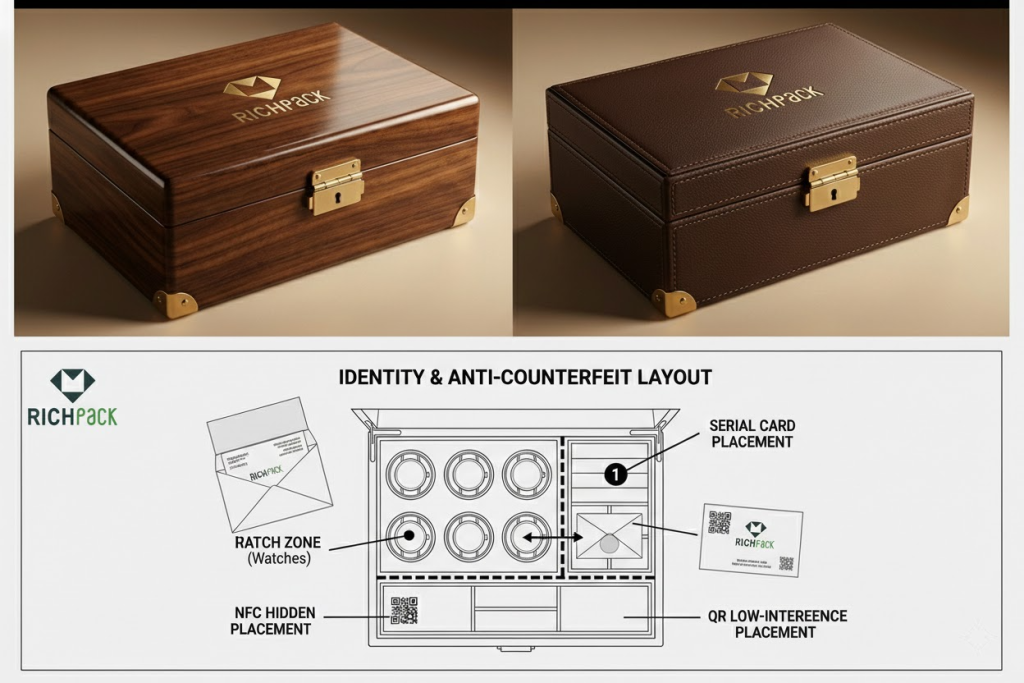
Your authenticity features should feel like part of the gift. I always aim for trust without creating a messy look. You want your customers to feel secure, not distracted.
I see many brands making rigid, paper-wrapped watch boxes. Whether you use a hinged lid or a drawer, your factory needs clear plans. You need a one-page spec and a vector dieline. This helps you get fast quotes and steady mass production. Since you sell globally, your files must work across every time zone.
High-end boxes often look great in photos but feel wrong. I have seen tight lids scrape the paper wrap. Sometimes a drawer rattles or the insert marks the watch. These small errors kill the luxury feel for your buyers.
My go-to fix is a solid spec sheet. It turns a “nice” design into a product you can remake. This is vital when you build watch boxes for retail. It ensures your quality stays high every single time.
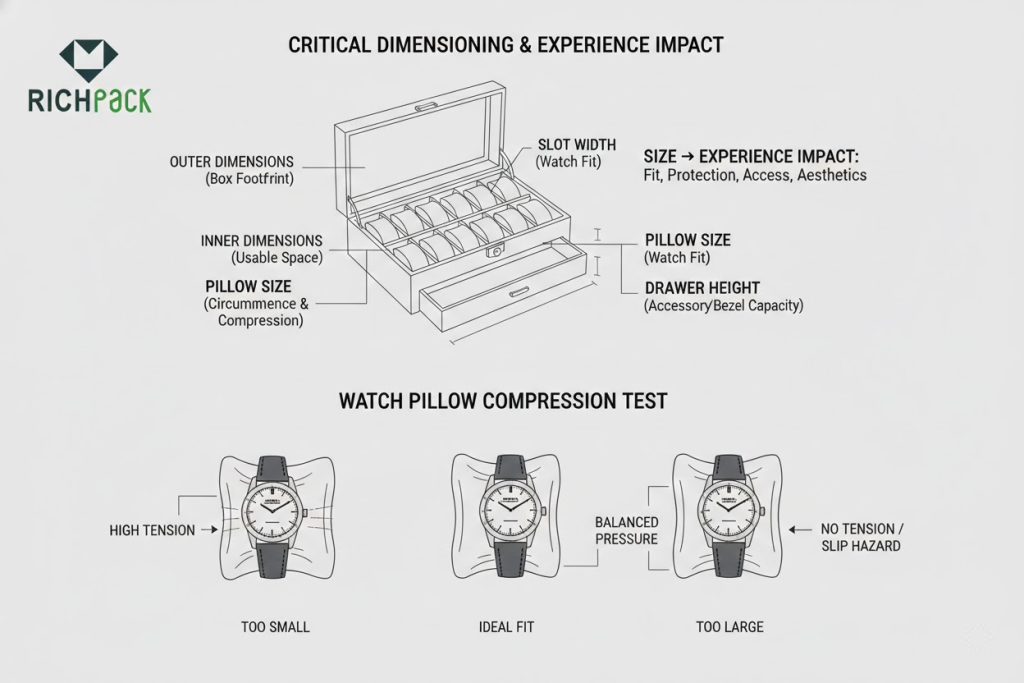
Dimensions do more than just make things fit. They change how people value your brand. I look at every measurement as a way to improve the user experience.
I have a trick from my own sampling work. We always test the fit with two real watches. One has a metal bracelet, and one has a strap.
I record the worst-case fit for the largest case. This cuts down on extra work later. It matches how your buyers use the box in real life.
I see small errors ruin many premium boxes. These tiny flaws show up quickly. You must name each defect in your spec. Then, set a tight limit for each one.
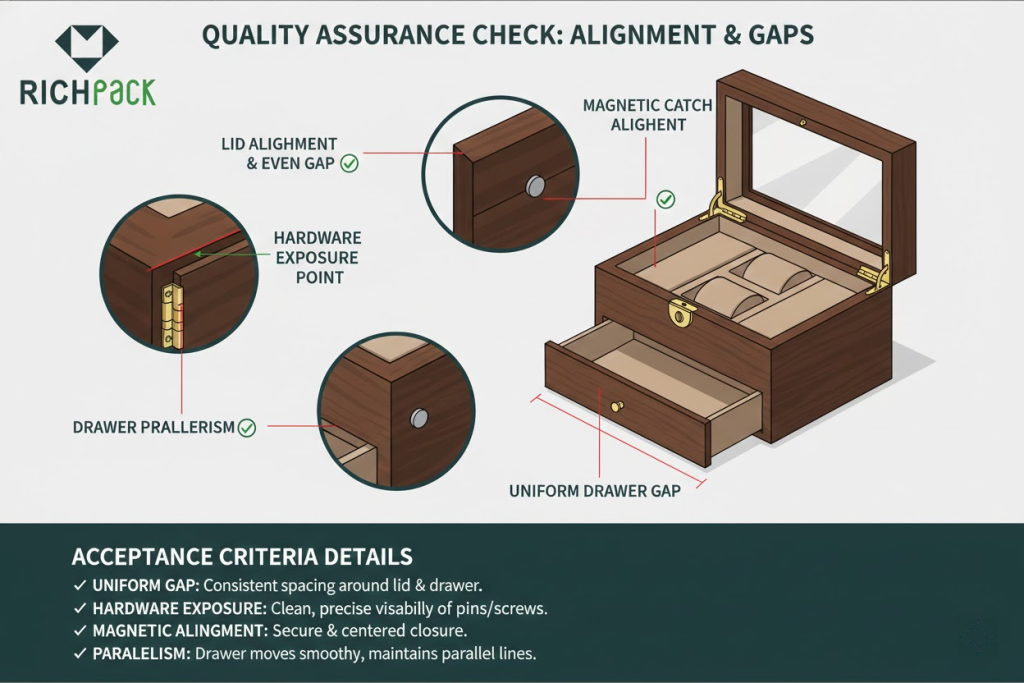
Bad lid alignment creates a “step” you can feel. Your thumb will notice it right away. I always write a clear rule for this. The lid must sit flush and stay still. Edges must line up perfectly all around.
Uneven drawer gaps make a box feel cheap. I find this happens often with poor QC. Define your needs clearly. The gap must stay even on both sides. The drawer should not scrape or drag. It needs to stop cleanly every time.
Crooked dividers ruin the look of your grid. This is a common issue I fix. Specify that every divider must stay straight. You should see no bowing under a desk light. Check this from an arm’s length away.
Poor wrap edges lead to wavy corners. This makes the brand look bad. Call out the wrap quality in your plan. The wrap must stay tight at every corner. Look for lifting or “fish-mouth” gaps. Ensure no glue shines through the seams.
I use a simple trick for quick checks. Grab a standard business card to test gaps. This works better than a ruler in real life. If the card fits in one spot but not another, buyers will spot that error. Even a “close enough” fit can fail.
I’ve seen factories quote much faster with a single-page summary. Put everything in clean fields for their BOM. Keep this part simple and direct.
Suggested fields (copy/paste friendly):
I always use spot colors like Pantone for brand consistency. CMYK builds change too much between different printers. This stops your black from looking warm or blue.
I’ve seen many brands fail when mass production looks worse than the sample. This happens because factories swap materials without telling you. You must describe every layer of your insert clearly.
I recommend writing your spec like a build recipe:
I always ask for a “stack-up photo” during the first run. I have the factory lay out every layer. I check the thickness of each part. I then compare this to the approved sample. This catches foam swaps before the order ships. It keeps your quality high for every unit.
You don’t get luxury at the factory. I’ve found it only works with a real prototype.
I use this stage to catch small details. Customers feel these tiny things. Maybe a pillow grips too hard. Or a hinge clicks. Sometimes, a divider edge rubs the case.
I treat prototypes like a real test bench. They are not just for photos. Little issues define a great watch box. Without this, it is just a gift box. People forget those quickly.
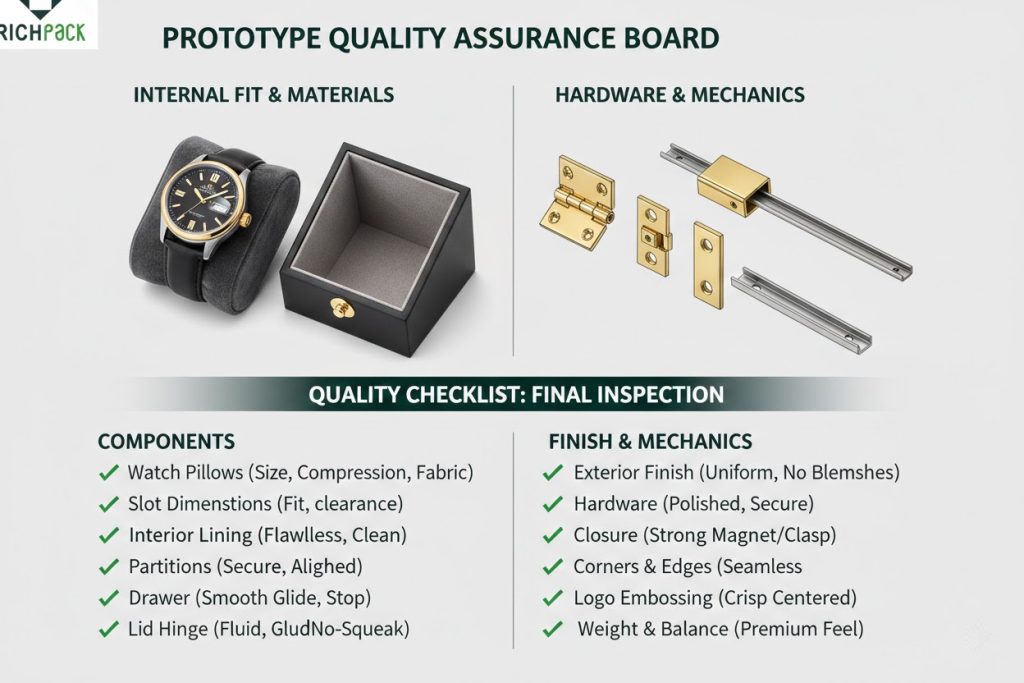
Fit means more than just sliding inside. It means easy pick-up with one hand. You want zero crown pressure and no bezel rubbing. Men’s gifts often have large cases and thick bracelets. I always make sure the insert respects these sizes.
I use a real watch or a steel dummy for sampling. We pull the watch out and put it back ten times. Then, I repeat this ten times using a cloth. If the cloth snags, your hardware will snag too. This test spots scratch risks very fast.
Check these failure signals and fixes:
I’ve found that “premium” is actually a sound. A lid that closes with a clean finish feels expensive. If it snaps or rattles, it feels cheap. Customers judge your brand the moment they pull that drawer.
I use a simple test for every project. I open and close the lid 50 times. Then I pull the drawer 20 times. I check the gaps under normal light. If it makes noise now, it will fail in the real world. This test tells me if we need magnets or hinges.
Watch for these red flags:
I’ve seen many watches ruined by two simple things: divider edges and hardware. Even soft-looking interiors often hide sharp metal points. One tiny metal point will scrape a clasp or case side fast. I check these spots first during my audits.
I recommend a quick scratch-risk sweep for every new batch. Run a microfiber cloth along every edge and hardware cutout. If the cloth catches, your product will catch too. Press your knuckle where the watch sits to feel for ridges.
Keep a close eye on these three areas:
I’ve worked with many brands on this. You cannot explain quality to a buyer because they decide in five seconds. People look for order, touch, smell, and the inner frame.
I always use a quick test. Open your box and ask if it looks high-end without a logo. If you hesitate, find the flaw. Usually, I find messy logos or bad glue smells.
Check these points right now:
You need a box that survives more than just an unboxing video. Global shipping is brutal on luxury goods. Damage leads to expensive returns and lost brand trust. I always test early to build strength into the structure itself.
I use ISTA Procedure 3A for most parcel shipments. It is a great way to check delivery safety by weight. For general performance, I often look at ASTM D4169. I use ASTM D5276 for drop tests. To see how boxes handle warehouse stacks, I use ASTM D642.
I suggest writing your prototype notes using this simple flow: “test purpose → failure look → fix.”
I often see luxury watch boxes that look great in photos. Then they fail when the customer opens them. That “cheap” feel usually starts with small mechanical flaws. Loose fabric or noisy hinges can ruin your brand.
Bad box depth and shipping dents also lead to bad reviews. I’ve found that consistency is your biggest challenge. You must create clear specs to keep your quality high. This ensures every box feels as good as your first sample.
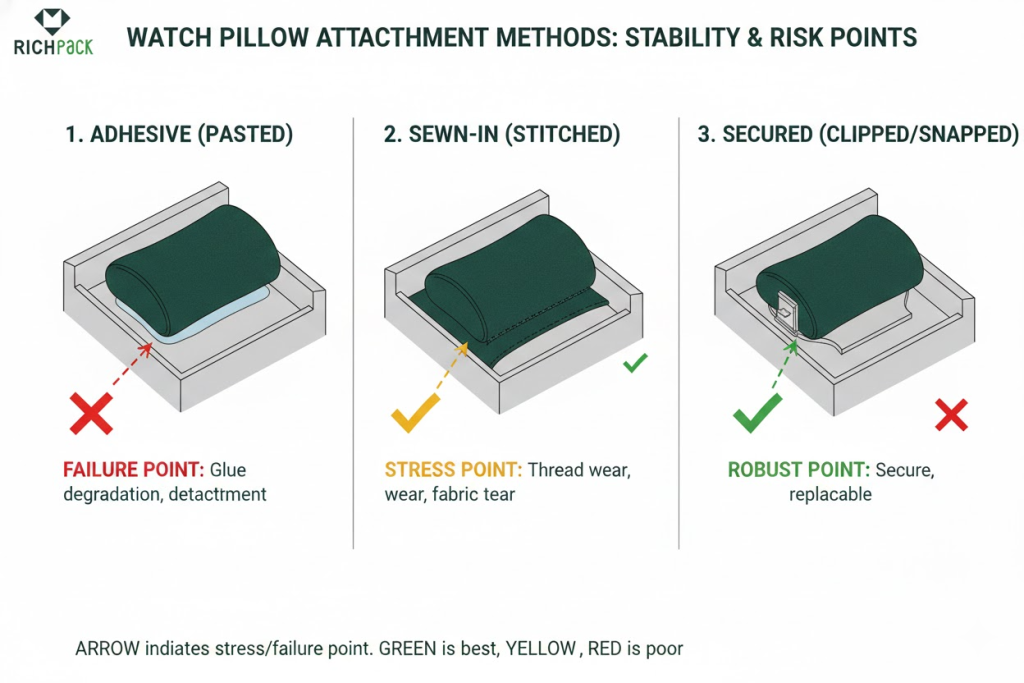
Loose pillows and peeling linings aren’t just bad luck. They happen when your glue or stitching doesn’t match the materials. I see this often when the bond line can’t handle heat or moving parts.
Here is how I choose the right fix:
During sampling, I always use a “grab point” test. I pinch one corner of the pillow, lift it, and twist. If the liner shifts, wrinkles, or crackles, it won’t survive retail. Your team can do this test without any tools.
Executable acceptance signals:
Watches that sit too deeply feel cheap. I often see people struggle to grab them. Crowns rub, and bracelets scrape the sides. This usually happens when slot depth, pillow height, and crown relief do not match.
Think about how dimensions affect the user. Slot depth decides your grip. If it is too deep, you have to pinch and pry.
Pillow height provides lift. Low pillows let crowns press into the fabric. Cutouts stop the crown from rubbing. Without them, you get scratches and fabric wear.
Try a quick fix during prototyping. I add a thin lift shim under the pillow. Use the same foam you plan for production.
If the unboxing feels better, you solved the height issue. Now you can lock the spec before making tools. This saves time and money.
Run a fast user check. Use just your thumb and index finger. Can you pull the watch out in one move?
Make sure the crown clears the side wall. Check the slot after twenty tries. Look for fuzz, shine, or wear marks.
Luxury does not just go away all at once. It fades through small flaws like color rub-off or flat fabric. I see these issues ruin high-end brands too often.
I have found that most problems come from a few main causes. Here is how I map these signs to the right fix.
In my own work, odor often comes from rushing the packing. A box might look great, but smell bad in a bag. I find that waiting 48 hours before bagging solves this.
Always ask your suppliers for TDS and SDS papers. Check reports for rub results and chemical levels. This makes sure your materials meet the rules for your market.
Bad hardware kills the luxury feel in two seconds. I’ve found that customers overlook small marks, but they never ignore a squeaky hinge. A grinding drawer or a crooked lid ruins the whole brand experience.
Common issues and how I fix them early:
Early warning signals:
Here is my go-to move: ask for a “dry-fit” sample before they apply any wrap. The bare structure must feel smooth and align perfectly first. If the box gets noisy after wrapping, the hinge isn’t the problem. Your wrap thickness or the edge turn-in is the real culprit.
Your customer’s experience ends the moment they see a dented box. I’ve found that even great designs fail without proper protection. You just need to focus on three main things. Fix your internal restraint, cushioning, and outer carton strength.
I see these three issues most often:
You should use real standards to test your packaging. I often point my teams toward ISTA 3A protocols. This mimics the rough parcel delivery world. Use ASTM D642 tests to check your carton strength.
| Test purpose | Failure sign | Fix |
| Drop test | Lid pops or drawer opens | Add internal locks and better corner padding. |
| Compression | Dents or warped lids | Use stronger cartons and better internal support. |
| Vibration | Scuff marks or loose parts | Add friction barriers and protect all touch points. |
I wrote this for brands selling high-end men’s watches. You likely need steady mass production. Your buyers want a great unboxing experience, not just storage. This keeps our talk practical.
I’ve found “premium” really means five specific things. The box must fit real watches and protect the metal. It should feel smooth and look great up close. It also needs to look good in photos. Use these lists to get those results before ordering. Feel free to put these bullets in your RFQ or QC plan.
I’ve helped many brands choose the right features for their boxes. You must match your design to your specific buyer. A collector wants something very different from a gift buyer.
Small marks cause most returns. These marks happen during shipping. I’ve seen sharp edges and rough seams ruin polished steel. Your inserts must protect every part of the watch.
A simple scratch test for you, I use a quick “wipe-and-check” during reviews. Place a polished watch into the slot. Open and close the box ten times. Then, check the edges with a phone flashlight. If you see a scuff, the insert is rubbing.
Great finishes don’t just happen. I’ve found they come from small, repeatable details. These tiny parts make the biggest difference for your brand.
Your branding must feel intentional. It should never look like a cheap gift. I always match the logo method to the specific surface. You also need plenty of white space.
Pick the right method for your material. In my experience, foil works really well on smooth paper wraps. I use embossing or debossing for leather textures. Screen printing needs the right ink and heat. Ensure metal plaques have clean edges and hidden screws.
Stick to one logo per “moment.” Decide between the outside cover or the inside unboxing view. Too many logos make your box look like cheap swag.
Always define a safe zone for your logo. Keep a clear buffer away from edges and corners. This stops the logo from looking off-center after the box is wrapped.
Organize your design files in layers. Create separate files for foil, embossing, and spot colors. All-in-one files often fail during the production phase.
You must control your colors carefully. Use Pantone numbers or physical swatches. Never trust the colors you see on a computer screen. The Pantone system keeps colors the same across all printers.
When I talk to printers, I mention ISO 12647. This standard keeps your color reproduction very strict. It shows the factory you know your stuff.
Add authenticity cues without creating clutter. Put the serial card under the lid or inside a drawer. Keep it off the main surface. Use a QR code for your warranty or care guide. The GS1 Digital Link is a great standard for this. Place NFC chips where a phone naturally taps. I usually put them in the inner lid corner. Check the NFC Forum for the best tech standards.
Leave enough white space for personalization. Keep a clean area with a set character limit. This ensures custom initials never look cramped or messy.
Scale matters for trust. If your photos hide the size, buyers think it’s tiny. If you miss the finish, they think it’s cheap. I see this mistake often with new brands.
Luxury means removing friction. A great box doesn’t wobble or squeak. I look for clean surfaces and soft contact points. These details prevent scratches on the case or bracelet. The box must stay premium long after day one.
I use a quick test when checking samples. First, I open and close the lid 20 times. I slide every drawer to check the movement. Then, I look at it from one meter away. Real luxury stands out right away if you check these points:
I’ve found drawers work best when your brand story includes accessories. If you offer extra straps, tools, or cards, a drawer keeps things tidy. I often suggest this to avoid a messy top layer.
A drawer is a mistake if it adds new ways to break. I tell my clients to watch their specs for global shipping. You need to avoid these common failure points.
If you are still unsure, just make two prototypes. Build a classic lid version and one with a drawer. Test them both for shipping and unboxing. You will soon see which one fits your price point best.
Scratch prevention needs two things: softness and stability. I usually pick microfiber or suede-like linings. These feel smooth against polished steel. They won’t act like sandpaper when dust gets inside.
Use this logic when you pick materials:
I always run these two quick tests in my office:
If you sell a Watch Jewelry Box for men, watch out. Most returns happen because of “tiny marks.” Picking the right insert is about risk control, not just looks.
I’ve found that pillow fit is about pressure, not watch diameter. You need a pillow that holds the watch firmly. It shouldn’t stretch leather straps or force bracelets open.
I use a simple routine for this.
Close the watch at a normal wrist setting. Then, measure the inside circle.
Pick a pillow that compresses slightly at that size. I often see brands use 55 mm or 60 mm widths. This helps you match different wrist sizes.
Here is how you spot the right fit:
I’ve seen many logos look cheap because they fight the material. This usually comes from poor registration or using the wrong technique. True luxury happens when your branding process matches the surface you use.
I use this simple plan to pick the right method:
I follow two rules to avoid common mistakes. Keep the logo area very calm. Stick to one spot and one finish style. Also, give the logo plenty of room to breathe. Tight margins make even the best foil look rushed.
You should check with groups like the FSEA for design help. Always ask your factory for their line weight limits. Do this before you finish any artwork.
The best watch box makes unboxing feel easy. The watch must stay safe. The finish should feel high-end even after use. Custom touches must look like part of the plan.
I’ve seen luxury feel vanish because of a bad pillow fit. Loud hardware clicks also ruin the mood.
Think of shipping as part of your design. I suggest testing for drops and shakes. Use standards like ISTA 3A or ASTM D4169. Stick to the one your team knows best.
Keep your quality rules on one clear page. Check your stock against these rules every time. I see many brands use ISO 2859-1 for this. It keeps things the same across all your suppliers.
Just submit your email to get exclusive offers (reply within 12 hours)
 PREV
PREV