


 PREV

10 Creative Ideas for Personalized Wedding Thank You Cards
2026-03-20
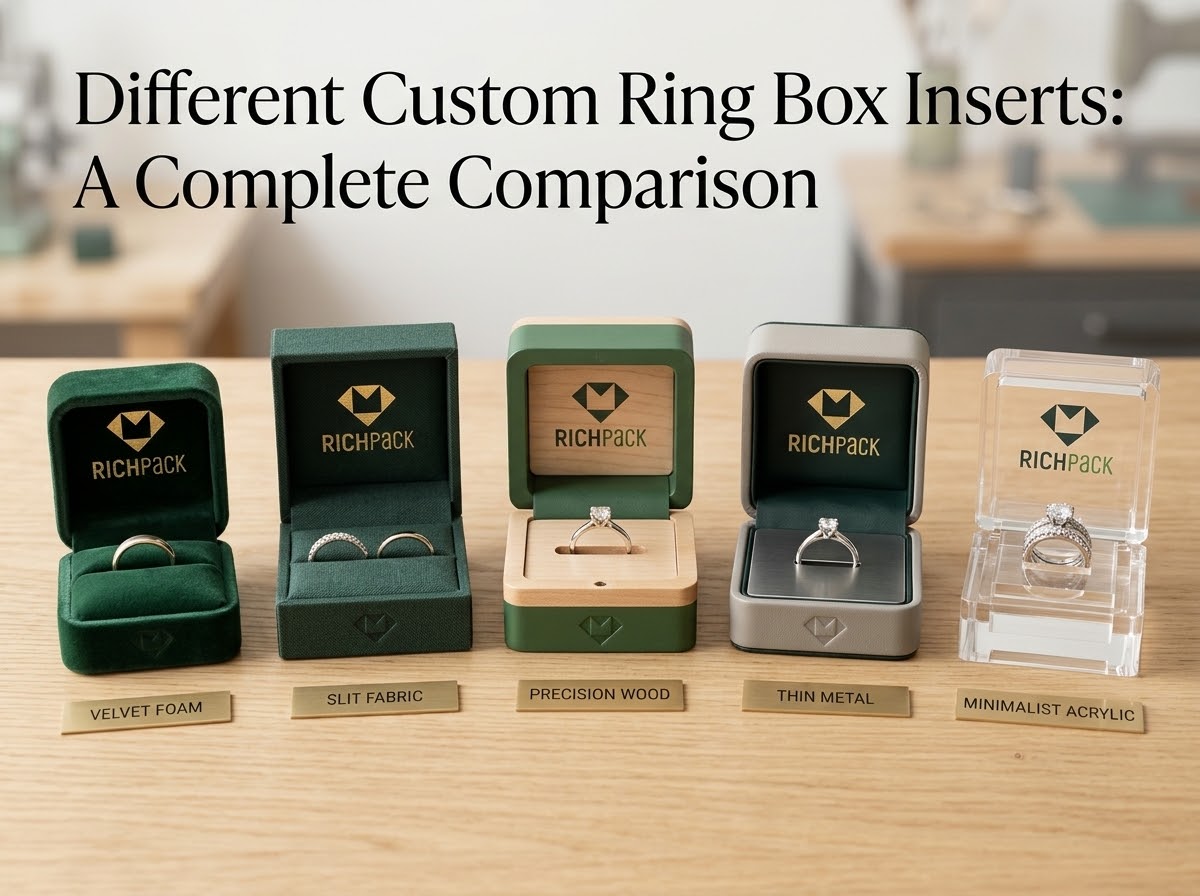



The best ring box insert is not chosen by fabric name alone. It has to hold the ring in the right position, leave the stone and lid clear, feel right when the customer removes the piece, and fit the way the box will be stored or shipped.
That is why a velvet insert can be the wrong answer for one ring and a good finish for another. The structure underneath may be a single slit, split foam, molded cavity, pillow, tray, or modular layout. The core may be EVA, PE, PU, paperboard, molded pulp, or a rigid composite. The surface then changes the touch and visual tone.
The practical rule is simple: choose the retention structure first, the core second, the contact surface third, and the outer box and finish after the physical fit is proven. There is no universal ring insert size that removes the need to check the actual band, setting, stone footprint, and lid clearance.
The comparison below is written for jewelry brands, retailers, manufacturers, and packaging buyers. It covers the main insert types, material trade-offs, ring-specific use cases, sample checks, and supplier brief fields so you can choose a defensible direction before production.
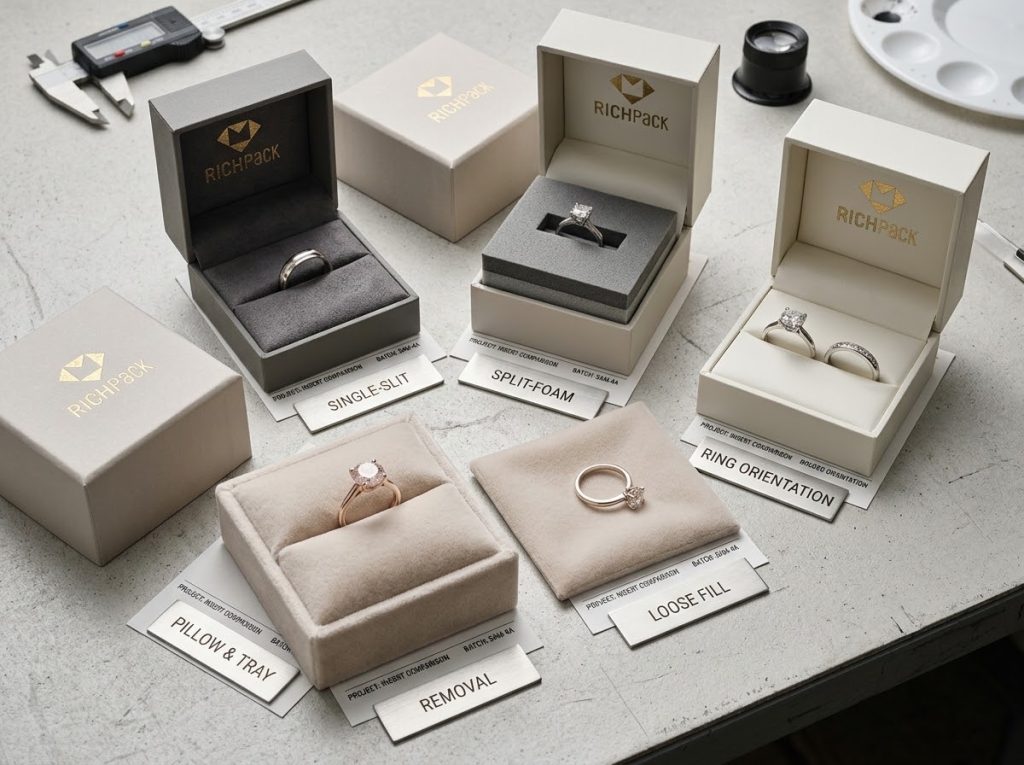
Ring Box Inserts are not one construction. They range from loose padding to fitted cavities that control the ring’s position from the first open to the final removal. Start with the retention system, then choose the core and the contact surface. That order keeps a soft fabric finish from carrying a job it cannot do on its own.
| Insert type | Retention | Removal | Best fit | Main watch-out | Typical commercial use |
| Loose fill and cotton padding | Low to medium | Easy, but less controlled | Light pieces and simple gifting | Can shift or compress | Entry-level or traditional presentation |
| Single-slit card | Medium | Fast when the slit is open enough | A single upright ring | Wide bands and tall settings may bind | Simple retail and event programs |
| Split foam | Medium to high | Good when finger access is planned | Single rings needing a defined hold | Slot pressure must not touch the stone | DTC and fitted presentation |
| Molded cavity | High when matched to the piece | Depends on the cavity opening | Halo, unusual profiles and sets | A poor outline creates a poor fit | Custom luxury and collection packaging |
| Roll, pillow or tray | Medium | Often comfortable for larger layouts | Soft, elevated or multi-piece presentation | Less precise than a fitted slot | Gift sets and display-led programs |
| Modular multi-ring insert | Medium to high | Varies by slot layout | Collections and wedding sets | One module may not fit every SKU | Wholesale and repeat programs |
For brands moving from a comparison to a repeatable program, custom ring boxes for wholesale programs are a separate commercial step after the insert direction is clear. A custom jewelry box insert brief should still name the physical ring, not only the desired look.
Loose fill is the simplest way to create a soft bed for a ring. It works when the piece is light, the box will not be moved much, and exact orientation is not central to the experience. Cotton padding also suits traditional gift packaging where a relaxed presentation is part of the look.
The trade-off is repeatability. Loose material can shift when the box is tilted, compress under handling, or leave the ring sitting lower than intended. For a premium line with several SKUs, that variation makes the opening feel less controlled. Use it only after checking how the actual ring sits in the closed box.
A single-slit insert holds the ring upright by passing the band through a narrow opening. It has a clean visual logic and can be useful when a brand needs a simple, flat construction. It also leaves a clear path for the customer to lift the ring.
The slit still has to match the band and setting. A wide shank may not pass smoothly, while a high setting can sit too close to the lid. Check finger clearance and the ring’s orientation with the actual piece, rather than approving the slot from a drawing alone.
Split-foam inserts use two sides of a foam opening to grip the band. They can give a more fitted feel than loose padding while leaving a defined route for removal. This makes them useful for single-ring boxes that need a stable first view without a complex molded form.
The split should hold the band, not the stone or prongs. If the opening is too tight, the customer may pull on the setting to remove the ring. If it is too loose, the ring can rock inside the box. Test both conditions with the assembled insert and a real piece.
A molded cavity follows the outline of the ring or a small set of pieces. It is a strong direction for halo styles, unusual profiles, and layouts that cannot be reduced to one straight slit. The cavity can also make the product look deliberately framed at first opening.
The benefit depends on the outline being correct. A cavity that follows an old SKU can leave a new stone touching an edge or create too much empty space around a smaller ring. Treat the cavity as a product-specific component and approve it with the current ring.
Rolls, pillows, and trays create a softer, more elevated presentation. They work well when the box needs to show more than one piece or when the brand wants the ring to sit above a flat base. A tray can also give a collection room for coordinated pieces without forcing every item into a narrow slot.
These formats trade precision for openness. They may not hold a light ring as firmly as a fitted slit, and the ring can move if the surface is too soft or the space is too generous. Use them when the display goal supports that movement, then check how the pieces rest after handling.
Modular inserts use more than one slot, cavity, or removable component to support a collection. They help a brand separate wedding sets, stackable rings, or several product families while keeping the outer box consistent.
Modularity does not remove the need for fit checks. Each slot still needs its own ring data, and the opening view should remain balanced when one slot is empty. Map the ring SKUs to the module before approving a repeat-order system.
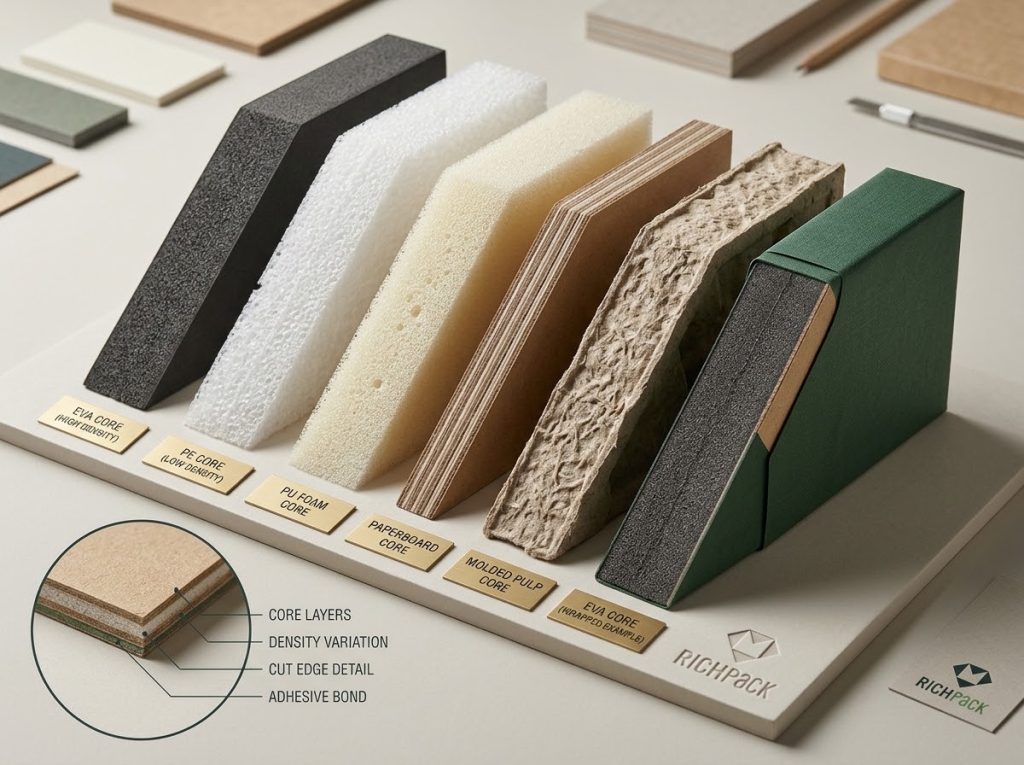
The core gives a custom insert its shape and retention. EVA, PE, PU, paperboard, molded pulp, and rigid cores can all work, but they answer different needs. Compare the ring’s weight, cavity precision, shipping path, desired feel, and end-of-life plan before choosing a material.
| Core | Fit precision | Surface compatibility | Best scenario | Questions before sampling |
| EVA foam | High when cut to the piece | Velvet, faux suede, microfiber and other wraps | Fitted luxury or retail presentation | What grade and cut edge will the sample use? |
| PE foam | High when specified and cut correctly | Soft wraps or functional surfaces | Shipping-heavy or protection-led programs | How does the selected grade behave in the assembled box? |
| PU foam | Medium, depending on density and construction | Fabric wraps and soft linings | Budget-conscious, lighter pieces | How does the sample hold after repeated handling? |
| Paperboard/folding board | Medium for flat or scored structures | Printed paper, fabric or layered board | Light pieces and print-led systems | What happens at folds, edges and contact points? |
| Molded pulp | Shape follows the tool and design | Natural or coated surfaces | Paper-forward or molded presentation | What surface, fiber and end-of-life details apply? |
| Wood or rigid composite | High structural rigidity | Fabric, paper or direct finish | Ceremonial or hard-shell presentation | Are weight, edges, and lining compatible with the box? |
| Hybrid core | Depends on the selected layers | Broad surface choices | When fit and touch both matter | Which layer provides retention and which provides contact? |
EVA is a common choice when the insert needs a clean, repeatable cavity. It can be cut into defined slots and shaped around a ring, then covered with a softer material for the customer-facing surface. That combination supports a controlled presentation without asking the fabric to hold the piece by itself.
Do not treat all EVA as interchangeable. The grade, thickness, cut edge, and wrap affect the assembled result. Ask to see the actual cross-section and check the cavity with the ring before approving the full construction.
PE foam suits programs where the insert must support a more demanding shipping path. It can provide a firm base for a fitted opening while leaving room for a soft contact layer. For e-commerce and export packaging, that balance can be useful when the box will be handled outside a retail counter.
The material name is not a complete specification. Confirm the selected grade, the cavity design, and the way the foam is held inside the box. A sample should show whether the ring stays in place without making removal difficult.
PU foam offers a softer, often more budget-conscious direction. It can work for lighter pieces and designs where the insert does not need a very crisp edge. It is also useful when a softer touch matters more than a sharply defined cavity.
The compromise is consistency over repeated handling. A soft insert can compress or lose its clean profile if the construction is not matched to the ring. Check the sample after repeated opening and closing rather than judging it from a new, unused piece.
Paperboard and folding board work well for flat structures, printed layers, and light jewelry. They can make the insert part of the brand story because the surface can carry color, copy, or a simple pattern. They are a practical choice when the product does not need deep cushioning.
Paper-based does not automatically mean recyclable or lower impact. The complete construction may include coatings, adhesives, fabric, or mixed layers. Ask what the finished insert contains and how the local waste stream handles it before making a public claim.
Molded pulp can create a shaped insert with a paper-forward appearance. It fits brands that want a natural visual language and a molded form rather than a loose paper pad. Its surface and edge quality matter as much as its material story when it sits next to a fine ring.
Check the actual fiber finish, contact points, and end-of-life instructions. A molded piece may need a surface treatment or a separate soft contact layer, depending on the ring and presentation goal.
Wood and rigid composite cores add a hard, substantial feel. They can suit ceremonial packaging, limited collections, or a box designed to become a keepsake. Their rigidity also changes the weight and the way edges meet the ring and the outer box.
Review the lining, edge treatment, cavity depth, and closure together. A hard core with an unfinished edge can create a worse contact point than a softer material, even when the outer box looks premium.
Hybrid construction separates two jobs. The core provides shape and retention; the wrap provides color, touch, and a finished appearance. For many custom jewelry box ring inserts, this is the clearest way to balance product fit with a polished opening.
Specify the layers separately. Name the core, contact surface, attachment approach when known, and sample checks that will decide approval. This prevents “velvet insert” from hiding the structure underneath.
A surface finish controls touch, color, and perceived polish. It does not replace the core, slot, or cavity geometry. Choose the retention system first, then compare the contact surface for fiber behavior, edge quality, color, and the way it frames the ring.
Velvet gives a classic jewelry presentation and can make a ring look warmer and more ceremonial. The pile direction also changes how the color reads under light, so a sample should be viewed from the angles customers will see when the lid opens.
Velvet is still a surface. It needs a core and a slot or cavity that hold the ring in place. Check the pile at the slot edge, the way it wraps around corners, and whether the finished layer changes the available space.
Faux suede and microsuede offer a softer, more even look for modern luxury packaging. They can suit a restrained palette or a minimal box where the surface should feel refined without a strong sheen.
Review the color under the intended lighting and inspect the cut and wrapped edges. The best-looking swatch may not be the best choice once it is folded around a tight cavity or placed beside a contrasting outer box.
Microfiber can create a smooth contact face with a clean, contemporary feel. It is useful when the brand wants a low-sheen surface and a consistent visual field around a small ring.
Do not use “microfiber” as shorthand for anti-tarnish or chemical protection. Those claims require a defined active layer, test method, and exposure scope. A soft contact surface alone does not establish that performance.
Felt is practical and can fit cost-conscious packaging or a deliberately simple visual language. It is easy to understand as a soft layer and may work well for lightweight pieces when the cavity does most of the holding.
Its edge and fiber quality need attention. Look for visible fuzz, loose fibers, and a surface that changes shape when the ring is removed. If the brand promises a polished luxury feel, compare felt with a more controlled finish on the actual insert.
Cotton and satin-like linings create a soft, gift-oriented presentation. They can be appropriate for ceremonial packaging or a padded layout where the ring is not expected to sit in a narrow, fixed slot.
They are less suited to a system that needs the same ring position across many units unless the supporting structure does that work. Test the assembled insert, not the fabric alone, and check whether the surface shifts when the ring is removed.
Bare foam or bare board can be the right choice for a sample, a transit-focused pack or a program where function matters more than tactile luxury. The cleanest construction is sometimes easier to inspect before adding a finish.
For a customer-facing ring box, an unfinished surface may make the packaging feel temporary. Decide whether the box is meant to present the jewelry, protect it in a shipper, or do both, then choose the finish that supports that job.
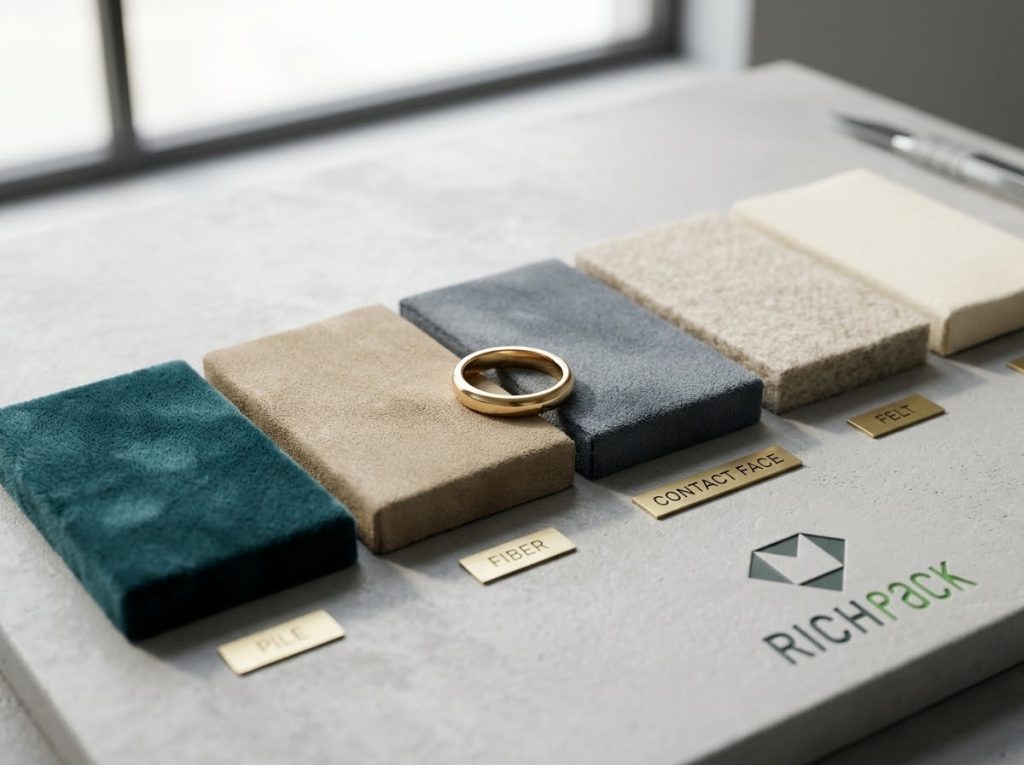
Compare an insert by what the ring does inside the box, not by the material name alone. A good choice holds the ring in the intended position, lets a customer remove it without touching the stone, leaves room for the lid to close, and stays presentable through normal handling. The same insert also needs to fit the outer pack and remain repeatable when a collection is reordered.
Retention means the ring stays where the brand placed it. Look for rocking, rotation, or a ring that leans after the closed box is picked up and set down. A slot that feels tight when empty may still fail if the ring’s band is tapered or if the stone shifts the center of gravity.
Check the actual ring in the assembled insert. Hold the box at the angle a customer would use, then open it and compare the ring’s position with the approved presentation. Record the result as a simple observation, such as stable, slight movement, or needs revision. This gives the supplier a useful target without pretending that one insert has a universal tolerance.
An insert can hold a ring too well. If the customer must pull on the setting or pinch the stone to remove the piece, the retention design has become a handling problem.
Leave a clear finger path beside the band. Test removal with someone who did not design the box. That person will reveal whether the slot is obvious, whether the ring can be lifted without scraping the contact surface, and whether the motion matches the intended unboxing moment. For high-value pieces, the safest removal point is usually the band, not the prongs or the stone.
The tallest point of the ring controls the usable height of the package. Measure the setting and stone profile, then close the finished box with its real lining and closure in place. A cavity that looks correct on a drawing can become too shallow after the insert is wrapped or compressed into the box.
Look for lid rub, pressure marks, or a closure that needs extra force. Record the ring’s highest point and the assembled insert height together. RichPack’s jewelry box measurement guide can serve as a broader measurement reference, while the ring-specific check still needs a physical sample.
The contact surface should feel soft, clean, and consistent at every point that touches the ring. Run a finger over the slot or cavity edge. Loose fibers, rough cuts, exposed adhesive, or a hard point under the wrap deserve correction before production.
Do not treat a soft fabric as proof of protection. Velvet, faux suede, microfiber, and felt each behave differently when wrapped around a core. The sample should show how the surface turns around corners, how it meets the slot, and whether any edge can catch a prong. A simple contact inspection is more useful than a broad claim that one finish is always safer.
The insert controls the first view when the lid opens. The ring should face the intended direction, sit at the planned height, and remain centered enough for the box to feel deliberate. A ring that leans or disappears into a deep cavity changes the presentation even when the fit is technically secure.
Photograph the open box from the customer’s eye level and from the sales associate’s counter angle. Compare the two views. If one angle hides the center stone or makes the box look empty, adjust the slot, the insert height, or the box depth before refining the artwork.
One opening proves very little. Open and close the sample enough times to see whether the foam compresses, fabric shifts, adhesive lifts, or the cavity loses its shape. The purpose is to expose visible change, not to claim a laboratory life cycle.
Use the same ring and the same closure for each material comparison. Otherwise, a better-looking result may come from a different box fit rather than the insert itself. Record any change in ring position, surface appearance, or closing effort so the next revision addresses a physical issue.
The closed ring box and its shipper work as one pack-out. Place the finished box in the planned outer pack and check whether it slides, rattles, or leaves a large void. A stable insert cannot solve a loose outer pack by itself.
Use a documented tilt and handling check for early samples. It is a practical screening step, not an ISTA certification or a substitute for a qualified transport test. If the pack-out changes later, repeat the check because a new void, filler, or shipper size can change movement.
For a collection, the approved sample must become the reference for later orders. Save the key internal dimensions, insert core, surface, color, logo position, and closure together. When a new SKU is added, compare its ring geometry with the approved insert family instead of assuming the old slot will work.
| Criterion | What to observe | Failure symptom | Buyer action |
| Retention | Ring stays in its intended position | Rocking, rotation, leaning | Adjust slot or cavity around the real ring |
| Removal | Finger reaches the band without force | Pulling stone or prongs | Add finger clearance or change orientation |
| Clearance | Lid closes without contact | Rub marks, pressure, hard closure | Recheck setting height and assembled insert |
| Contact | Edges and surface are clean | Fibers, rough cuts, hard points | Review wrap, cut edge, and adhesive |
| First view | Ring is centered and upright | Stone hidden or box looks empty | Rework insert height or slot angle |
| Handling | Appearance holds through repeated opens | Compression or fabric shift | Compare core and construction again |
| Outer pack | Closed box stays controlled | Rattle or large void | Rework shipper, filler, or pack-out |
| Repeatability | Approved specification is usable again | New batch looks or fits differently | Keep a golden sample and revision record |
Match the insert to the ring’s widest, tallest, and most exposed features, then match the presentation to the sales channel. A solitaire, a high halo, a wide band, and a two-ring set should not be forced into one slot profile. Start with the piece record, choose the retention direction, and only then refine the outer box.
A single upright slot is often the clearest starting direction for a solitaire. It keeps the band visible, gives the stone a defined first view, and leaves a simple path for removal. The slot still needs to match the band shape and the setting height. A narrow band with a tall setting and a wide band with a low setting may need different cavity proportions even when both are sold as single rings.
High settings and halo outlines need more attention to the side profile than a flat top view suggests. Measure the highest point and the full stone or halo footprint. Then close the finished box with its actual lining and closure. If the halo reaches the side wall or the lid lining, the cavity needs revision before the fabric color or logo is approved.
For broader material and presentation decisions, readers can continue to RichPack’s diamond engagement ring box selection guide. The focus here is the insert fit and the physical checks behind it.
Wide bands need a slot opening that supports the shank without forcing it into the foam or fabric. Measure the widest point, not only the nominal ring size. Check whether the band tapers, carries a raised pattern, or has a surface that should not press against a rough edge.
Avoid copying a single “wide ring” number into every project. The usable opening depends on the core, wrap, band profile, and how the ring is presented. A real sample gives a clearer answer than a generic range.
Two rings need separation as well as horizontal space. The insert should keep the pieces from striking each other while preserving a coordinated opening view. Test both rings together, including the wider band, the highest setting, and the order in which the customer is expected to remove them.
A two-slot insert can look balanced in an empty box but become crowded when both rings are loaded. Mark each slot in the sample record and check metal contact at the divider.
A slim proposal box prioritizes a low profile and controlled opening. The design still needs enough height for the setting, a closure that stays shut, and a removal path that does not require the customer to pinch the stone. Do not treat “slim” as a fixed dimension. Confirm the ring height, insert thickness, and lid construction together.
Stacked or multi-ring collections benefit from a modular layout when the pieces share a clear family of dimensions. Map each SKU to a slot position and record the orientation. If one ring has a taller setting or a wider band, give it a dedicated cavity rather than weakening the fit of every other piece.
Modular does not mean one-size-fits-all. It means the supplier can understand which insert variant belongs with which SKU and which outer box.
Retail display favors a clean first view and fast handling at the counter. DTC shipping adds outer-pack movement and repeated courier handling. Luxury programs may give more weight to tactile finish and presentation, while wholesale programs need repeatable specifications across batches and collections.
| Ring/scenario | Insert direction | Priority check | Avoid when | Sample note |
| Solitaire engagement ring | Single upright slot or fitted cavity | Stone view and band removal | Setting touches lid | Load the actual ring |
| High-setting or halo | Deeper or shaped cavity | Highest point and side footprint | Halo reaches wall | Close finished box |
| Wide band | Wider slot or custom cavity | Shank support and edge contact | Slot compresses surface | Measure widest point |
| Double or wedding set | Separated two-slot layout | Metal contact and coordinated view | Divider crowds rings | Test both rings together |
| Slim proposal | Low-profile fitted insert | Closure and removal access | Height is guessed | Confirm insert and lid stack |
| Multi-ring collection | Modular slot family | SKU mapping and orientation | One slot forced across SKUs | Keep variant record |
| Retail/DTC/wholesale | Channel-specific fit plus outer pack | Presentation, movement, repeatability | One priority assumed for all | Approve pack-out and sample |
An insert works only when its assembled thickness, orientation, and closure fit the outer box. Set the physical fit first. Then specify brand color, logo, and finish so artwork does not hide a structural problem. RichPack’s jewelry box range can be used as a category starting point, while the final insert decision still depends on the ring and assembled sample.
Internal dimensions describe the usable cavity. External dimensions include the walls, wrap, lining, hardware, and closure. The two sets answer different questions. Inside dimensions determine whether the ring and insert fit. Outside dimensions affect the shipper, shelf footprint, storage, and freight planning.
Write both sets in the brief, and identify whether a value belongs to the empty box, the wrapped insert, or the finished assembly. This prevents a supplier from treating an outside measurement as the ring cavity.
The slot should face the direction the customer sees first. Orientation also affects how the band is held and how much finger room is available. Mark the front, back, hinge side, and opening direction in the sample drawing or photo.
If an insert can be rotated, test both orientations. A reversible insert may fit physically but create a weaker presentation or make removal awkward.
Hinged, magnetic, drawer, and two-piece structures each change the relationship between the insert and the lid. A hinge can limit the opening angle. A magnetic lid can add lining thickness near the top. A drawer can change the pull path and the first view.
Choose the opening structure with the assembled insert in mind. Do not approve a box shell first and hope a later insert will fit the remaining space.
Keep physical and visual approvals separate. The sample should first prove slot fit, cavity shape, lid clearance, and removal. Then approve fabric color, logo location, print, foil, emboss, and texture as individual fields.
For broader structural decisions, RichPack’s packaging design and structural engineering service can sit beside the insert brief. A logo page such as custom jewelry boxes with logo is a route for brand discussions, not proof of a specific finish, price, or delivery promise for this project.
Paperboard and molded pulp can support lower-plastic packaging directions, but the claim must cover the complete package. Check the core, coating, adhesive, wrap, ink, and end-of-life route together. A paper-looking insert is not automatically recyclable or compostable in every market.
The physical sample still needs to pass the same fit and contact checks. A sustainability preference does not remove the need to protect the ring or make it easy to remove. For a material-specific follow-up, see RichPack’s paper packaging solutions.
A common outer box with interchangeable inserts can support a collection when the ring family shares compatible dimensions and presentation rules. Define the insert variant, SKU list, orientation, and approved finish for each combination.
The practical test is simple: can a new operator identify the right insert without guessing? If not, the system needs clearer labels, a narrower SKU family, or a different cavity plan.
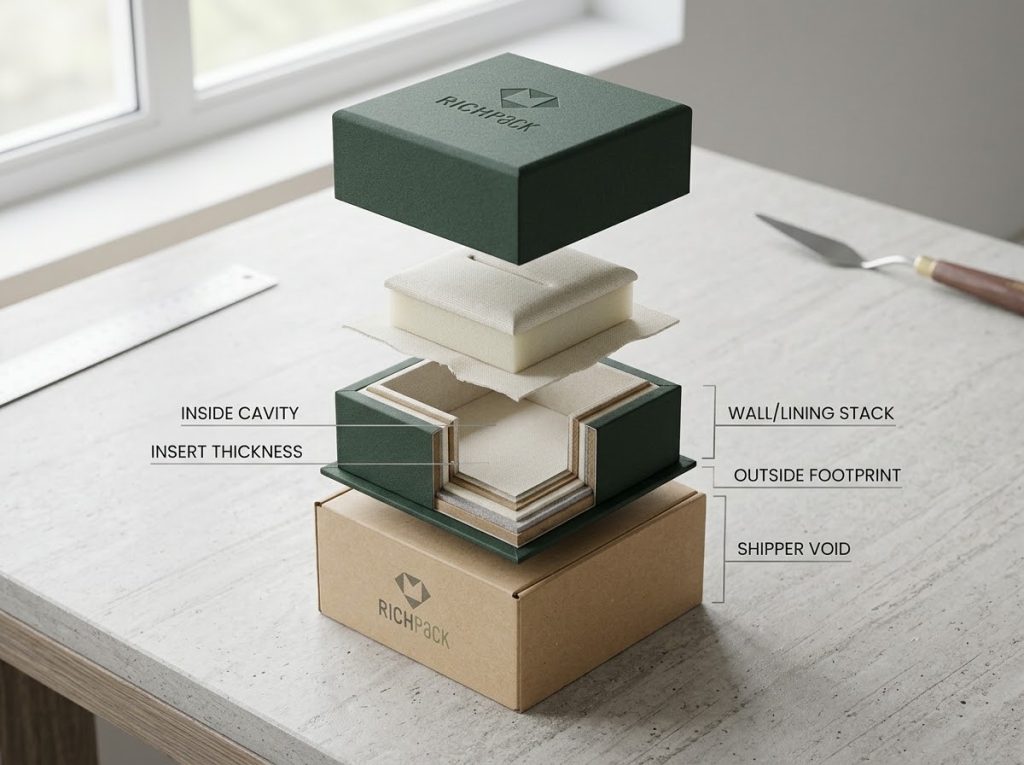
Do not approve a ring box insert from a rendering or an empty box. The real ring, assembled insert, closed lid, outer pack, and removal path all need a check. A simple sample gate catches fit problems before they become a production problem. RichPack’s custom services can be a later discussion once those physical requirements are documented.
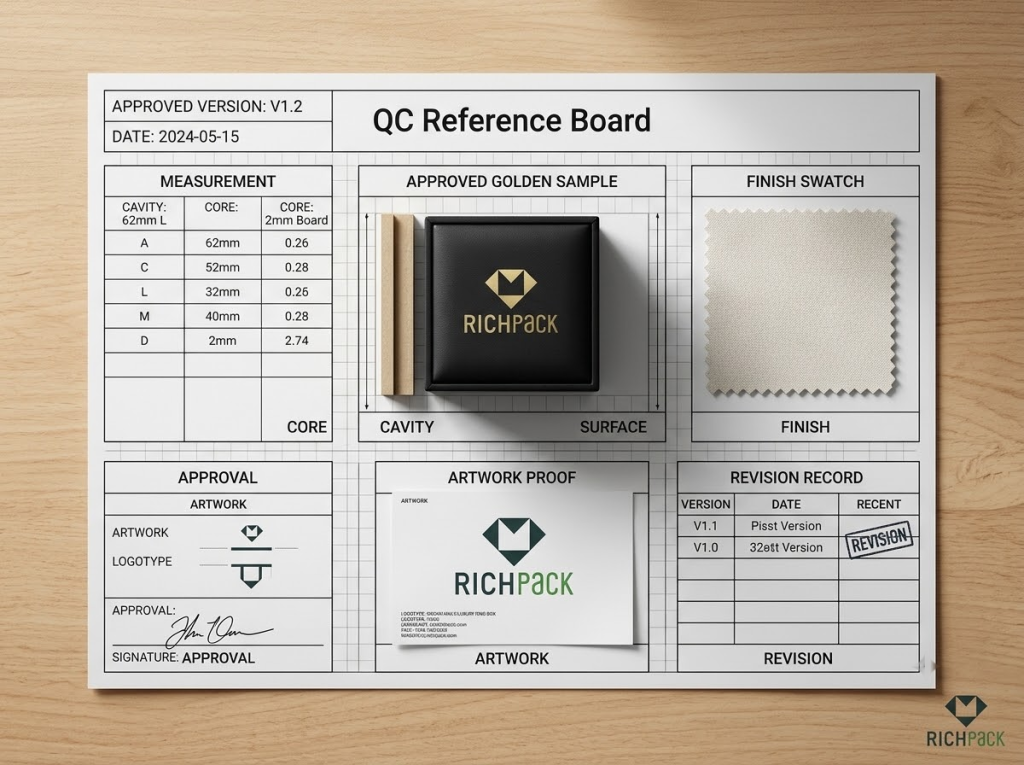
Start with the jewelry, not the box. Record the SKU, ring orientation, band width at its widest point, the highest point of the setting, and the outer footprint of the stone or halo. Add a reference photo or drawing that shows the same view the supplier will use.
This record keeps a small change from becoming a hidden fit change. A wider shank can need a different slot. A taller setting can need more space under the lid. A halo can need more room at the sides even when the band itself is narrow. Write those facts beside the SKU instead of relying on a product name such as “engagement ring.”
If the collection has several ring shapes, group them only after you compare the physical records. A shared insert can work for a true family of products, but the name of the collection does not prove that the pieces share one cavity.
A paper or white sample is a fast way to check proportions before you pay for final fabric, color, or decoration. Look at the internal cavity, slot position, wall clearance, lid height, and the way the ring faces the customer.
The sample does not need to look finished. It needs to answer a physical question: can the proposed geometry hold the ring without forcing the stone, prongs, or band into the box? Mark every change on the sample or on a dated drawing. A casual verbal request is easy to lose when the insert, box, and artwork are developed by different people.
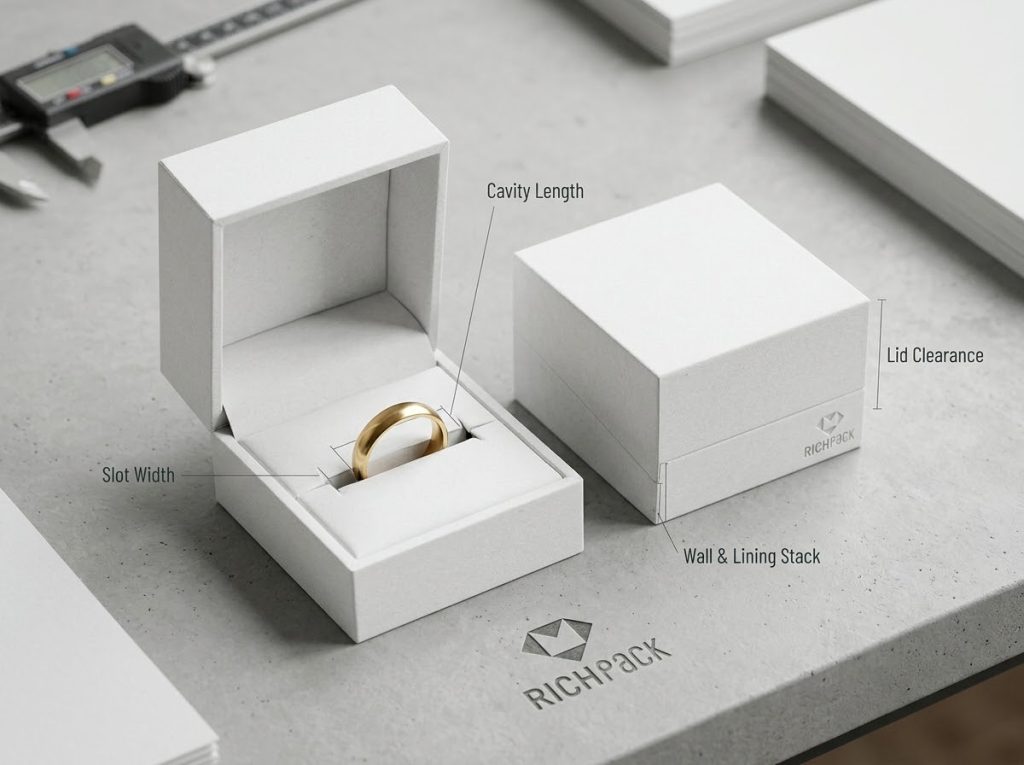
Load the actual ring into the actual insert. Do not test an empty cavity and assume the jewelry will behave the same way. Check whether the ring stays in its intended position, whether the slot grips the band rather than the setting, and whether the customer can remove it without pulling on the stone.
Check the contact surface as well. Look for rough cut edges, loose fibers, exposed adhesive, hard points, or a wrap that shifts when the insert is handled. A soft surface can still create a problem if the core beneath it is too loose or the fabric is not held cleanly at the edge.
Repeat the fit check with every ring that the insert is meant to serve. If a single cavity is supposed to cover several SKUs, use the smallest, widest, tallest, and most detailed pieces in that group. A sample that fits one easy ring is not evidence that the whole family fits.
Close the box slowly, then open it and inspect the lid lining, stone, prongs, and insert edges. Repeat the movement several times. The lid should close without pushing the ring down, catching on a setting, or lifting the insert out of its seat.
The most useful observation is often visible on the contact surfaces. A rub mark on the lining, a flattened pile, a dent over the setting, or a shifted insert tells you that the assembled height is wrong. Record the condition of the box open and closed. External dimensions cannot show this problem by themselves.
Use a documented handling check to see what happens when the closed box is tilted and moved by hand. The purpose is to find obvious rocking, rotation, or escape from the slot. This is a practical packaging check, not a laboratory transport certification.
Photograph the ring before and after the check. Record the direction of movement and the point where the ring loses its intended position. If the ring moves, first inspect the slot or cavity, then the insert’s fit inside the box, and finally the empty space in the outer pack. Changing the fabric alone may not solve a structural problem.
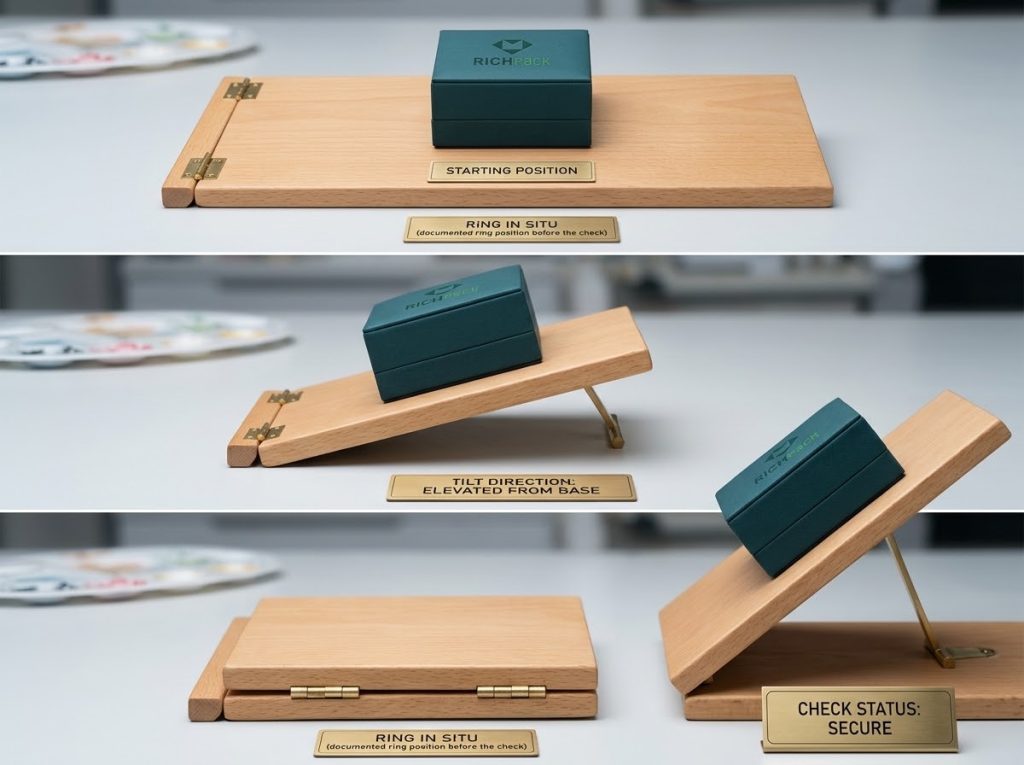
Ask someone who did not design the insert to open the box and remove the ring. Watch where that person touches the package, how long it takes to find the grip point, and whether the ring is still facing the intended direction after removal.
The first view and the removal path can disagree. A slot may make the ring look perfectly upright but leave too little room for fingers. A deep cavity may protect the setting but force the customer to pinch the band at an awkward angle. Record both outcomes. The better choice is the one that supports the product and the human action that follows the opening.
Put the closed ring box into the planned shipper, mailer, tray, or display footprint. Confirm that the outside package holds the box in the intended position and that the insert does not shift when the box is packed with the other components.
This check separates two jobs. The insert controls the jewelry inside the presentation box. The shipper controls the space around that box. A well-fitted ring insert cannot correct a large empty area in the outer pack, and a tight shipper cannot fix a loose ring inside the presentation box.
For retail programs, check the front, side, and top views on the intended tray or shelf. For DTC programs, check the closed pack, void space, and the order in which the customer sees the box. Keep the observations qualitative unless a qualified transport test has produced a report. RichPack’s packaging manufacturing service can be a later supplier discussion once the physical requirements are defined.
When the fit is approved, keep a dated golden sample and a matching record. The record should name the ring SKU group, insert type, core, surface, key dimensions, box structure, closure, artwork, and the revision date.
The sample protects the next order from memory-based changes. A fabric color can look close while the slot has changed. A new cutting file can preserve the outline but change the edge or cavity depth. Compare the next pre-production sample with the approved sample before the run starts, and record any accepted difference. RichPack’s quality system is a relevant next page for a buyer preparing these inspection questions; it is not evidence of a test performed for this project.
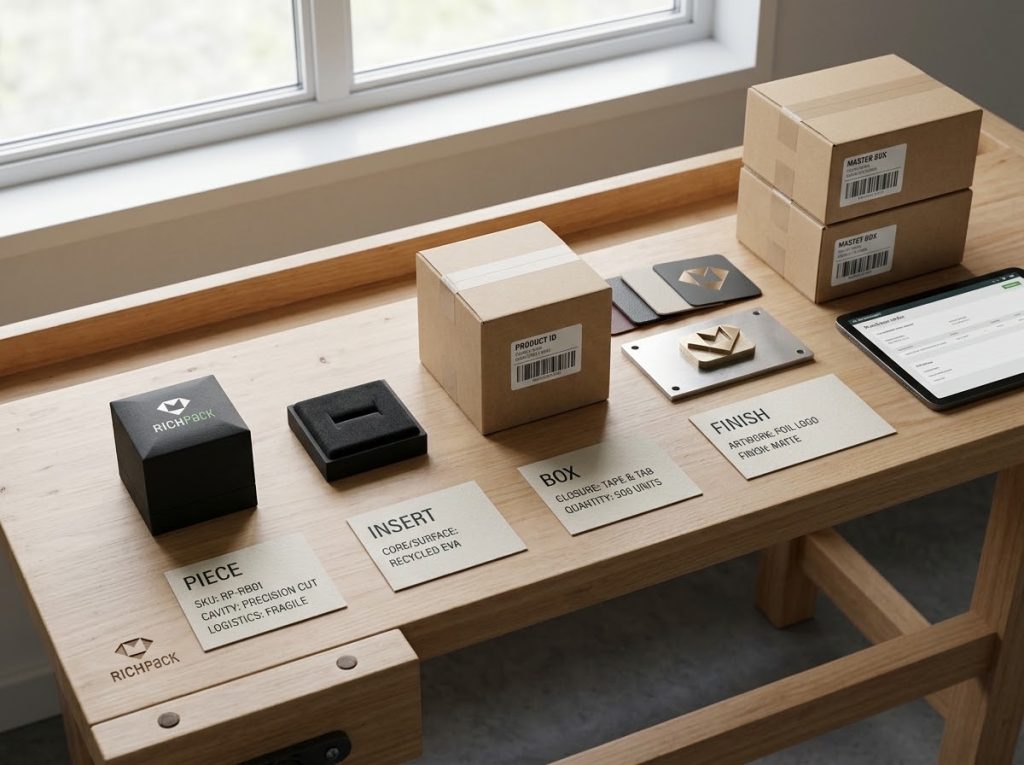
A supplier-ready brief separates the ring, the insert, the box, the finish, and the approval or logistics fields. That structure prevents a supplier from guessing which dimension belongs to the jewelry and which belongs to the assembled package.
List the SKU, quantity per set, ring orientation, band width, highest setting point, stone or halo footprint, and any surface sensitivity that affects the contact material. Attach the most current photo or drawing and state whether it represents the production piece or an early sample.
If the brief covers several SKUs, use one row per product family and explain the grouping rule. “All bridal rings” is too broad if the group includes a low solitaire and a tall halo. A supplier can only validate a shared insert when the physical range is visible.
Name the construction first: single slit, split foam, molded cavity, pillow, roll, tray, or another defined layout. Then name the structural core and the contact surface separately. For example, “custom cavity, EVA core, faux suede wrap” tells the supplier more than “premium velvet insert.”
Add the retention goal, removal requirement, ring orientation, and whether the insert is fixed, removable, or part of a modular system. Ask for a cross-section or assembled sample when the surface covers a different core. A material list without the layer order is incomplete.
Record internal dimensions first. Then record external dimensions, wall and lining stack, lid or drawer structure, closure, and the space needed for the insert to seat correctly. Keep the inside and outside measurements on separate lines so a supplier does not treat the external footprint as usable cavity space.
State what must remain clear when the box is closed. For a tall setting, that may be the lid lining and the highest point of the stone. For a double-ring layout, it may be the space between the two slots. The brief should describe the physical check, not only a target number.
Separate color, logo method, print, foil, emboss, texture, fabric direction, edge treatment, and artwork approval. These are finish decisions. They should not hide a change to the cavity or slot.
Describe the intended first view in plain terms. For example, the ring may need to face forward when the lid opens, or the insert may need to align with a logo on the inside lid. A small diagram can remove more ambiguity than a long email.
List the initial quantity, expected reorder pattern, destination, target delivery window, sample rounds, and the person who approves each stage. Keep MOQ, price, production lead time, freight method, and any certification as supplier-confirmation fields unless you have a current written quotation or certificate in scope.
For an adjacent packaging format, wholesale small jewelry gift boxes can help a buyer compare how product, quantity, and approval questions are framed. It does not establish a quote or MOQ for this insert project.
Use a simple handoff table:
| Field | Example entry to provide | Why the supplier needs it | Confirm at sample stage |
| Ring piece | SKU, band width, setting height, stone footprint | Defines the physical object | Yes |
| Insert | Type, core, surface, orientation, retention goal | Defines the holding system | Yes |
| Box | Internal cavity, external size, closure, lining | Defines the assembled package | Yes |
| Finish | Color, logo, surface, edge and artwork files | Defines the visible experience | Yes |
| Logistics | Quantity, destination, shipper, approval dates | Defines the handoff and timing questions | Yes |
Most insert failures come from comparing the wrong layer or approving the wrong evidence. Return to the physical ring, assembled insert, and closed box before changing the material.
Velvet can give a ring box a rich surface, but the fabric does not define the slot, cavity, or core beneath it. Ask what holds the ring, how the edge is finished, and how the insert is fixed in the box. A premium surface over a weak structure still produces a weak fit.
External dimensions help with shipping, shelf planning, and storage. They do not tell you whether the ring has enough usable space inside. Record internal dimensions, insert thickness, lining, and closure clearance before comparing outside footprints. RichPack’s standard jewelry box dimensions reference can support the broader measurement conversation, but it does not replace a ring-specific sample.
Supplier pages often show familiar starting ranges. Those numbers can help you request a first sample, but they do not replace the ring’s actual geometry or the assembled insert. Mark the source and date of every reference, then verify the fit with the production piece.
A ring can fit the slot and still touch the lid. Measure the highest setting or stone point, then close the box with the final lining and closure in place. A lid-rub mark is a fit failure, even when the outside box size looks correct.
Artwork and outer-box shape can be attractive before the physical fit is solved. That order creates rework when the insert needs more height, a different orientation, or a wider slot. Lock the ring record and insert direction first, then finalize the box and finish.
One insert can support a collection only when the SKUs share a real physical range and the same opening experience. If a wide band, a tall halo, and a slim proposal ring need different retention, group them into separate families. Fewer well-defined insert families are easier to sample and reorder than one compromised universal layout.
Start with a fitted single-slot or cavity insert that holds the band while keeping the setting and stone away from the lid. EVA or PE can provide a stable core, while velvet, faux suede, or microfiber can provide the contact surface. The final choice depends on the ring’s widest point, setting height, stone footprint, opening direction, and how much handling the box will receive. Approve it with the actual ring in an assembled sample.
They answer different questions. Foam is usually the structural core that creates the slot or cavity. Velvet is usually a surface finish that changes touch and appearance. A velvet-wrapped foam or board insert can combine both roles, but velvet alone does not prove that a ring will stay upright or clear the lid. Compare the complete construction rather than treating velvet and foam as direct substitutes.
Only when the SKUs share a real physical range and the same opening experience. A wide band, tall halo, slim proposal ring, and double-ring set often need different slot widths, cavity outlines, or heights. Group products by measured geometry, then test the smallest, widest, tallest, and most complex piece in each group before approving a shared insert. RichPack’s custom jewelry box inserts for organization is a related resource for broader insert layouts, while the decision here stays focused on ring fit.
Custom inserts are useful when product movement, first-view alignment, or SKU consistency affects the customer experience and the cost of rework. They are especially helpful when an online order travels through several handling points or when a collection needs a repeatable presentation. A simple custom slot may be enough; a complex cavity is not automatically better. Start with the failure you need to prevent and validate the simplest structure that solves it.
Record the band at its widest point, the highest point of the setting or stone, the outer footprint of the stone or halo, and the intended orientation in the box. Then measure the assembled insert and the box’s usable internal space, including lining and closure clearance. Keep internal and external dimensions separate. Use the measurements to create a sample, not as a promise that one number fits every ring.
An ordinary velvet, foam, felt, or microfiber surface should not be described as an anti-tarnish system by itself. Tarnish protection depends on the actual materials, active treatment, exposure conditions, and test method. If tarnish control matters, ask the supplier what active layer or treatment is present, what was tested, for how long, and under what humidity or exposure scope. A soft surface can protect against contact marks while providing no oxidation control.
Ask the supplier to confirm the insert type, core, contact surface, cavity or slot, ring orientation, internal and external box dimensions, closure clearance, finish, artwork, sample stages, quantity, destination, and approval gates. Keep MOQ, price, lead time, capacity, certification, and transport test scope as written confirmation fields. A supplier who receives the ring record and the assembled sample can answer more accurately than one who receives only a box size and logo.
Choose ring box inserts in layers. Start with the ring’s geometry and the retention structure. Select the core that can hold that geometry, then choose a contact surface that fits the brand and handling path. Confirm the assembled insert inside the closed box before you commit to final artwork or a production quantity.
For a wholesale or multi-SKU program, keep one record for the ring, one for the insert, one for the box, and one for the outer pack. A white sample, an assembled fit check, a closure check, a movement check, and a golden sample will give the buying team a clearer decision than a material name alone.
RichPack can be the next step when you need to turn that record into a custom jewelry packaging brief. The project still needs to confirm its own materials, dimensions, quantity, price, lead time, and test scope. The useful starting point is the same: send the actual ring requirements, define the insert layers, and approve the physical sample before scaling. For a separate example of RichPack’s packaging work, see the Majorica jewelry box case; do not treat that case as proof of results for a new insert project.
2026-03-20

2025-08-18
2026-03-24
2025-06-21
2024-12-02
2026-01-07
Clear Gift Boxes for Sleek Presentation | Transparent Boxes for Gifts Customizable Clear Plastic Gift Boxes with Lid Options
View More
Custom Proposal Ring Box Light Ocean Blue Velvet | Bulk & Custom – Richpack
View More
Eco-Friendly and Sustainable Zero-Waste Jewelry Packaging Sets with Recyclable Components | Sustainable Solutions for Jewelry Brands | Richpack
View More
Jewelry Box with Hanger for Necklaces | Beige Fabric – Richpack
View More
Luxury Themed Jewelry Packaging Sets for Weddings and Special Events | Elegant, Custom Packaging Solutions for Memorable Jewelry Presentations
View More
Personalized Packaging for High-End Tech Products | Designed for Technology Brands Requiring Elegant and Secure Packaging with Branded Elements
View More

