


 PREV

2024 Ranking the 10 Best Sustainable Jewelry Packaging Brands
2024-11-26
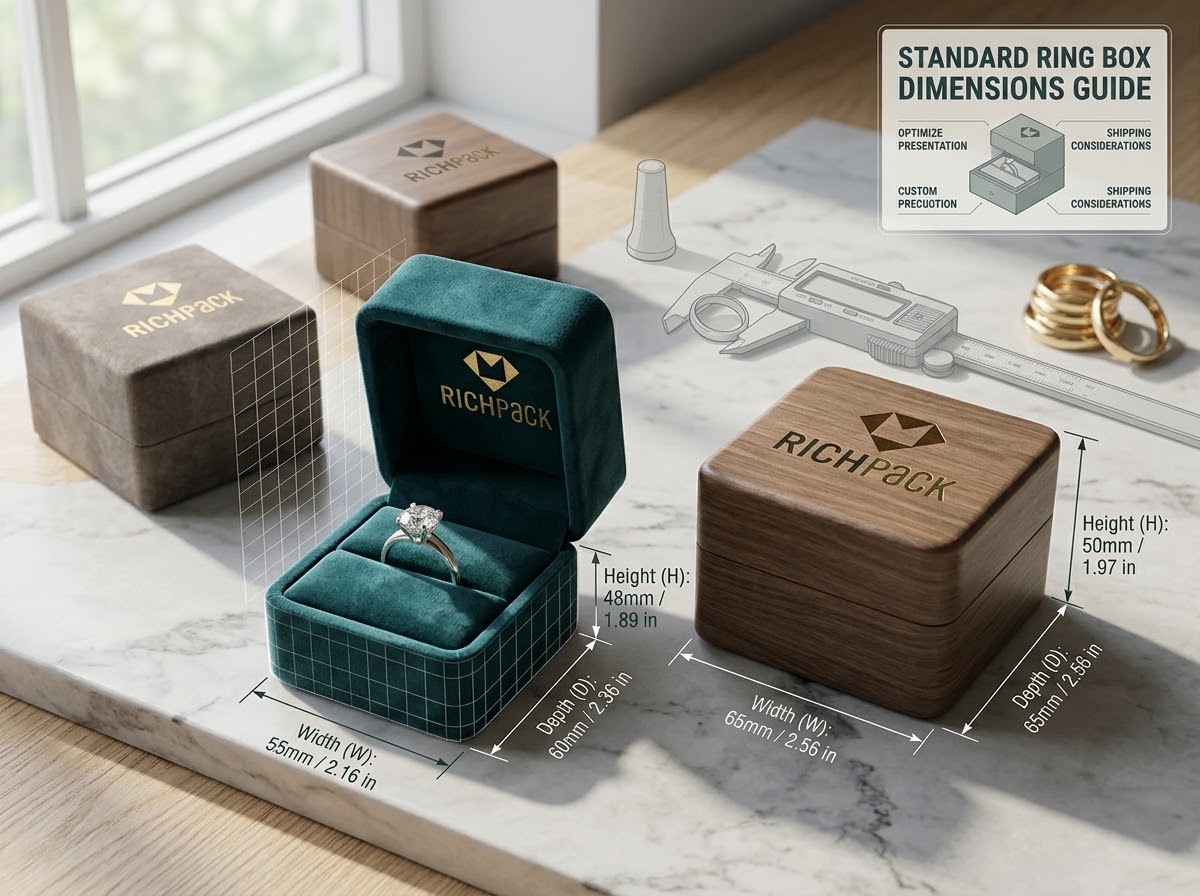



Ring box dimensions are the length, width, and height of the box. A common single-ring starting point is 2 × 2 × 1.5–1.75 inches (50 × 50 × 40–45 mm), but the final size must follow the ring style, insert, lid clearance, and closure.
The first question is whether the reference describes the inside cavity or the outside shell. Inside dimensions control fit. Outside dimensions control display, storage, and shipping. A box can match a catalog number and still press a high setting. It can pinch a wide band. It can let a narrow ring move in a large cavity.
Use these checks to choose a first sample and measure the ring and insert. Inspect the closed box. Then prepare a supplier-ready dimension brief for single rings, slim proposals, wedding sets, high-setting rings, retail collections, and e-commerce packs.
Start with the ring and its insert, not one catalog number. There is no universal size for every solitaire, proposal ring, wedding set, or high-setting design. For a typical single ring, use about 2 × 2 × 1.5–1.75 in, or roughly 50 × 50 × 40–45 mm, as a first sample only. Confirm whether the figures describe the inside cavity or outside shell, then check the ring, insert, lid, and closure together. Once fit is defined, a branded program can move into custom ring boxes for wholesale programs brief.
The single-ring range gives one ring and a small cushion or slot as a comparison point. The Packaging World, Dream Custom Boxes, and Custom Box Makers publish similar starting references. They do not always define the measurement the same way. Treat the range as a planning reference, not a required standard. Sources report the product, internal cavity, or finished outside dimensions, so similar numbers can describe different parts of the box.
| Ring box scenario | Starting reference | What to verify before approval |
| Single ring | About 2 × 2 × 1.5–1.75 in (about 50 × 50 × 40–45 mm) | Inside versus outside definition, insert fit, lid clearance, and ring movement |
| Slim proposal box | A low-profile reference is around 2 × 2 × 0.75 in (about 50 × 50 × 19 mm) | Stone height, closure pressure, pocket handling, and easy ring removal |
| Double-ring wedding set | No fixed number; plan for two positions and added width | Both band widths, slot separation, removal order, and metal-to-metal contact |
| High-setting or halo ring | Use the ring footprint as the starting point, then add height for the tallest feature | Highest point, halo outline, side clearance, and the inside of the lid |
Use the table to choose a first sample, then replace it with measured values from the actual pieces. An outside fit can still press a setting or leave too much room around a narrow band.

A slim proposal box is chosen for a low profile and easy handling. It can travel in a pocket, but reduced height leaves less room for a tall setting or thick cushion. Check the ring upright, close the lid slowly, and look for pressure on the stone, prongs, or lining. Open it several times to confirm easy removal.
The low profile should change the outside shape without removing inside clearance. A taller setting needs a deeper base, a different insert, or more lid room. Let the sample settle that trade-off before applying the format across a collection.
A double-ring box needs two positions and a clear way to remove each piece. Do not solve it with a wider shell alone. Measure each band at its widest point. Decide whether the rings sit side by side or at different levels. Define a separation between slots to limit rubbing during handling.
The insert also controls presentation. Record both rings in the sample brief. A narrow band paired with a wide band may need different slot widths, firmer holding, or lateral (side-to-side) room.
High-setting, cathedral, and halo rings need extra room at the top and sides. Measure from the ring base to the highest feature, then check the closed lid. A halo adds a wider footprint, so vertical clearance alone does not protect the sides.
Do not add a guessed height to every box. Place the real ring in the intended insert and inspect the lid, lining, and side walls. If the lid touches the setting, change the cavity, insert, or structure before approving outside dimensions.
Most packaging records use L × W × H for length, width, and height. Ask whether height includes the lid and whether the box is measured open or closed. Label each set as inside or outside.
Inside L × W × H describes space for the ring and insert. Outside L × W × H describes the finished footprint, including walls, wrap, closure parts, and sometimes the lid. Carry both sets in the supplier brief so one number does not serve fit, storage, and shipping.
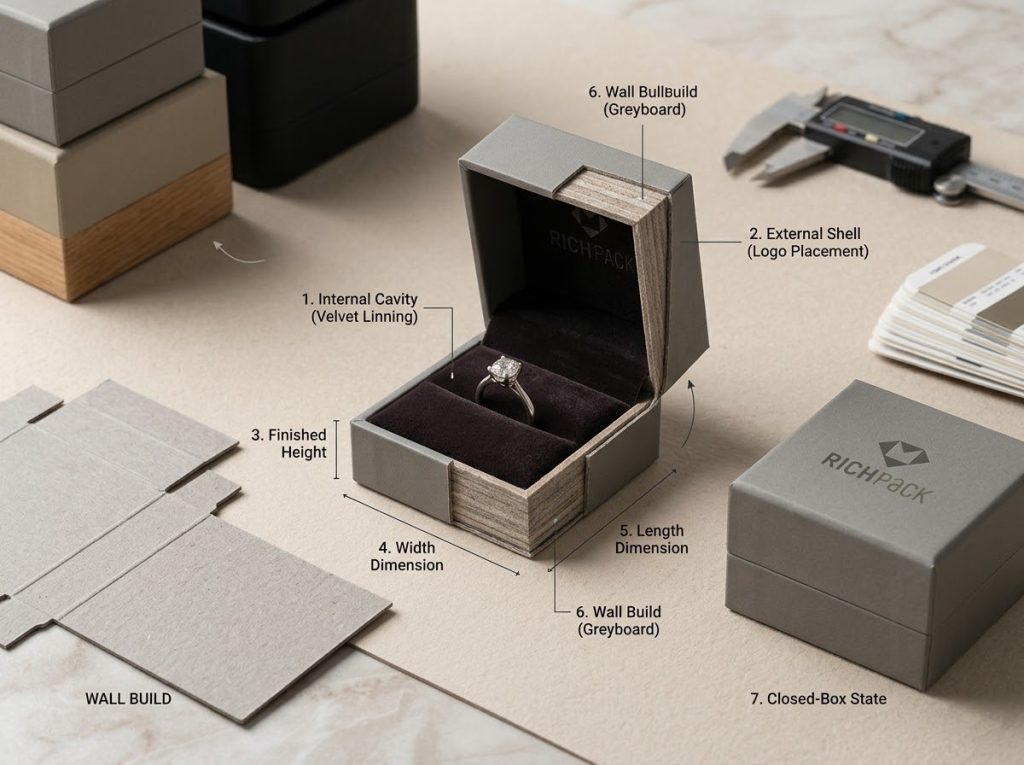
Use one conversion system throughout a sample brief. One inch equals 25.4 mm, or 2.54 cm. Thus, 2 × 2 × 1.5–1.75 in equals 50.8 × 50.8 × 38.1–44.45 mm. A planning table can round that to about 50 × 50 × 40–45 mm, but it must keep the same inside or outside definition.
Keep the original unit beside the converted value for mixed teams. Do not compare an outside measurement in millimeters with an inside measurement in inches. Record the unit and measurement definition in the same row.
Ring box dimensions affect more than whether a ring fits. They control movement, contact, first view, removal, display footprint, storage, and empty space inside an outer pack. Check these outcomes with an assembled insert and closed sample before treating a planning range as final.
An undersized cavity can push a raised setting into the lid or rub the band against a narrow slot. A loose cavity can let the ring tilt, slide, or strike the insert. These are fit problems that an outside measurement cannot solve.
Place the real ring in the finished insert and close the lid gently. Check the prongs, stone edges, band, and lining, then tilt the closed box to see whether the ring moves. If it touches the lid or side wall, adjust the cavity, insert, or structure before branding.
The box size sets the visual proportion around the ring. Too much empty space can make a small piece look lost. A tight cavity can feel compressed and make removal awkward. The right proportion keeps the piece clear and the insert purposeful.
Judge the proportion with the actual product. Open the box from the expected angle, check the visual center, and compare open and closed views. A different insert position may solve an imbalance before the outside size changes.
Dimensions decide where the ring sits when the lid opens and how a customer reaches it. A secure slot without a lift point can make removal difficult. Plan opening direction, insert height, ring orientation, and finger access together.
Record the first view, finger position, and whether the piece catches on the lining. Use those observations to choose a deeper cavity, different cushion, or changed insert position.
Retail and storage decisions use outside dimensions. A collection needs boxes that line up on a tray, fit a drawer, or stack without leaning. Consistent footprints help organization, but they should not force every ring into the same cavity.
Record outside length, width, and height for each format. Compare them with the planned tray, shelf, or storage location, then keep the inside record separate for fit. This lets a high-setting ring receive needed height without losing footprint control.
The ring box and outer shipper solve different problems. The ring box presents the jewelry; the inner pack or shipper controls space around it. Large voids can let the ring box move even when the ring fits its insert.
Test the closed box inside the planned inner pack or shipper. Turn and tilt it, then record movement, lid opening, insert shift, and empty space. This is a practical fit review, not proof of an ISTA or laboratory test; confirm any formal requirement separately.
Start with the ring, then measure the assembled insert and the closed box. A usable record shows the ring’s widest point, tallest point, stone footprint, orientation, lining, and clearances. An outside measurement from an empty box cannot tell you whether the ring will sit upright. It cannot show whether the ring rubs the lid or moves in its slot. For a broader sequence, see the RichPack jewelry box measurement guide.
Measure the shank, the band section that must pass through the slot, where it is widest. Record the maximum value, not the average. This number guides slot width: too narrow can make removal awkward, while too wide can let the ring lean or turn.
Measure from the bottom of the band to the highest point of the setting or stone. Include prongs, a basket, halo edge, or cathedral rise that faces the lid. Use the measured height for the actual ring or an approved drawing. Check it again with the assembled insert. Do not apply a fixed “high setting” threshold.
Record the stone, halo, or top detail as a maximum length-and-width footprint. Note side elements that extend beyond the band. The footprint helps position the slot and protect the first view from looking crowded against a wall.
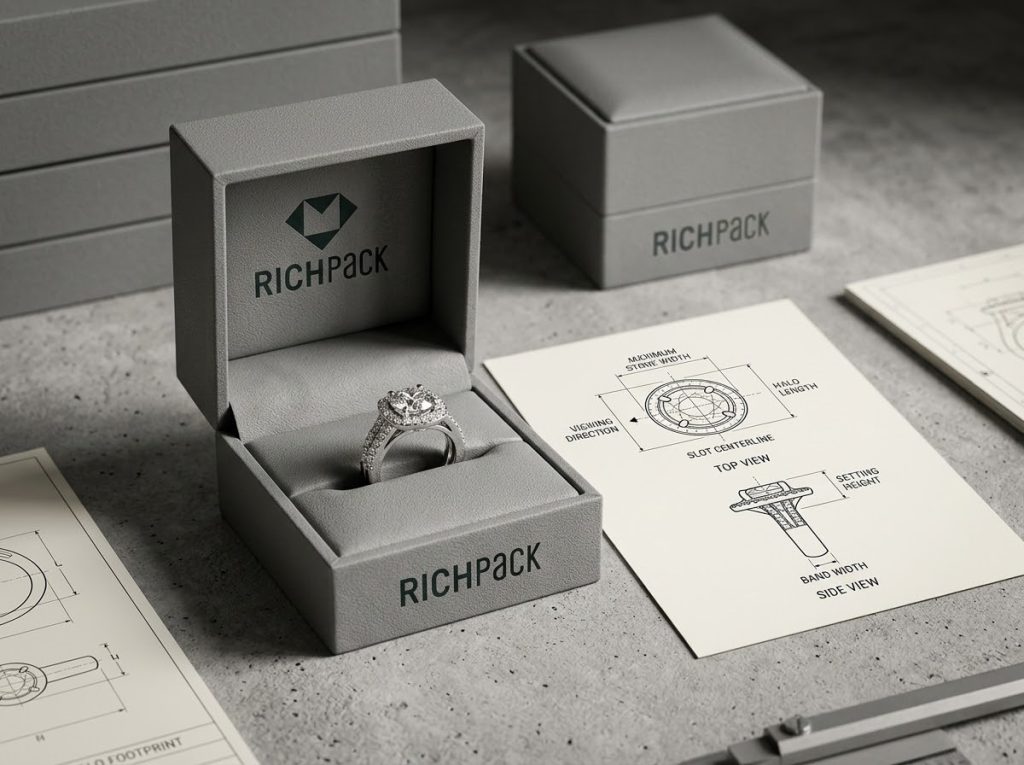
Decide whether the ring sits upright or flat before finalizing the cavity. Upright presentation needs a deeper slot and more height; flat placement changes how the customer lifts the piece. Record the orientation, opening direction, lift point, and any relationship to a logo or hinge.
Measure the assembled insert, including the cushion, slot walls, core, and lining. Keep two values: the cavity that receives the ring and the total insert footprint inside the box. Soft materials can compress, while a shaped cavity can hold a fixed form, so use the actual assembled part for the sample record.

Close the box with the real insert in place. Check contact between the highest point of the ring, lid lining, closure area, hinge-side structure, and cavity wall. Treat clearance as a sample check rather than a universal number. If the lid resists closing, the ring shifts, or the lining catches a prong, revise before approval.
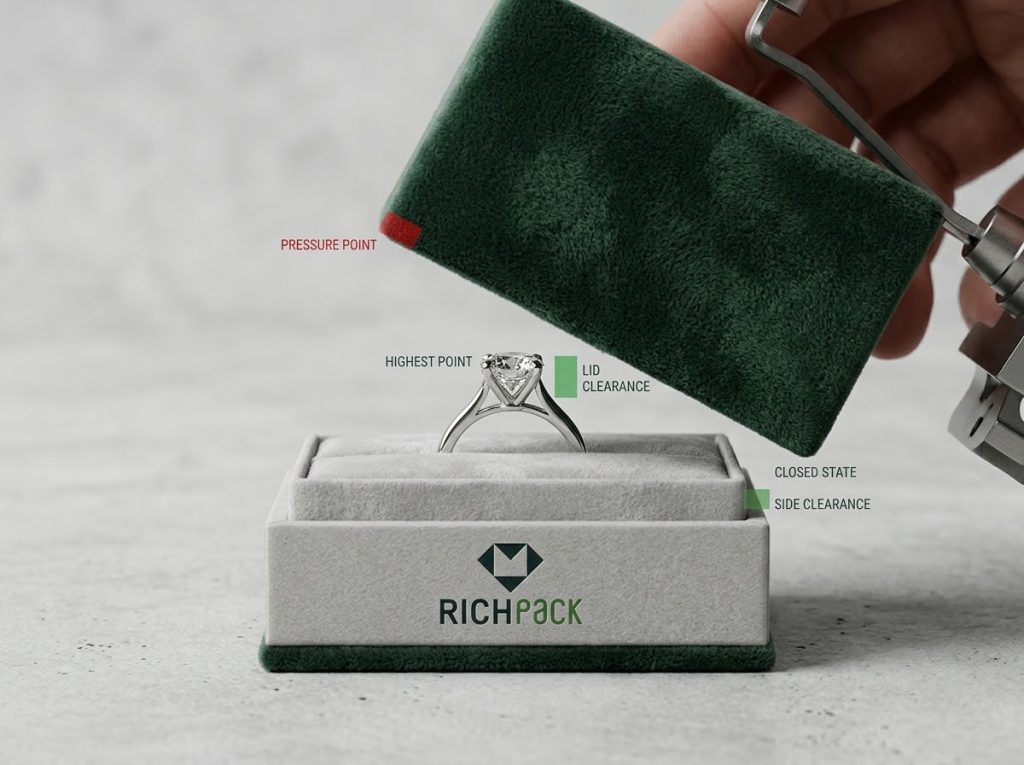
Keep inside and outside measurements in separate fields. Inside length, width, and height describe fit around the ring and insert. Outside dimensions describe the finished package for a tray, shelf, drawer, shipping pack, or carton. Label the state too: open or closed, insert installed or removed, and lid, base, or complete box.
Usable space comes from the whole assembly, not the outside outline alone. RichPack custom jewelry box inserts show why the support structure belongs in the size record. The insert holds the ring. The lining changes the contact surface. Walls consume room. The opening or closure can take space above the ring. Choose the structure first, then review the material stack and finish as separate decisions. RichPack jewelry box options can help teams compare formats before they lock a cavity.
A slot holds the band along a defined line. A cushion uses compression and surface contact, while a molded or shaped cavity controls the ring with a set form. Compare four things: hold, removal, presentation, and insert changeover. Test the real ring before approval.
Velvet, foam, microfiber, and other linings cover the insert and can reduce the opening around a band or stone. Compression and recovery depend on the assembled material, so measure after lining is installed. A soft textile alone is not an anti-tarnish technology; list any active insert or contact test as a separate requirement.
Rigid paperboard, wood, and shell constructions create different wall and base requirements around the same cavity. A thicker wall can increase the outside footprint while leaving inside fit unchanged. Start with the required inside dimensions, then review the resulting outside dimensions in the technical drawing or sample.
Use these planning values to start a supplier conversation. They are not universal production specifications:
| Component | Planning range or label | What it changes | Ask the supplier to confirm |
| Grayboard for a small or mid-size rigid box | About 1000–1200 gsm | Board weight, stiffness, and finished wall build | Board caliper, finished wall thickness, and a corner sample |
| Hidden neodymium magnet | Common grade labels include N35–N52 | Pull feel, closure strength, and placement tolerance | Magnet size, gap, pocket depth, glue layer, and closing force |
| Wood shell | Project-specific thickness | Outside footprint, weight, and corner strength | Species, moisture control, wall thickness, and finished fit |
| Paperboard or shell insert | Project-specific | Slot stability, compression, and removal feel | Slot width, insert compression, and assembled clearance |
GSM measures paper weight. It does not tell you the finished wall thickness or corner strength. Magnet grade also does not predict the closing feel by itself. Size, gap, wrap, glue, and placement all matter. Ask for a finished sample and a written tolerance for the cavity, lid, slot, and closure. Do not publish a universal ± millimeter tolerance without the supplier drawing.
Wood feels hard, but hardness alone does not prove better compression resistance. Grain direction, moisture, joints, wall thickness, and the insert carry the load. Paperboard can weigh less and still protect the ring when the walls, corners, tray, and shipper work as one system. Press the finished corners, open and close the lid, and compare the assembled sample instead of judging the raw material by touch.

Opening style changes how the ring enters, leaves, and appears. A hinged lid swings over the insert. A magnetic box places reinforcement near the closing edge. A drawer needs pull clearance. A two-piece box changes the reveal and storage footprint. Record opening direction before finalizing the cavity.
A magnetic catch, hinge reinforcement, lid overlap, or drawer stop can occupy the same zone a high stone or prong needs. Check the highest point, lining, and closure area together with the ring installed. If the closure engages only when the lid presses the ring, revise the insert position, lid height, or closure layout.
Write the brief in three separate lines. Structure covers hinged, magnetic, drawer, two-piece, or slim formats. Material covers rigid board, wood, shell, insert core, and lining. Finish covers wrap, print, foil, coating, or another surface treatment. This separation keeps a finish change from silently changing the cavity and reopens clearance checks when the structure changes.
Sustainable sizing follows the same logic. Remove empty volume before adding a new material claim. A smaller finished box can reduce board, wrap, filler, carton space, and transport volume, but the ring still needs its measured clearance. RichPack’s paper packaging solutions page describes recycled pulp and paper, biodegradable materials, FSC-certified cards, low-energy production, and waste recycling. Confirm the certificate scope and finished-pack claim for the exact material and market before printing sustainability language.
The right starting size depends on the ring’s profile and the moment the box must support. Use the quick references in the table as a first sample. Match the box to the tallest point, the insert, the opening view, and the outer pack. A solitaire for a retail counter, a slim proposal box, and a two-ring wedding set can need different dimensions. The rings may look similar in a product catalog.
A single solitaire starts with the compact square ring-box format. The ring needs a stable upright position and a clear first view. Leave room for the insert without letting the ring drift inside the cavity. Check the stone height before approving the lid. A low-set solitaire can fit a standard insert. A taller setting needs a deeper base or a taller lid.
For a brand collection, record the solitaire’s band width, setting height, stone footprint, insert position, and outside footprint as one row. That record lets the team compare a new ring against an existing sample without treating the box as a universal fit.
Cathedral settings and halo rings need more vertical and lateral space than a low solitaire. RichPack diamond engagement ring box selection guide covers nearby material and presentation choices. The size decision still starts with the physical ring. The highest point controls lid clearance. The halo or side stones control the space around the ring. A box can close around the band and still press the stone or catch the lining if the top profile is wrong.
Use a deeper cavity or a taller lid when the actual ring requires it. Test the ring with the final insert installed, then close the box slowly. Look for pressure marks, fabric snagging, and a lid that needs force to shut.
Wide bands change the slot decision first. A narrow slit can pinch the band, push the ring out of alignment, or make removal awkward. Measure the widest part of the shank and check whether the insert can hold that width without collapsing at the edges.
The outer box may still look like a standard ring box, but the insert needs a wider slot and a clear lift point. If a collection includes both slim bands and wide bands, keep separate insert records even when the outer design is shared.
A wedding ring box for a set needs more than a wider box. The two rings need separate, stable positions. Leave enough distance to avoid metal-on-metal contact. Leave room for the customer or officiant to remove each ring without disturbing the other.
Start with the wider band, the taller setting, and the combined presentation view. Then choose a double-slot or paired insert that keeps the rings aligned. Confirm whether the brand wants both rings facing the same direction or presented as a balanced pair. That choice affects slot position, box width, and the first view when the lid opens.
A slim proposal box prioritizes a low profile and discreet handling. Its smaller height works well for a surprise proposal. The reduced profile leaves less room for a high-set stone, a thick insert, or a bulky closure.
Before approving a slim format, test three things. Check closed thickness, upright presentation, and closure force. A box that fits a pocket but makes the ring lie flat or rub the lid can create a poor reveal. The box should support the proposal moment without making the ring feel compressed.
Stacked rings and multi-ring sets need independent positions rather than one oversized cavity. Separate slots help the team control the order of the pieces, prevent tangling, and keep the first view intentional. They also make it easier to change one ring size without redrawing the entire box.
Record each ring’s width and height, then map each position in the insert. If the set includes rings with different profiles, place the tallest ring where the lid and first view can support it. Do not reuse a two-slot wedding-set layout without checking the extra pieces and their removal path.
Retail collections benefit from consistent outside footprints, but consistency should follow product groups. For smaller product groups, wholesale small jewelry gift boxes can be compared by format before a collection-wide footprint is locked. A display tray can look organized when every box shares a width. A tall stone or a wider band still needs its own inside cavity. Standardize the outside where it helps the display. Vary the insert or height where the jewelry requires it.
Review the open-box view at the counter. The logo, lining, and ring position should sit in the same visual system across the collection. If a larger box makes a small ring look lost, reduce the unused space or change the insert. Do this before changing the brand’s entire display footprint.
An e-commerce ring box has two size decisions: the presentation box and the protective outer pack. The ring box must hold the piece securely. The outer pack must limit movement and stop the inner box from rubbing against the shipper.
Record the ring box outside dimensions, the inner pack, the shipper, and the void-fill material used around the box separately. Test the assembled pack with the real insert and the intended opening direction. A compact presentation box can still need a fitted shipper. This matters when the route includes repeated handling or when the box travels with other items.

| Scenario | Starting format to compare | Main fit question | Approval check |
| Solitaire engagement ring | Compact single-ring box | Does the stone clear the lid? | Close the box with the final insert |
| High-set or halo ring | Taller or deeper profile | Does the highest point avoid pressure? | Check lid, lining, and side contact |
| Wide men’s band | Single-ring box with a wider slot | Can the band enter and leave without pinching? | Test slot retention and lift point |
| Double wedding set | Rectangular double-slot box | Do the rings stay separated and aligned? | Test both rings in the assembled insert |
| Slim proposal | Low-profile proposal box | Does the slim form still display the ring upright? | Check thickness, closure, and reveal |
| Stacked or multi-ring set | Multi-slot insert | Does each position have its own clearance? | Test each ring in its assigned slot |
| Retail collection | Consistent outside footprint | Does the collection look balanced at the counter? | Review open-box display and tray fit |
| E-commerce pack | Presentation box plus shipper | Does the inner box stay stable in transit? | Test the assembled outer pack |
A dimension sheet is ready for sampling when it can be checked against the real ring and the assembled package. Use a white sample or prototype to expose fit problems before artwork, finishing, and mass production lock the structure. This is a practical buyer check; it does not replace a formal laboratory or carrier test when the project requires one. RichPack packaging manufacturing services are the relevant next step when a project moves from a fit sample into production planning.
Start with a plain sample that shows the final cavity, lid, closure, and insert position. A white sample makes proportion and opening problems easy to see because color and foil are not competing for attention.
Check the box in the closed and open positions. Confirm the ring position first. Check the intended lid angle. Then check that the structure stays square during handling. Record each change against the sample version.
Test the actual ring, or a dimensionally matched sample, inside the assembled insert. The insert can change the result more than the empty box suggests. Check the slot, cavity, cushion, and removal path in the same state the customer will receive.
The ring should stay in its intended position without needing force to insert or remove it. If the ring moves, tilts, or sits too low for the first view, revise the insert before revising the artwork.
Close the lid slowly and watch the highest point of the ring, the lining, and the closure. A lid that catches, rubs, or needs extra force is a fit problem even if the outside dimensions match the brief.
Open and close the box several times. Look for marks on the lining, compression on the insert, and a closure that becomes harder to operate. Record the observation as a sample issue rather than guessing at a new clearance number.
Hold the closed box in the positions it may experience during normal handling. Observe whether the ring shifts, rotates, or contacts the sides. A simple movement check can reveal a loose cavity or a weak slot before the package reaches a more formal test.
Keep the observation tied to the actual insert, closure, and ring weight. It is a practical fit check, not proof that the packaging passes a named transport protocol.
Place the assembled ring box in the planned inner pack, shipper, tray, or retail display. Confirm the outside dimensions, opening direction, stack behavior, and removal space. A ring box can fit the jewelry perfectly and still create a problem when it enters a shipper or display system.
Review both the closed pack and the open presentation. If the shipper leaves excess movement, adjust the pack structure. If the display makes the box look oversized, adjust the box footprint before approving the production sample.
Keep the approved sample with its dimension record, insert version, artwork version, and approval date. When a ring, material, or closure changes, compare the new sample against that record rather than relying on memory.
A golden sample helps procurement, design, and quality teams use the same reference during a reorder. It also gives the supplier a clear record of which cavity, insert, and opening view were approved for that ring group.
RichPack’s public quality page describes batch inspection, measurement equipment, traceability, supplier management, and a 100% QC inspection claim for its production process. Use those public statements as questions for a project review: Which dimensions are measured? Which records travel with the batch? What happens when a cavity, lid, or closure falls outside the approved sample? The page describes RichPack’s system; it does not replace a project-specific inspection plan.
One published RichPack case gives a concrete procurement reference. The Majorica jewelry box case lists at least 5,000 pieces and a three-week lead time. It describes sustainably managed paper or recycled plastic, a biodegradable support liner, and modular construction. It also reports a 40% rise in positive social feedback for that project. Those figures belong to Majorica. Treat them as a case example, then confirm quantity, timeline, materials, and results for your own ring-box program.
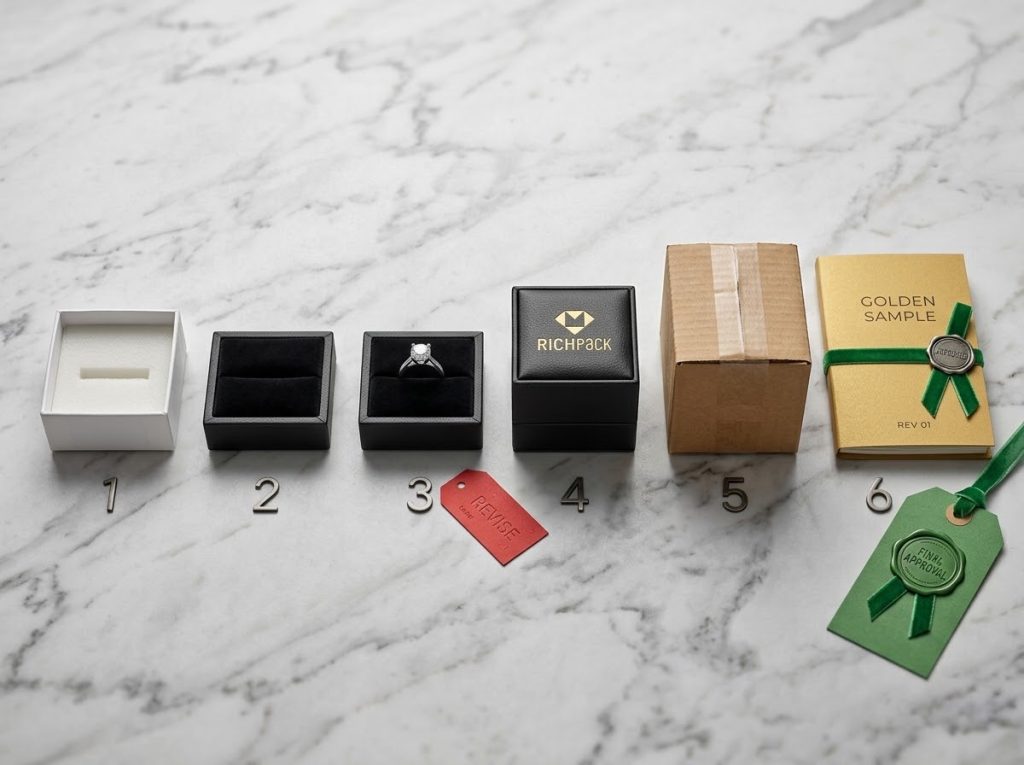
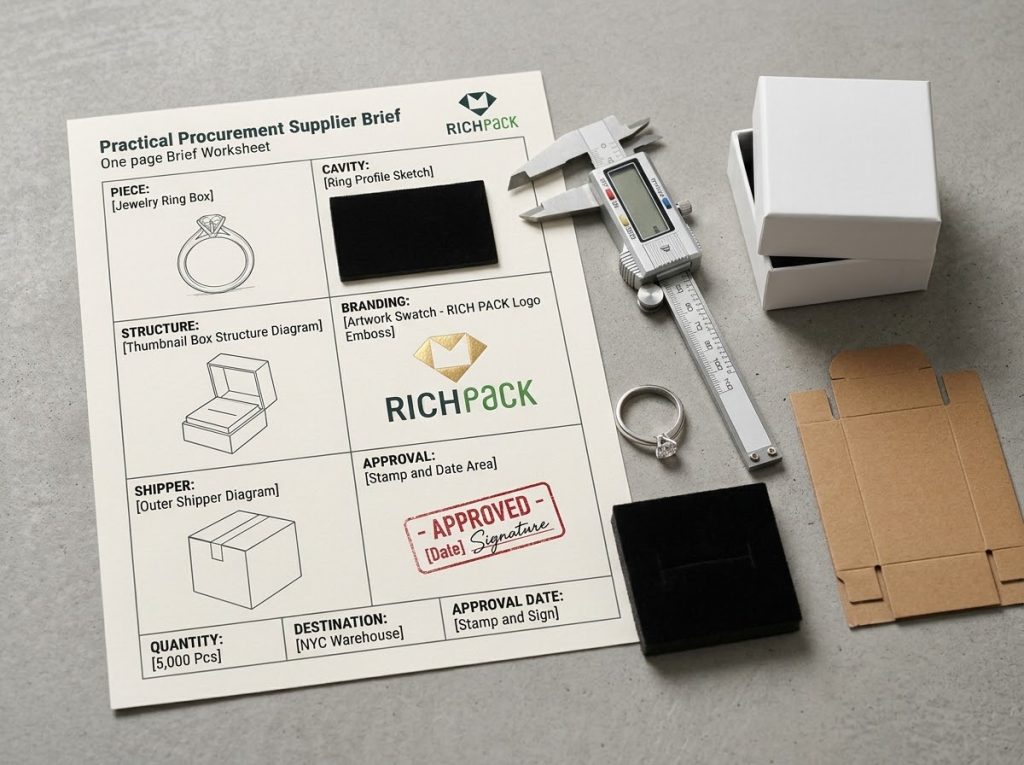
A supplier can build the right box only when the brief describes the ring, insert, box, and outer pack together. A single outside measurement leaves too many decisions open. Use these fields to turn the size discussion into a brief that can be sampled, compared, and approved.
Begin with the finished ring, not the box. Record the ring type and band width at the widest point. Add setting height, stone or halo footprint, and the intended opening orientation. If the collection has several profiles, create one row for each group instead of averaging them into one “standard” ring.
Add a product photo or drawing only as a reference. A photo alone cannot confirm the highest point, slot width, or the clearance under the lid. Those fields should come from a physical sample, a dimensioned drawing, or a measurement that the project team can review.
Write the usable inside length, width, and height first. Then add the slot or cavity position, side clearance, lid clearance, and the removal path. State whether each value describes the box empty, the box with the insert, or the assembled presentation.
This distinction prevents a common handoff error. The supplier receives an outside size while the brand expects the number to describe ring space. Keep inside and outside dimensions on separate lines, with the measurement state clearly named.
Describe the insert material, slot count, support method, compression or retention needs, and the surface that touches the ring. Note whether the insert can be replaced or whether it is bonded into the box.
The insert is part of the size decision. A thick cushion, a covered foam, or a molded cavity can reduce the space available inside the same outer box. If the project needs an anti-tarnish or non-tarnish claim, list the active component and required test method separately. A soft textile alone does not prove oxidation control.
Name the box format and opening direction: hinged, magnetic, drawer, two-piece, or slim proposal. RichPack package design services can align structure, opening, and artwork after the dimension record is complete. Add the closure type, lid construction, and any hardware or fold that can reduce top clearance. The same ring can need a different cavity when the lid, drawer, or insert moves in a different direction.
Describe the first view and the removal action in plain language. “Ring upright with the stone centered after opening” gives the supplier a usable presentation target; “luxury ring box” does not.
Record the logo zone, artwork version, surface finish, and lining direction. A custom jewelry box with logo should be approved against the assembled structure, not the artwork file alone. Keep structure, substrate, wrap or lining, and finish as separate fields.
The branding brief should serve the fit decision. A large logo panel, a raised decoration, or a thick lining may affect the cavity or the lid. Confirm those details on the sample instead of assuming the artwork will fit because the outside rectangle stayed the same.
Add the ring box outside dimensions, inner pack, shipper, carton arrangement, and storage footprint. Note how many boxes share a carton and whether the box must sit in a retail tray, drawer, or display case.
These fields help the team compare a presentation box with the space it occupies after packing. They do not determine the ring’s fit. They expose excess void, shelf mismatch, or an outer pack that lets the inner box move.
Finish the brief with quantity by size, destination, target date, artwork status, sample owner, and approval gates. Keep MOQ, price, lead time, capacity, and certification as fields to confirm for the specific project. A supplier’s public page can show one company’s commercial terms. It does not establish RichPack’s terms or a universal industry condition.
For a custom request, send the piece record, inside cavity, insert, structure, branding, shipper, quantity, and destination together. That gives the packaging team enough context to quote or prototype without guessing which measurement controls the decision.
Most ring-box rework comes from the order in which decisions are made. Measure the piece, define the insert, confirm the cavity, and then lock the outside structure. These mistakes reveal where a size plan usually breaks.
An outside measurement tells you how much room the box occupies on a shelf or in a shipper. It does not tell you whether the ring clears the lid or fits the slot. Record inside dimensions after the insert and lining are defined.
Common dimensions are useful starting points, not a guarantee that every ring will fit. RichPack standard jewelry box dimensions reference provides broader context, while the sizing decision here stays tied to the actual ring. Different sources may describe an inside cavity, an outside box, or a product format. Keep the source, unit, and measurement state beside the reference, then confirm the real ring in a sample.
The lowest part of a ring may fit while the stone, halo, or cathedral setting touches the lid. Measure the highest point and check it with the final lining and closure. The tallest feature controls the top clearance.
An insert changes the usable cavity, the ring position, and the removal path. RichPack custom jewelry box insert organization guide shows why the support plan should be defined before the outside structure. Choosing the outer box first can leave too little room for the support that protects the ring. Lock the insert direction and main dimensions before finalizing the box structure.
One outside format can support a collection, but one cavity rarely fits every ring profile. Separate slim bands, wide bands, high settings, double sets, and multi-ring layouts into clear product groups. Standardize where it helps the display, and customize where the jewelry needs different support.
There is no single standard that fits every ring. A compact square reference around 2 × 2 × 1.5–1.75 inches is a common starting point for a single ring. Confirm whether the number describes the inside cavity or the outside box. Test the real ring with the final insert before approval.
Start with the ring’s widest point, setting height, stone footprint, and the insert you plan to use. A low-set solitaire fits a compact single-ring format when the insert and height fit. A high-set, halo, or wide-band ring needs a taller lid, deeper cavity, or wider slot.
Use internal dimensions to confirm that the ring fits. Use external dimensions to plan the tray, shelf, shipper, storage footprint, and carton. Record both, and state whether each value is measured empty, with the insert, or with the box closed.
Yes. A high setting can touch the lid, catch the lining, or make the closure hard to operate. The band can still fit the slot. Measure the highest point of the ring and check the closed box with the assembled insert.
A two-ring box needs enough width for two stable positions, separate slots, different band widths, and an easy removal path. Choose the format after measuring both rings. Do not assume that a single-ring box becomes suitable simply by adding a second slot.
Measure the band at its widest point, the height from the band to the highest setting, and the maximum stone or halo footprint. Then record the orientation, insert, lining, lid clearance, side clearance, inside dimensions, and outside dimensions.
Slim proposal ring boxes use a lower profile for discreet carrying. The slim form leaves less room for tall settings, thick inserts, and closures. Check the closed thickness, ring orientation, lid clearance, and removal path before using a slim format across a collection.
Custom ring box dimensions can cost more because a custom size requires a new structure, insert, sample, artwork setup, or production configuration. The final cost depends on the box format, materials, insert, finish, quantity, destination, and approval requirements. Request a project-specific quote instead of treating a competitor’s price as a general standard.
Cost follows the finished structure. The main drivers are the box format, board or shell, insert, closure, finish, artwork setup, quantity, destination, and sample rounds. A smaller cavity can reduce material use, but a complex insert or magnetic closure can add cost. Ask for a quote that separates tooling, sampling, unit price, packaging, and delivery assumptions.
Lead time depends on design approval, material availability, sample rounds, quantity, and the delivery route. A supplier should separate design review, prototype, approval, production, inspection, and shipping dates. Use the Majorica case as a project example only: its public case page lists at least 5,000 pieces and a three-week lead time. Your brief still needs its own schedule.
Ring box dimensions are a fit decision before they become a box specification. Start with the actual ring. Choose a scenario-based reference. Separate inside from outside measurements. Let the insert and closure shape the final cavity. Then validate the assembled sample before you lock artwork and production.
For a branded jewelry program, prepare the piece, insert, box, shipper, quantity, destination, and approval records together. RichPack’s custom packaging services can be the next step when the project needs a structured path from requirements and design to prototyping and production.
2024-11-26


2025-03-27

2025-08-22
2026-03-05

2025-06-24

2025-05-16
2025-01-24
Adorable Baby Gift Boxes | Custom Newborn & Infant Gift Packaging | Premium Baby Shower Gift Sets
View More
Bespoke Gift Boxes with Unique Shapes and Sizes | Custom Packaging Solutions for Creative Brands Richpack Jewelry Merchants
View More
Black Magnetic Gift Box | Luxury Black & Gold Rigid Packaging | Richpack
View More
Bracelet Gift Box in Pink Thick Cardboard | Elegant Bracelet Packaging Box for Retail and Wholesale | Richpack
View More
Cartier Watch-Pillow Box | Vintage Leather Luxury Timepiece Packaging – Richpack
View More
Cufflink Box in Black Velvet | Portable Single-Pair Cufflinks Display and Gift Case | Richpack
View More

