


 PREV
PREV
2024 Ranking the 10 Best Sustainable Jewelry Packaging Brands
2024-11-26
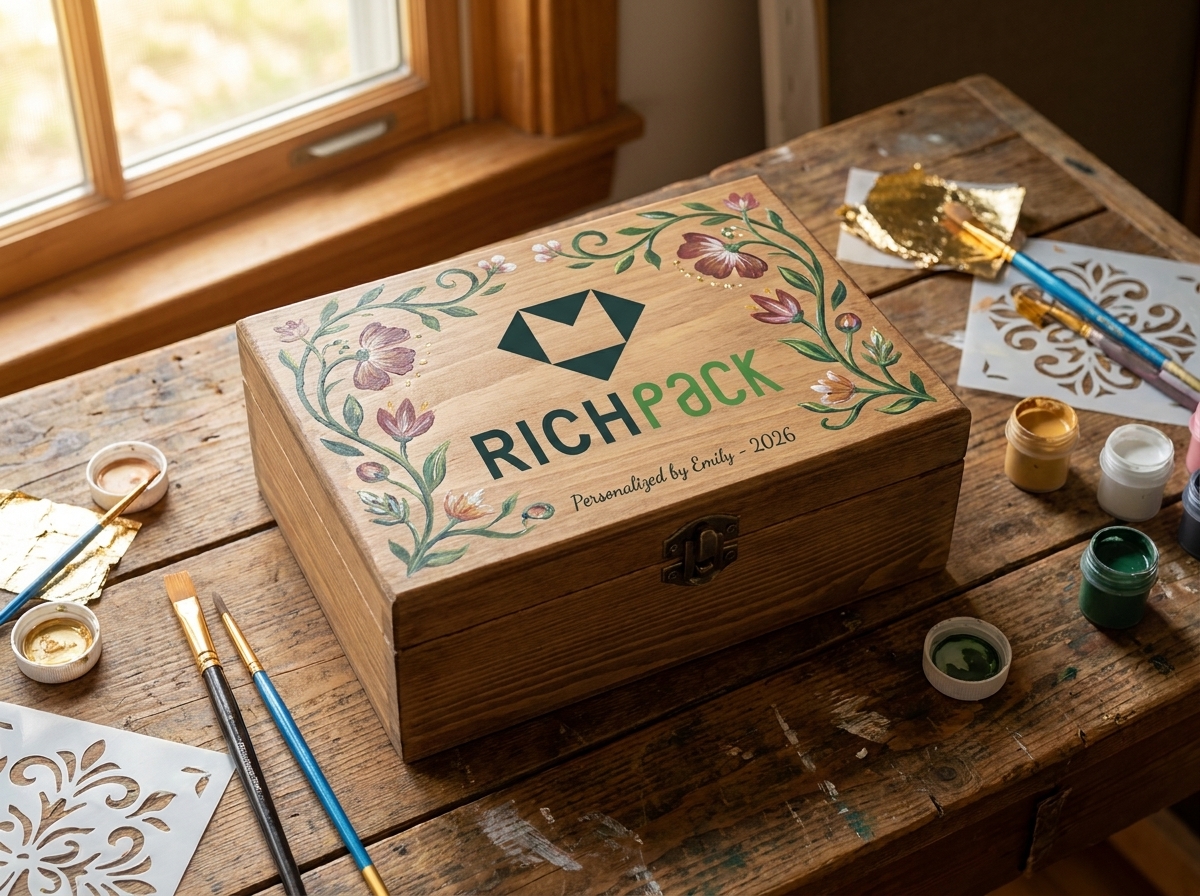



Yes, you can paint and personalize a small jewelry box, but start with the surface. Wood, MDF, plastic, and metal each need a different preparation method if you want the coating to hold.
Before you pick up a brush, check the finish, protect the liner and hardware, and set a realistic time and budget. A simple box usually needs two to four hours of hands-on work, spread across one to three days.
DIY makers and jewelry brands need the same basics. The surface should be clean, the coating should hold, and the lid should open the same way each time. Brands can compare the results with custom jewelry boxes with a logo.
A simple box takes about two to four hours of hands-on work, while drying adds most of the calendar time. Plan one to three days for a basic painted box, and longer when the label calls for a slow cure.
Do not block out one long painting session because the work comes in short rounds.
| Task | Active time | Waiting time |
| Inspect, remove hardware, and mask | 15–30 minutes | None |
| Clean and repair | 20–45 minutes | Until dry |
| Sand and remove dust | 15–30 minutes | None |
| Prime and paint | 45–90 minutes | Follow each recoat time |
| Add a name, stencil, or paper design | 30–90 minutes | Let each layer dry |
| Seal, reassemble, and test | 20–40 minutes | Follow handling and cure times |
A box with serious damage, many drawers, or a detailed hand-painted scene will take longer. A clean, unfinished wood box may take less.
For a simple acrylic or spray-painted box, reserve 24–48 hours after the final coat before light use. This is a planning window, not a promise of a full cure.
One Minwax Polycrylic topcoat requires 24 hours before normal use. Plaid’s Mod Podge Academy lists about 28 days for full cure, so wait if the box feels tacky.
The total depends on what you already own. A US retail check on August 26, 2026, found a 3M assorted sandpaper pack with 80, 120, 220, and 400 grits at about $9. A 12‑color acrylic set was about $13. Spray primer was about $11, while clear craft coats often ran from about $7 to $18.
| Basic supply | Planning range |
| 120-grit and 220-grit sandpaper | 5–5–13 |
| Cleaner, cloth, and painter’s tape | 5–5–15 |
| Primer and paint | 10–10–25 |
| Clear finish | 7–7–18 |
| Simple stencil, paper, or transfer | 0–0–15 |
| Estimated total excluding the box | 25–25–60 |
Local prices, taxes, and pack sizes vary. A large spray can can make one tiny box look expensive, but most of the product will remain.
A clean base color and one small name can look finished. You do not need new hardware, a transfer, ribbon, trim, metallic paint, and a replacement liner on the same box.
Spend extra only when the detail supports the person, jewelry, or brand. A $9 sandpaper pack is cheap, but repainting a lid that no longer closes is not.
Reuse a brush only when it is clean, and check that old tape or finish still suits the new surface. Dried grit can scratch a topcoat, while old paint can thicken or split.
Record the product name and finish on a brand prototype. Reusing the same safe supply later is easier than trying to match an unnamed leftover paint.
A small box has less room for error than a cabinet or a large furniture piece. A thick coat can stop the lid, while overspray can ruin velvet.
A rough edge can catch a chain, so identify the box before you choose a color.
Look at an unfinished edge, the underside, or a hinge hole, where solid wood will show grain. MDF looks like a fine, compressed fiberboard, especially along a cut edge.
Plastic often has a molded seam, while metal feels cold and may show a separate hinge or latch.
Rust-Oleum starts wood prep with cleaning, light sanding, and dust removal. Prime next if the paint calls for it.
Krylon treats plastic and metal differently because each has a different grip problem. Follow the label on the paint you bought.
The outside may be paper, veneer, laminate, or leatherette. Treat that layer as the surface and do not sand through it. A torn wrap often looks worse after paint.
| Box surface | What to check | Typical preparation direction | Main risk |
| Solid wood | Grain, old stain, knots, dents | Clean, repair, light sand, prime when needed | Uneven absorption or bleed-through |
| MDF | Fuzzy edges, flat cut faces, swollen spots | Seal or prime thirsty edges, sand lightly | Dark edges and rough coverage |
| Plastic | Molded seam, slick face, flexible parts | Clean, remove loose coating, and use a compatible plastic product | Peeling or soft paint |
| Metal | Rust, plating, shine, loose coating | Remove rust or loose paint, scuff slick areas, prime when required | Corrosion or poor adhesion |
| Veneer or wrapped board | Thin face layer, lifted corners | Clean gently and test a hidden area | Cutting through the visible layer |
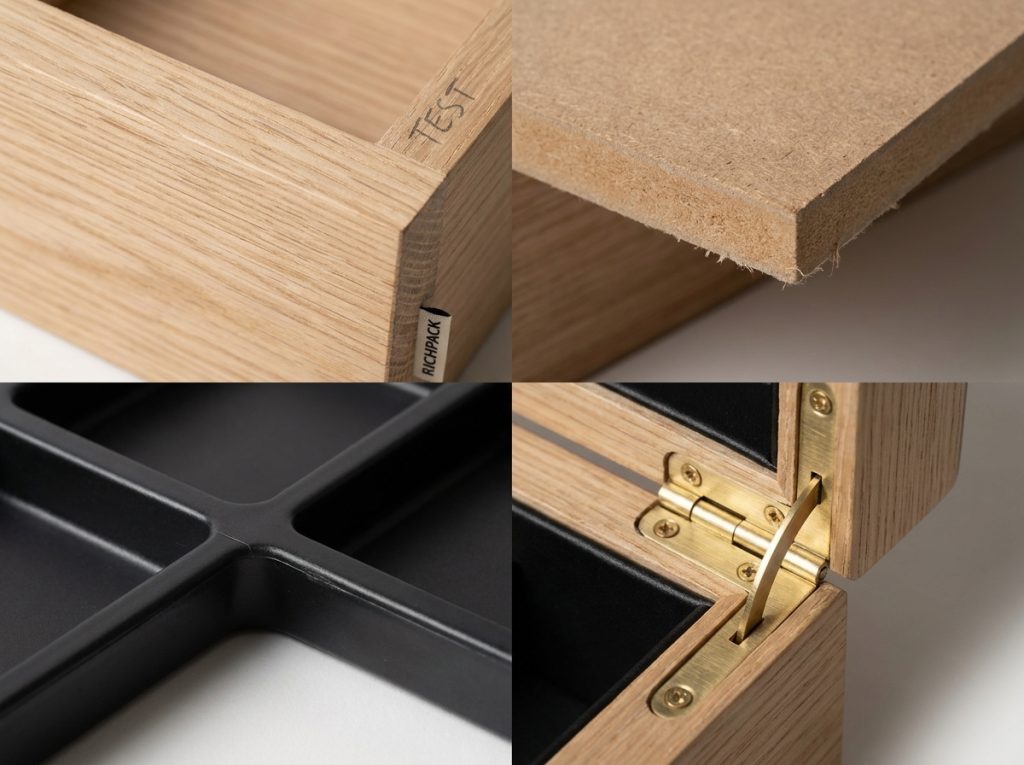
Run a clean fingertip over the outside, checking the paint and corners first. Then look for wax, glue, loose veneer, swollen MDF, and hinge dents.
Open and close the lid before you work because that movement gives you a fit reference.
Old damage matters because paint follows the shape underneath it. A chip stays visible under a thin color coat. A raised edge may become more obvious after a glossy topcoat. A broken hinge needs repair before decoration, not after.
Start with the problem that could make the box unusable, rather than the fun decoration.
Keep jewelry-contact surfaces clean, smooth, and free from loose coating. A removable wood divider can be painted after you check its fit.
A glued velvet liner, flocked paper, foam pad, or fabric pocket needs a different choice. Cover or replace it because paint does not make a soft liner safer.
Protect glass, mirrors, and magnets, then mask hinge pins, latches, tracks, and lid edges. Paint the hard outer shell while keeping the coating away from parts that move or touch jewelry.
Remove knobs, pulls, hinges, trays, and glass panels when you can do so safely. Put each screw group in a labeled bag because small hardware disappears under a drop cloth.
If removal could damage the box, mask the part instead. Press tape along the lid line, cover the liner, and wrap the hinge pins rather than flooding them with paint.
Paint the hardware on its own if you want a new color, then let it cure before assembly. Use the right screwdriver so tightening does not chip the finish.
Choose a spot under the box, inside a hinge recess, or behind a removable tray, then apply the cleaner. After it dries, test small primer and color patches for wrinkles, tack, color bleed, or weak grip.
The test also shows how the surface takes paint. MDF edges may drink in the first coat, while plastic may leave paint sitting on top.
A stained wood lid may let the old color show through.
Wait for the label time before you judge the result because a wet patch tells you little.
Cover a stable work surface and keep sanding dust away from open paint. Spray outdoors, follow the label, and stay within its temperature limits.
Keep food, jewelry, pets, and children away from the work area. A small box is easy to move, so place it on a stand or turntable that lets you reach the sides without touching wet paint.
The best paint depends on the surface and the look you want, with a fine brush giving control for a monogram. Spray paint can give a smooth base coat, while chalk-type paint can cover tired wood with a soft, opaque look.
Every choice still needs a compatibility test.
Acrylic paint lr uclhsfio dsc letters, flowers, dots, and lines on a sound base coat. A fine synthetic brush gives cleaner edges than a furniture brush.
Acrylic can show brush marks when it is thick, so thin it only as directed. Keep the brush lightly loaded and let each layer dry before a correction.
Acrylic lets a brand test artwork before choosing a print process. Record the color, sheen, brush size, and coat count so another person can repeat the sample.
Chalk-type paint gives many wood boxes a solid, low-sheen coat. It suits broad color changes, worn looks, and simple patterns.
The soft look does not protect the box uc ldo amv. Some chalk-style paints need wax or a clear topcoat. Some formulas do not suit plastic, metal, or glossy surfaces.
Read the label and test the cured surface before you add jewelry.
Use this option when the base material is compatible and the design needs a solid color field. It is less useful for precise artwork on a slick surface.
Spray paint can reach corners and leave a smooth coat, but your hand needs a steady pace and good airflow. Rust-Oleum and Krylon both favor light coats over one heavy pass.
Start and finish the spray pass off the box when the product instructions allow it. Keep the can at the label distance. Move across the surface at a steady speed. A small box can collect too much paint quickly, especially along its edges.
Spray paint suits the outside, but indoor mist can spread far beyond the box.
Primer helps create a more stable base, but “use primer” is not a universal answer. A wood primer may help hide an old color or reduce uneven absorption. A bonding primer can help on a hard-to-paint plastic surface. A metal primer may help after rust removal or on a surface that needs extra corrosion protection.
Some all-in-one paints let you skip a separate primer, but that claim belongs to the named product. Do not apply it to another paint.
If the primer wrinkles, stays soft, or beads up in the hidden test, stop. The color coat will not fix that problem.
Use a fine brush for letters and narrow borders. Use a wider soft brush for broad acrylic or chalk-type paint. A foam applicator can reduce visible brush marks on flat areas, but it can also leave bubbles if you press too hard.
Choose low-tack painter’s tape for clean lines. Use a clean lint-free cloth for dust removal. Keep a separate brush for a clear finish when possible. Dried particles from a color coat can spoil a clear layer.
The tool should match the surface. A stiff brush may help reach a carved groove, while a soft brush gives a calmer finish on a flat lid.
A clear finish can protect paint and paper, but it adds another material layer. Test its fit with the color, stencil, transfer, or decoupage medium on a hidden patch.
A matte finish softens glare, while satin adds a small amount of sheen. Gloss shows every dust speck and brush mark, so choose the finish that supports the design.
| Paint or product | Best use | Surface notes | Finish control | Main limitation |
| Acrylic paint | Small letters and hand-painted details | Best over a stable, compatible base | Easy color mixing and detail control | Thick layers can show brush marks |
| Chalk-type paint | Opaque wood makeover | Test on old finish and sealed surfaces | Soft matte appearance | May need a compatible protective finish |
| Spray paint | Even exterior color | Needs surface prep and ventilation | A broad range of sheens | Drips and overspray appear quickly |
| Bonding primer | Hard-to-paint surfaces | Use only where the product supports the substrate | Creates a base for the color coat | Product-specific compatibility |
| Decoupage medium | Paper and graphic layers | Use on a prepared hard surface | Matte, satin, or gloss formulas vary | Bubbles, lifted edges, or tackiness |
| Clear acrylic or other topcoat | Added surface protection | Test over the full decoration stack | Matte, satin, or gloss | Can wrinkle, yellow, or stay tacky if incompatible |
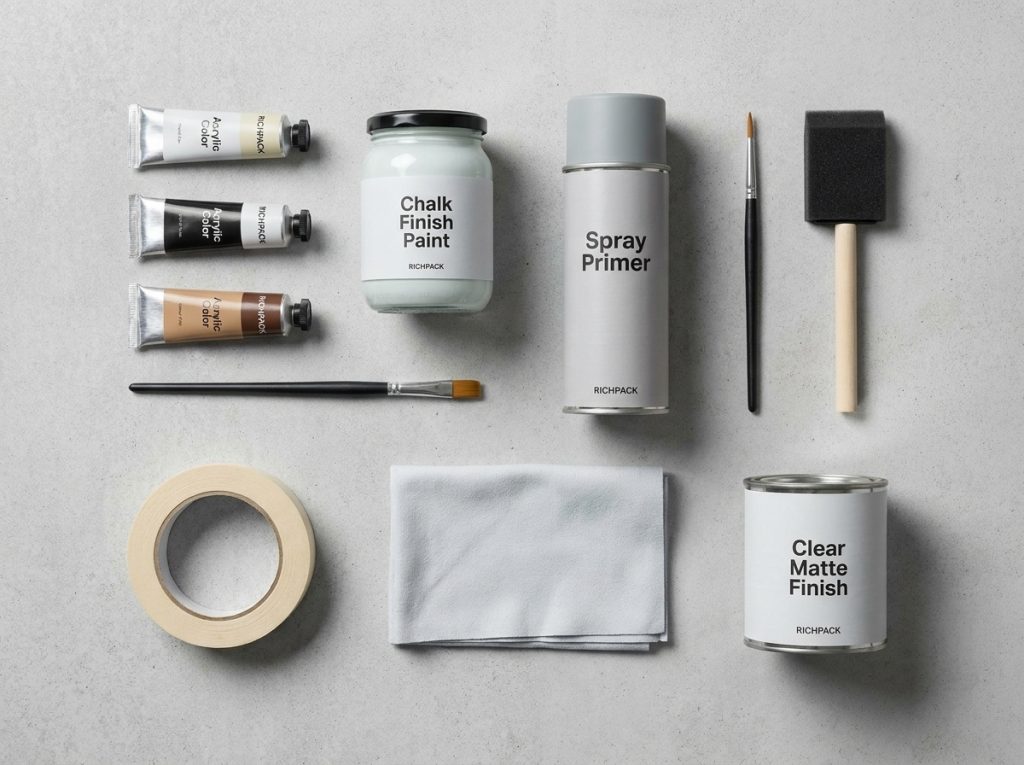
Preparation controls the final look more than the first color does. Paint can grip a clean surface, while dust, wax, and loose finish pass problems into every layer.
Clean the outside and hard inner parts with a product that suits the material. Remove dust before grease or glue, then dry the surface before sanding or priming.
Do not soak a veneer, MDF edge, glued liner, or unfinished wood box. Excess moisture can swell fibers or loosen an adhesive. Use a damp cloth rather than a wet one when the surface is sensitive.
Old label glue may need a separate remover, so test it in a hidden spot. A cleaner that lifts glue can also soften the finish.
Fill small holes and chips with a repair product made for the box material, then let it dry. Sand the patch level with the surface.
The phrase “sand again flush” matters because your finger may miss a bump that a gloss coat will show.
MDF edges often need extra attention because cut fibers can remain fuzzy. Seal or prime the edge as the product instructions allow, then smooth it after it dries. Do not keep sanding a weak edge until it becomes smaller than the rest of the box.
Skip structural repairs that need a trained restorer. A decorative paint project should not hide a loose hinge or a split panel that needs real repair.
Use 120-grit paper on bare solid wood or a rough repair that needs leveling. Move with the grain, stopping before you round a sharp edge.
Move to 220-grit for the final smoothing pass. Minwax sanding guidance uses the same 120-to-220 sequence for wood prep. Use 220-grit between coats only when the finish maker allows it.
Do not start thin veneer, wrapped board, plastic, or plated metal with 120-grit. It can cut through the visible layer. These surfaces may need a hidden test and a lighter scuff.
Some paints need little prep, while others need a dull surface for grip, so read the label.
Should you strip every trace of old finish? No, stop when the sanded surface feels smooth and evenly dull.
Use a clean lint-free cloth or the method named by the coating maker. Dust in a hinge can become a hard bump, while dust on the lid can catch light.
Do not wipe a dry surface with a dirty cloth and call it finished. If the cloth comes away gray after one pass, clean again and let the surface dry.
The box should feel dry and clean before primer touches it.
Apply primer only where the box needs it. A thin coat creates a base, while a heavy coat can catch the lid or drawer.
Brush into the grain or spray with the motion and distance stated on the label. Let the primer dry for the stated time. Check the hidden test before covering the whole box.
If the old color still shows, let the primer dry before adding the next allowed coat. Change to a stain-blocking primer rather than hiding bleed-through under thick paint.
Leave the lid contact edge as clean as the original build requires. Protect moving parts such as hinges, latches, magnets, and drawer runners.
Open the lid after the primer dries. Slide each drawer before the color coat. If a panel already rubs, mark the contact point with removable tape and keep that area thin.
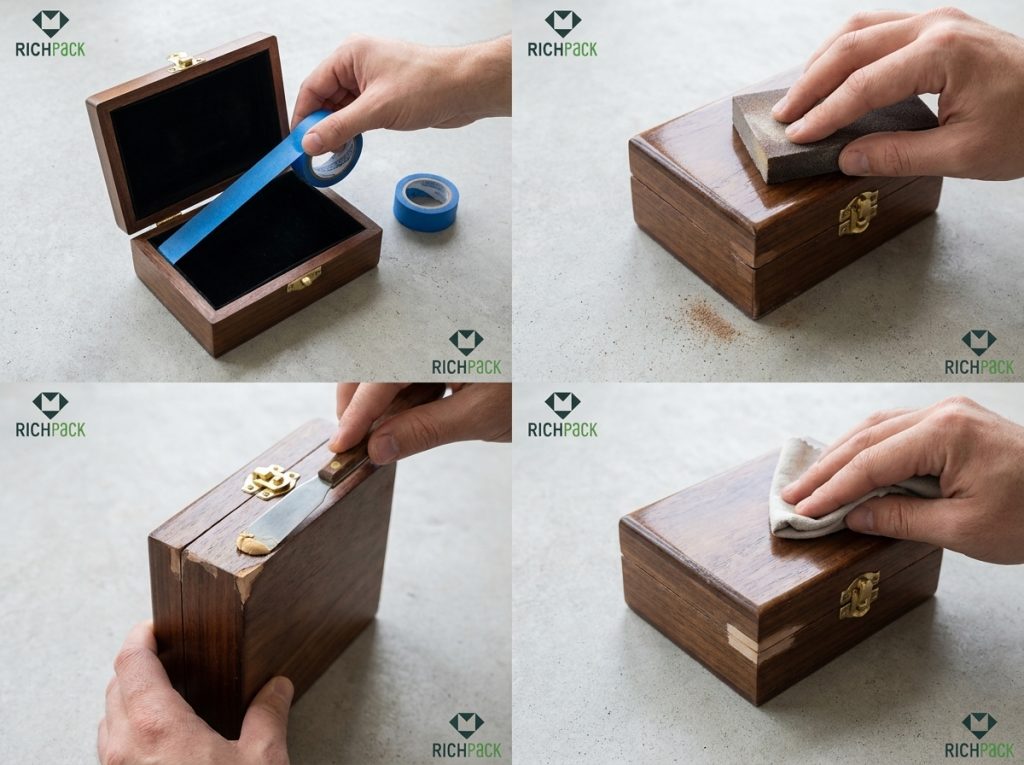
Keep the first color coat simple and even because a thick film can block the box. Add decoration only after the base coat dries.
Paint the outside panels before you work on delicate interior details. Place the box on a stable support so its wet edges do not touch the table. Rotate the box instead of dragging it through dust.
If the inside needs color, paint removable hard dividers on their own. Keep glued fabric, velvet, and foam covered. Paint them only when the coating maker approves that use.
Use the lid as a test of restraint. The broad face can take a little more visual weight than a hinge edge or narrow side wall.
One heavy coat may look faster, but it can leave runs, soft edges, and trapped moisture. Several light coats give you more control.
Let each coat reach the recoat condition on the label. The time can change with temperature, humidity, product type, and the thickness of the coat. Do not use the phrase “dry” as a substitute for the manufacturer’s full instructions.
A small box may need extra edge passes, but keep them light so the edge does not form a ridge.
Use a small brush for grooves and a nearly unloaded brush for narrow edges. Touch the paint to the corner, then pull it away. Do not push a wet pool into the hinge side of the lid.
On a carved box, work from the recess toward the flat face. This keeps the brush from dragging a thick bead across the raised detail.
MDF edges may absorb more paint than flat faces. Let the first coat show you where the surface needs another thin layer.
Read the label before you start, then record the product name and coat time. Those notes help a brand repeat the finish later.
Some coatings feel dry on top while remaining soft below. A second layer applied too soon can wrinkle the first. A clear coat applied too soon can trap tackiness.
Use the label’s recoat, handling, and cure instructions as separate checkpoints.
Plan the color blocks before you put down tape. Press tape onto a dry, stable base. Seal the edge only when the paint system allows it.
Follow the paint instructions when you remove the tape. Many painters pull it before the top coat turns hard.
For a simple pattern, use two colors and leave space near the edges. A small lid fills up fast when stripes, flowers, initials, dots, and metallic paint compete.
A clean border beats a busy pattern with rough edges.
Move the lid and drawers after the coat reaches the product’s handling condition. Look for rubbing, sticking, scraped paint, and a latch that no longer reaches its seat.
Fix a fit problem while the coating is still easy to correct. Sanding a fully decorated lid creates more work and can damage the artwork.
| Symptom | Likely cause | Fix before the next coat |
| Drip or sag | The coat is too heavy, or the movement is too slow | Let it dry as directed, smooth the area, and apply less paint |
| Brush marks | The brush is overloaded, or the paint is being worked for too long | Use a lighter load and leave the coat alone sooner |
| Rough dust | The surface or work area was not clean | Let it dry, smooth the bump, clean the box, and control dust |
| Old color shows through | Base needs another thin layer or a better primer | Use the compatible product’s next coat or primer guidance |
| Tape edge lifts | The base was soft, dirty, or not fully bonded | Remove carefully, let the area settle, and retest the tape |
| Surface stays tacky | Incompatible layers, heavy coating, or poor drying conditions | Stop adding layers and follow the product’s correction guidance |
| Lid sticks | Paint reached the contact edge, or the coating is still soft | Keep the edge clean and correct the contact point before decoration |
| Orange peel | Spray dried before it could level, often because the can was too far away, the coat was too dry, or conditions were wrong | Let the coat dry, smooth it as the paint system allows, then correct distance, pace, and temperature |
| Fish eye | Oil, wax, silicone, grease, or another contaminant made the wet paint pull away into small, round craters | Stop spraying, let the layer dry, remove the failed area, clean the surface, and retest before repainting |
Orange peel looks like citrus skin, and PPG links it to poor spray setup or bad conditions. Fish eyes are round craters covered in BESA’s defect guide.
More wet paint usually makes either defect worse.
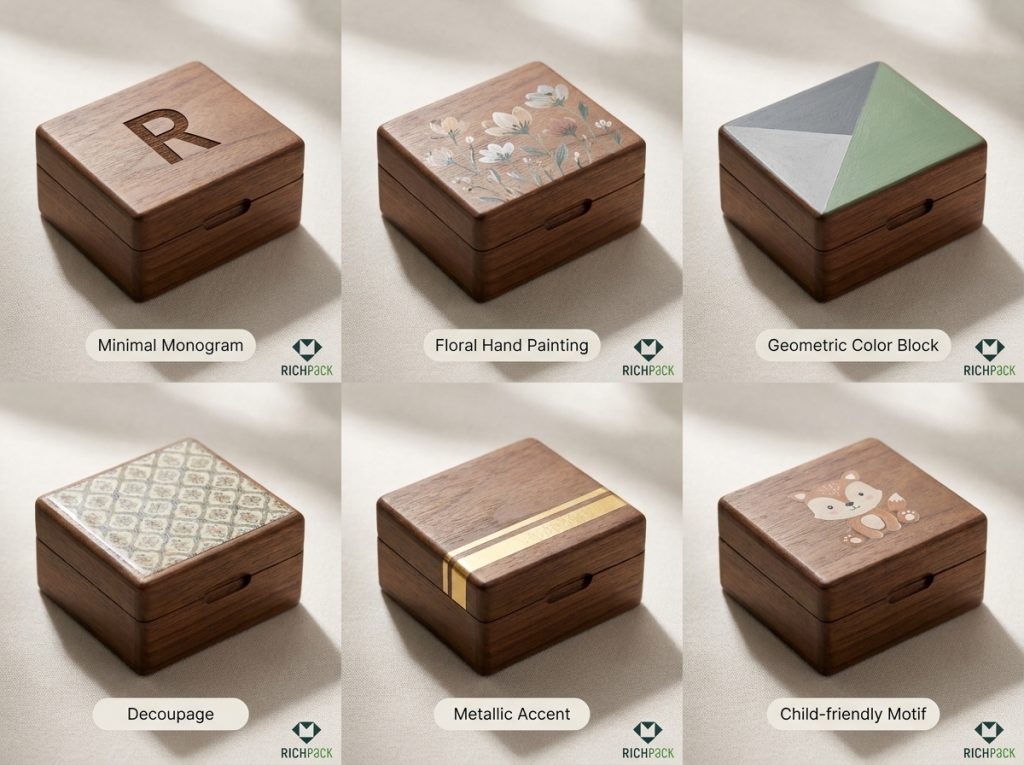
Choose one main visual idea and one or two supporting details. This leaves calm space around the jewelry and keeps the monogram easy to read.
Use a name, initials, date, or short message when the box has a clear recipient or brand story. Test the letter size on paper first. A design that looks balanced on a screen may feel oversized on a small lid.
Center the text on the usable face, not the full lid. A hinge or latch can shift the space your eye sees. Curved corners and raised trim can do the same.
For a brand sample, record the typeface, letter height, color, and sheen. Measure the design from two fixed edges so the idea becomes a repeatable instruction.
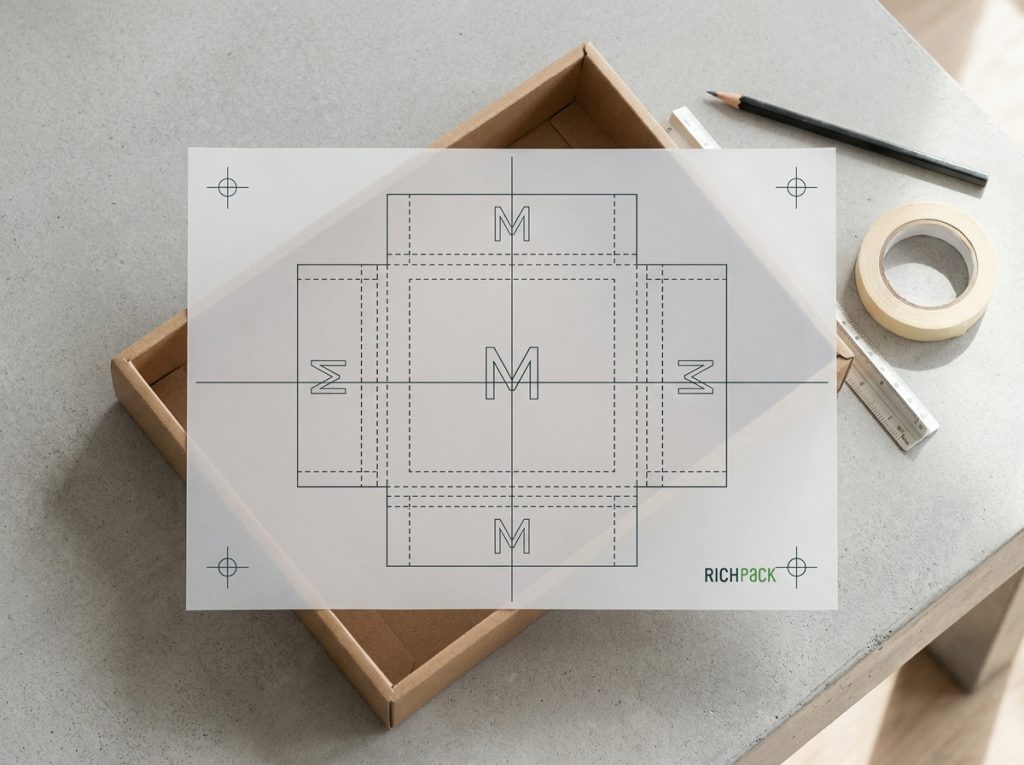
Use a centerline and registration marks before placing a stencil. For a design that runs across several sides, mark the same baseline on each face. Check the lid closed and open so the design does not disappear under a trim line.
Transfers and stencils need a stable, clean base. Press from the center, remove the carrier slowly, and stop if an edge lifts.
One maker wanted to repeat a print on every side, which needs two checks. The paint must grip, and the artwork must line up.
Small motifs are easier to control than a full scene, so try a flower, leaf, star, wave, or geometric mark. Start with the largest shape and add fine lines after it dries.
Use a test card made from the same surface when possible. A brush that feels perfect on paper may drag on a sealed lid. Keep a clean water or solvent setup only when the paint label supports it.
If the design looks uneven, do not keep adding detail to hide it. Let the layer dry, correct the main shape, and stop when the box still has visual breathing room.
For paper decoration, cut the pieces before applying adhesive and dry-fit each one. This check shows whether a fold, hinge, or curved corner will cause trouble.
Plaid puts adhesive under the paper, then smooths out the air and seals the top. Use clean waxed paper between the design and squeegee when the method calls for it.
Let each layer dry before adding the next one, and keep jewelry away from a tacky surface. A decoupage medium may also be wrong for a soft liner.
Start with what will remain inside the box. A yellow liner can become the warm accent that guides the exterior. A cool gray, navy, or muted green can calm a bright interior. A natural wood tone can carry the design without another strong color.
Match the palette to the jewelry and the moment. Soft neutral tones suit a quiet fine-jewelry presentation. Brighter blocks can work for a playful gift or event favor. Metallic accents need a calm base, or they lose their edge.
The question “not sure what color to paint the outside” is easier when you choose the fixed element first. Then select one supporting color and one small accent.
New hardware can change the character of a box, but it should fit the existing scale. A large pull can overpower a small lid. A shiny metal accent can look disconnected from a soft matte finish.
Use trim, ribbon, or a message card as supporting details. Check that they do not rub the jewelry, block the lid, or create loose pieces inside the box.
If you keep the original liner, let it guide the texture. Smooth exterior paint beside a soft interior can create a useful contrast. Too many textures can make the box feel busy.
Choose the focal point before you decorate. It might be a monogram, a floral motif, a bright lid, a metallic hardware detail, or the jewelry itself.
Use the other elements to support that focal point. A simple name can carry the lid. A quiet side border can carry a floral center. A plain interior can make the outside feel more intentional.
| Personalization method | Skill level | Best surface | Precision risk | Best use |
| Monogram or short name | Beginner to intermediate | Flat lid or front panel | Uneven spacing | Gifts and brand prototypes |
| Stencil | Beginner to intermediate | Stable flat surface | Bleeding under the edge | Repeated symbols and clean shapes |
| Hand-painted motif | Intermediate | Sound paint layer | Uneven scale or brush marks | One-of-a-kind boxes |
| Decoupage | Beginner to intermediate | Prepared hard surface | Bubbles and lifted corners | Paper patterns and illustrations |
| Hardware update | Beginner with careful tools | Hinges, pulls, latches | Scratched finish or poor fit | Small visual upgrade |
| Liner or message detail | Intermediate | Removable insert or card | Loose parts or poor contact | Gift story and product presentation |
The last coat may feel dry before the box is ready, so check both the handling and cure times on the label.
The finish should not rub off, smell strong, or stop the box from working.
Add a clear finish when the color or paper needs more protection. Test a thin coat for wrinkles, clouding, lifted color, yellowing, or a soft film.
Keep an unknown finish away from the jewelry-contact area. An outside topcoat does not prove that the same product is safe inside.
If the box becomes a brand sample, record the full layer stack. Write down the primer, color coat, decorative medium, and clear finish.
Dry to the touch is one checkpoint, safe handling is another, and full cure can take much longer.
The timing changes with the product, coat thickness, heat, humidity, and surface.
Plaid says Mod Podge may feel dry in 15–20 minutes, yet full cure can take about 28 days. Minwax lists 24 hours before normal use for one Polycrylic wood finish.
That is why 24–48 hours is only a planning window for a simple box, while the label sets the real wait.
Keep the box open while it settles unless the instructions say otherwise. Closing a soft finish can trap odor and make contact edges stick.
Wait until the coating can handle the assembly step. Use the original screws when they fit, and tighten them without forcing the hardware into a wet edge.
Protect the finish under a screwdriver with a small piece of paper or tape that will not leave residue. Check the hinge line after the first screw. The second screw should not be an afterthought.
If the hardware no longer fits, stop. A stripped screw or cracked edge is harder to fix than a small paint correction.
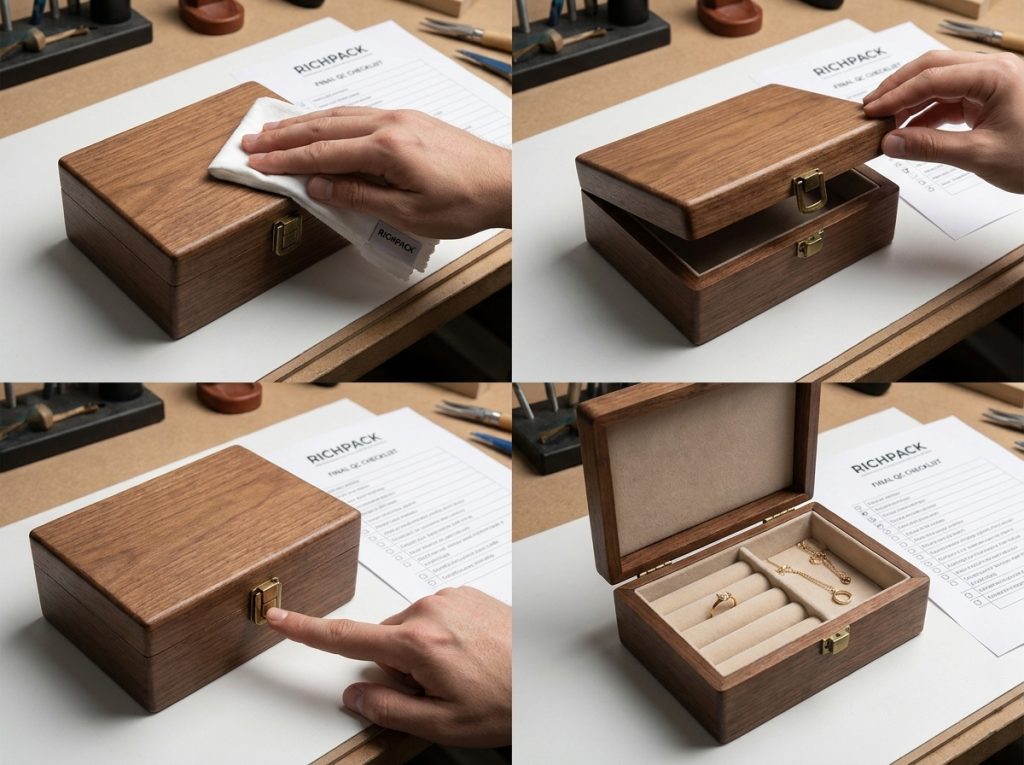
Press a clean white cloth lightly against a hidden finished area. Check for color transfer, sticky drag, fibers, or a strong residual odor. This is a simple household check, not a laboratory test.
Repeat the check on the lid edge and the area around the insert. A finish can feel fine on the top but remain soft in a shaded corner.
Wait for the label’s cure point before adding valuable jewelry, then run the contact checks below.
Open and close the lid several times, then test the latch, magnet, and drawers. Listen for scraping and look for fresh paint marks.
Check the box with the insert installed. A liner or tray can change the clearance even when the empty box works. A chain should not catch on a rough edge, and a ring should sit in its intended slot.
The final design must work in the hand. A photograph cannot reveal every fit problem.
Use the cleaning method allowed by the finish manufacturer. A dry, soft cloth may be enough for dust. A damp cloth can work for some cured surfaces, but it is not suitable for every coating or paper decoration.
Avoid abrasive powder, harsh solvents, and untested household cleaners. Store the box open until any residual odor has gone and the coating has reached its full cure.
Use this acceptance check before the first jewelry piece goes inside:
A branded package needs fixed artwork, named materials, and a production specification. It also needs approved samples and repeatable checks.
The prototype confirms the final dimensions and color. It also checks fit, texture, and opening feel.
Keep one finished box as the master sample. Photograph it closed, open, and beside the jewelry it must hold. Record the surface, colors, artwork, hardware, insert, and finish.
The master sample stops quiet changes. A darker color can alter the mood. A thick coat can change the fit. A shifted monogram can make the lid look off-center.
Does the prototype use real wood? Compare the woods used for handmade jewelry storage before you lock the material.
Wood changes the grain and paint uptake. It can also change the engraving result.
For names or monograms, review customized jewelry boxes with engraving options. Use the page to compare visible options.
Then confirm the real material, process, and sample for your order.
Turn the visual result into a short production specification:
Use the jewelry box customization process to turn the idea into a request. A clear brief leaves less room for a sample that looks close but misses the mark.
The paint is only one layer of a jewelry package. The insert keeps the product from moving. The lining is the surface the jewelry touches. The box structure controls the space around the piece.
Need a ring slot, earring card, necklace support, or bracelet space? Review customizable jewelry box inserts.
The insert should hold the piece without scraping it or lifting the lid.
If the insert changes, test the full box. Do not approve the tray alone.
The custom insert construction steps cover material, shape, and fit.
Hand painting gives every box a small variation. That variation can be part of the value of a limited gift or keepsake. It can become a problem when a retail campaign needs hundreds of boxes to match.
Printing can repeat a logo, pattern, or color block more closely. A transfer may suit a short run. The choice rests on the box surface, art size, quantity, and allowed variation.
The jewelry packaging design and sourcing guide moves from paint to the full package. The finish must work with the jewelry, insert, opening action, and shipper.
A white sample checks the physical build before color and artwork distract you. Open the lid. Test the insert.
Check the hinge, latch, drawer, and contact edges. Look for gaps and movement.
A decorated sample checks color, artwork position, surface texture, logo scale, and finish. Compare it beside the master sample under the same light. Do not approve from a phone image alone.
If the structure feels wrong, compare jewelry packaging box types. A painted face cannot repair a poor box style.
Compare finished units against the master sample in a small group. Check:
Record the result with photos and a pass or hold decision. Use the jewelry packaging budget and design guide to place the finish inside the wider plan.
Use a packaging manufacturer when the design must repeat across products or stores. The same applies to a seasonal or corporate gift program.
Keep the painted prototype. It shows the target color, scale, feel, and opening action.
Keep commercial planning separate from the paint steps. The small jewelry gift box personalization guide covers the occasion and brand. It also covers inserts and supplier choices.
Keep the painting content focused on the physical box.
| DIY prototype decision | Production specification | Sample check | Batch QC |
| Surface and base coat | Substrate, primer, color, and finish | Adhesion and surface appearance | Color and coating consistency |
| Monogram or motif | Artwork file, size, position, and margins | Alignment and edge quality | Position and repeatability |
| Liner and insert | Material, contact area, and jewelry fit | Lid clearance and product movement | Fit, rub, and loose-part checks |
| Hardware detail | Finish, size, and attachment | Open, close, and latch test | Scratches, movement, and attachment |
| Hand-painted effect | Acceptable variation or repeat method | Compared to the master sample | Variation within the approved limit |
Match the paint to the box surface. Acrylic works for small details.
Chalk-type paint can cover compatible wood. Spray paint can give the outside an even coat. Test a hidden spot, then follow the label for primer, recoat, airflow, and cure time.
Not always. On rough bare wood, start with 120-grit and finish with 220-grit. Use a lighter scuff on veneer, plastic, metal, or sound paint when the coating label calls for it. Test a hidden spot before sanding the full box.
Avoid painting glued velvet, flocked paper, foam, or fabric. Paint can change the feel, stay tacky, or rub onto jewelry. Mask the liner, paint the removable hard parts on their own, or replace the liner with a tested material.
Plan 24–48 hours before light use for a simple painted box, but follow the product label. Some craft finishes need far longer to cure. Keep the box open, then check for tack, odor, color transfer, and blocked movement.
Try a small brush, stencil, transfer, paper design, hardware change, or message card. Test the method first. Keep the artwork simple enough to center on the lid and read from a normal distance.
Keep one approved box as the master sample. Record the surface, color, art size, position, finish, and insert. Approve a plain sample and a decorated sample. If each unit must match, compare hand painting with print or applied graphics.
Start with the surface, protect the liner and closure areas, and build the finish with thin compatible layers. A hidden test, a white-cloth check, and a full open-and-close test will protect the jewelry and the design. For a repeatable brand result, keep the approved prototype and turn its details into a production brief.
2024-11-26

2025-02-25

2026-07-10

2025-09-08
2025-06-22

2025-04-01
Affordable Custom Gift Boxes for Small Jewelry Shops | Budget-Friendly Packaging Solutions Custom Designs for Small Retailers
View More
Bespoke Jewelry Packaging for Independent Jewelry Stores | Tailored Designs for Unique Branding Small Quantity Options
View More
Creative Custom Gift Packaging for Boutique Jewelers | Unique Packaging Solutions Tailored Designs for Small Jewelry Brands Richpack
View More
Creative Jewelry Packaging with Fast Sample Production | Customizable Designs for Unique Brands | Quick Turnaround Times
View More
Custom Drawer Gift Box (7.5×7.5×3.5cm) | Specialty Paper Jewelry Packaging
View More

