

 PREV
PREV

10 Creative Uses for Magnetic Gift Boxes
2026-05-19




Corrugated boxes can look perfect at the packing bench. They may still arrive with crushed corners. The failure often starts before the tape goes on. The box may be too roomy, weak in the wrong direction, or paired with an insert that shifts.
In July 2026, the Fibre Box Association listed about 33 flutes per foot for A flute and about 125 for F flute. Those numbers are rough profiles, not buying tolerances. They show why flute letters describe structure, not a simple strength rank.
After reading this guide, you will learn how to:
For jewelry brands, the outer shipper has one quiet job. It protects the presentation box until the buyer opens it. RichPack builds the custom jewelry packaging system inside that shipper. The system includes the box, insert, protective layers, samples, and production checks.
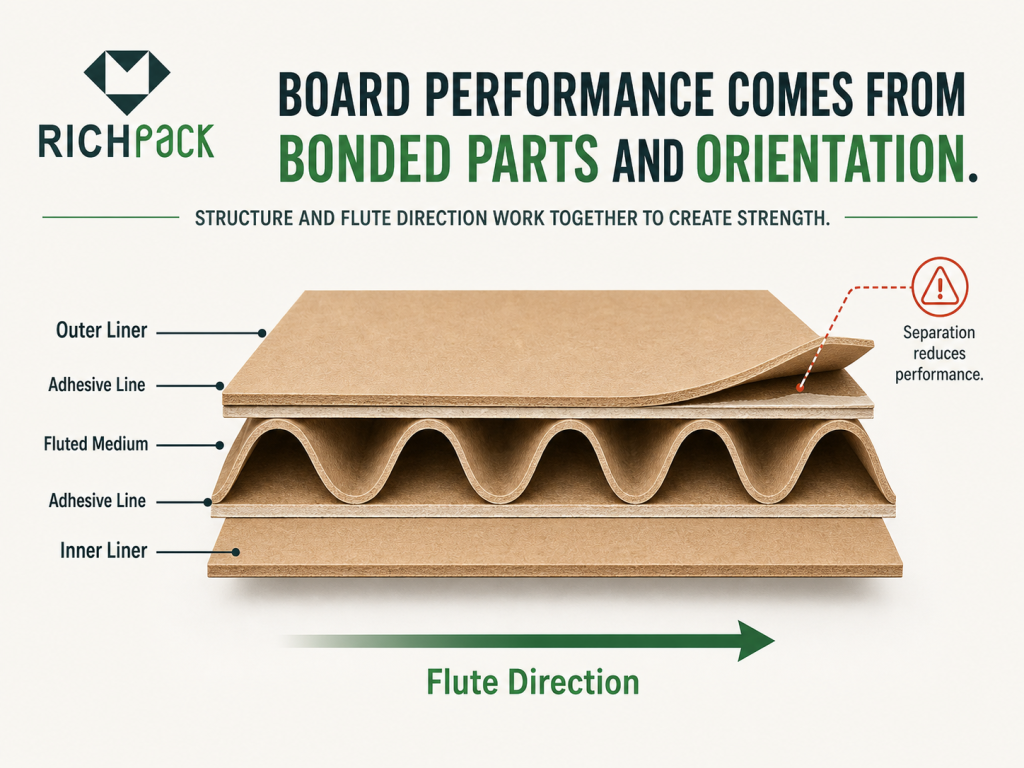
Most of a corrugated box hides its structure between two flat liners. Once you understand those layers, flute, wall type, and test values are easier to compare.
A corrugated box is a container made from corrugated fiberboard. That board bonds arched paper flutes to flat linerboards. The arches separate the liners, stiffen the panel, and create space that can absorb part of an impact.
The Fibre Box Association calls this material combined board. A common single-wall board has one fluted medium between two liners. Folding cartons, greeting cards, and cereal boxes lack that fluted middle.
People use “cardboard” for a wide range of paper packages. The term works in casual talk. On a quote or drawing, ask for corrugated fiberboard when the pack needs flutes. Ask for paperboard for a thin folding carton.
The material names in the first column belong on drawings and quotes.
| Material | Basic structure | Common role | Protection | Print surface | Typical example |
| Corrugated fiberboard | Flat liners bonded to a fluted medium | Shipping, storage, retail-ready packs | Better cushioning and panel stiffness | Brown, white, coated, or laminated | RSC shipper or die-cut mailer |
| Paperboard | One or more flat paper plies | Lightweight retail packs | Lower cushioning without added structure | Smooth and suited to detailed graphics | Folding carton |
| Rigid paperboard | Thick board wrapped with decorative paper or fabric | Premium presentation and storage | High shape retention but needs transit protection | Premium wrap and finishes | Jewelry presentation box |
A rigid jewelry box and a corrugated shipper have different jobs. The rigid box handles presentation and storage. The shipper protects it from dirt, scuffs, compression, and routine handling.
Linerboard is the flat paper on the outside and inside faces. The medium is the paper formed into flutes and bonded to those faces. Poor bonding can let a liner peel away. Stress or damp air can speed up the damage.
Flute direction matters too. Upright flutes act like small columns. That is why panel direction can change compression behavior. Creases, hand holes, print pressure, and poor scores can interrupt those columns.
A converter can change the paper grade, flute, and wall type. It can also change the size and inner supports. These choices help the team balance protection and print quality. They also affect storage and shipping cost.
The practical benefits include:
That flexibility also helps brands use a limited set of sizes across related SKUs. Fewer sizes can make restocking easier. The boxes must not leave excess void or raise freight cost.
Water and high humidity can weaken corrugated board. Crushed edges, poor scores, and repeated handling can do the same. Sharp products, loose parts, and hard inner corners can also push through a panel.
A high test value does not fix poor fit. Small products can move fast inside oversized heavy-duty boxes. That movement can cause impact damage against the inner walls. Extra filler may hide the gap at the bench, but it adds labor and size.
Printed corrugated has limits too. Fine type and gradients may need a smoother liner. Metallic effects may need another print method. A tight brand-color target may need a laminated sheet.
Corrugated boxes move goods through parcel, case, and retail systems. They carry industrial parts and food. They also carry electronics, cosmetics, and premium packs. The route changes the design. A parcel meets belts, drops, and mixed loads. A palletized case spends more time under compression.
Jewelry and watch orders add one more layer. The shipper must hold the inner pack and stop it from moving. It must protect each finished surface and keep the label readable. RichPack’s packaging distribution support covers these handoffs.
A swatch can show thickness and surface quality. It cannot show how the finished box will pack, close, stack, or ship. Compare finished samples with the actual product inside.
Kraft liners show the natural brown paper color. They work well for standard shipping graphics. White-top liners give artwork a lighter base. Coated or laminated surfaces can improve print detail and rub resistance. They can also change scoring, glue, tape grip, and recycling options.
Ask the converter to name each paper layer. Do not accept “premium cardboard” as the material callout. RichPack’s packaging materials page compares paper-based structures used around jewelry.
Test the finished surface with the planned tape, label, ink, and coating. Match the test to the planned storage conditions. Tape that grips uncoated kraft may lift from a slick surface.
Flutes are the arched paper waves inside corrugated board. They create air space, help absorb shock, and support vertical load. The common profiles in shipping and retail packs are A, B, C, E, and F flute.
A flute has about 33 flutes per foot in the Fibre Box Association reference. Its larger arches create a thick board profile. The extra space adds cushion and vertical support. Detailed graphics may show more washboarding.
Use A flute when its cushioning direction and panel structure match the hazard. Do not choose it because the arches look large.
B flute has about 47 flutes per foot in the same reference. Its tighter structure gives a firmer surface for die cutting and helps resist flat crush. It often works for compact mailers, trays, and products that support part of their own load.
B flute leaves less cushioning space. If a fragile inner pack needs more room, test B flute against a thicker or combined construction.
C flute has about 38 flutes per foot. It sits between A and B in flute count and often appears in general shipping cases.
“General purpose” does not mean universal. Confirm the liner and edge-crush target. Then check box style and size. Check the packed weight and route before approval.
E flute has about 90 flutes per foot. F flute has about 125. Their smaller arches make a thinner board with a smoother print face. They can replace plain paperboard when a small retail pack needs more structure.
Small flutes have less space for cushioning. A printed E-flute jewelry mailer may look sharp. It may still need a fitted insert and an outer shipper for a demanding route.
A combined-flute board uses two fluted media between three liners. The two flutes often have different profiles. A converter may pair a large flute with a small flute. This can balance cushion, stiffness, wall toughness, and print quality.
Ask why each flute is present. If the supplier says “more protection,” ask what each flute does. Compare that sample with the single-wall option using the same product and test plan.
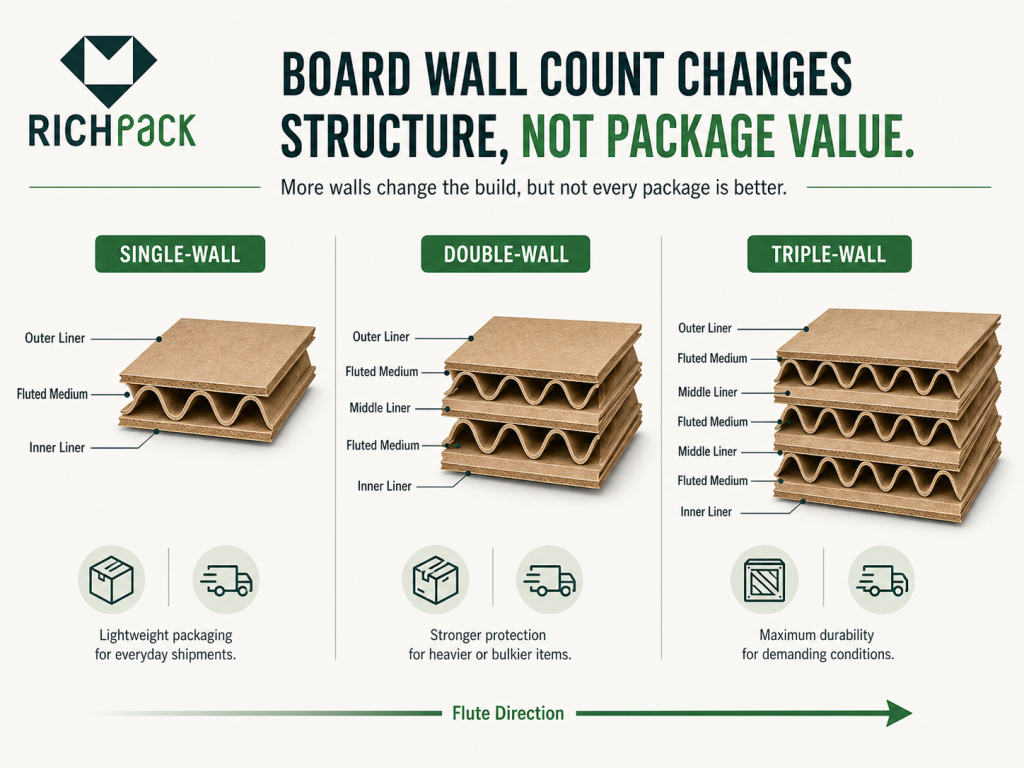
This count states the number of fluted media in the board. It does not name the papers or flute profiles. It also omits the adhesive, box size, and build quality.
Use this table to start a sample request. Flute profiles set the final thickness. Paper grades in the supplier’s spec also affect weight.
| Construction | Basic build | Typical relative thickness | Common reason to sample | Main caution |
| Single wall | Two liners and one medium | Lowest of the three | Parcel, retail, and general cases | May lack margin for heavy or harsh routes |
| Double wall | Three liners and two media | Higher | Heavy products, stacking, puncture, or longer routes | More material can raise freight and conversion cost |
| Triple wall | Four liners and three media | Highest | Heavy industrial loads | Handling system and pallet design become critical |
A well-made single-wall box can beat a double-wall box with weak scores or bonds on a given route. Samples and packed-product tests settle that decision.
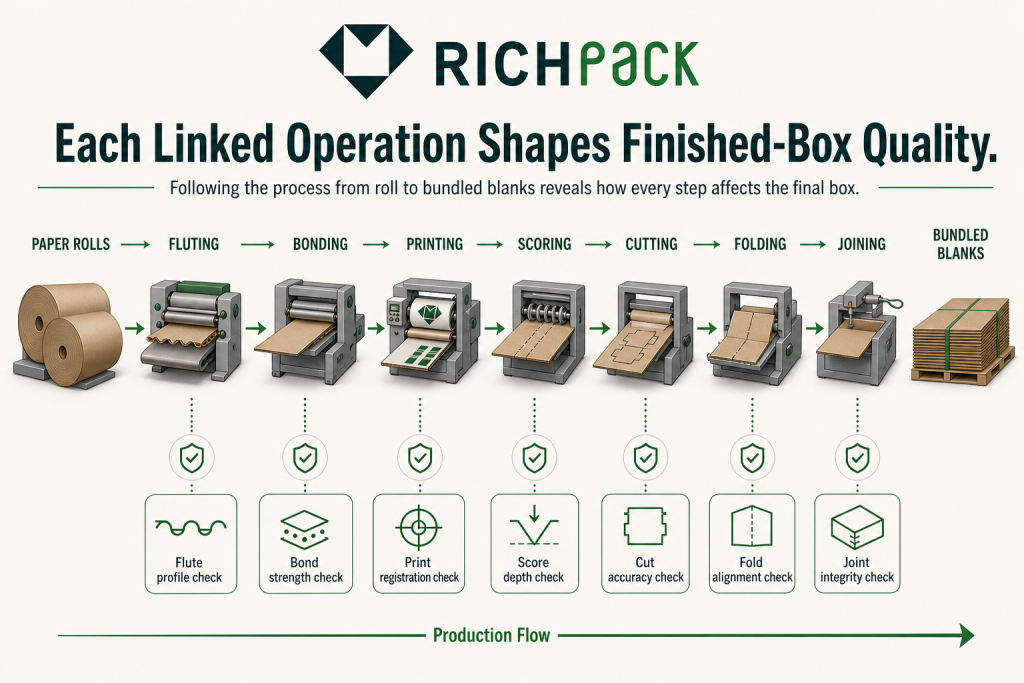
A corrugator forms the fluted medium, adds adhesive, and bonds the liners. Converting equipment then prints, scores, slots, die cuts, folds, and joins the box. Each step can change the final pack.
Watch these production points:
Incoming checks should target defects from each packaging manufacturing step. A flat blank can look fine and still fail when a packer squares, fills, and closes it.
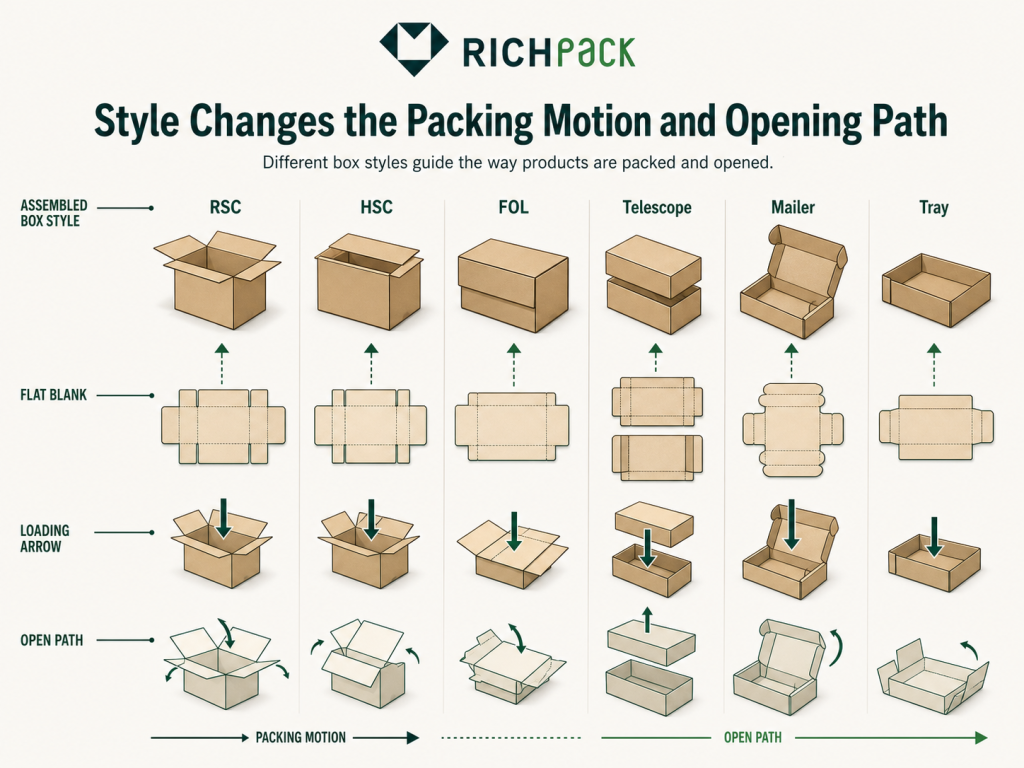
Box style changes how people load, close, open, and store a pack. Map the packing work before choosing one. If a die-cut design adds extra folds to every order, the labor cost may outweigh the board saving.
A Regular Slotted Container (RSC) is a standard box style. It has four top flaps and four bottom flaps of equal length. The outer flaps meet at the center. RSCs ship flat, run well on manual or automated packing lines, and fit a wide range of products.
RSCs need tape, staples, or another approved closure. The center seam may need extra support. This matters when a small, dense product presses against it.
A Half Slotted Container (HSC) is a box with one open end and one set of flaps. It can work with a separate lid or with products loaded from above. A Full Overlap (FOL) box has outer flaps that overlap across most of the panel. That adds board where bending or rough handling may occur.
More overlap also means more board. Compare the protection gain with blank size, closure time, and pallet use.
A telescope box is a two-piece style with a lid and body that slide over each other. It can fit long, flat, or variable-height products. The overlap adds wall coverage on part of the pack.
Control the fit. A loose lid can lift, while a tight lid can scrape a printed or wrapped inner pack. Humidity and production tolerances can change the lid fit.
A die-cut mailer is a shaped blank that folds into a self-locking or tab-locking pack. It can reduce tape and improve the opening experience. It also adds more scores and tabs than an RSC, so test the assembly at normal packing speed.
Run a timed pilot with the actual packers. Watch the operators during the pilot. Note any forced tabs or torn corners. Note skipped locks as order volume rises.
A corrugated tray is an open or partly open style that groups products. It can move from case to shelf with less handling. Display-ready packs may add tear strips, covers, windows, or printed fronts.
The opening feature must survive distribution and work at the destination. Test both states: closed for transit and open for display.
A multi-depth box has extra score lines that let a packer reduce height. Tubes, folders, one-piece folders, partitions, and custom die-cut cases solve other fit problems. They are useful for long, flat, fragile, or uneven products.
Extra score lines can reduce local stiffness. They can also start a buckle when the load hits the wrong place. Test any unused score lines before using the box across a range of SKUs.
Compare the packing motion before requesting artwork.
| Style | Loading | Closure | Assembly effort | Opening | Best fit |
| RSC | Top | Tape or approved alternative | Low | Utility | Broad shipping use |
| HSC with lid | Top | Lid plus closure as needed | Medium | Full top access | Tall or display loads |
| FOL | Top | Tape, glue, or staples | Low to medium | Utility | Extra overlap or bending resistance |
| Telescope | Top or end | Lid restraint as needed | Medium | Separate lid | Long, flat, or variable-height products |
| Die-cut mailer | Top | Locking tabs and optional seal | Medium | Controlled reveal | Compact direct orders |
| Tray | Top | Stack, cover, or wrap | Low to medium | Immediate access | Retail-ready grouping |
Count hands and motions at the bench. One extra fold repeated across thousands of orders can outweigh a small saving in board.
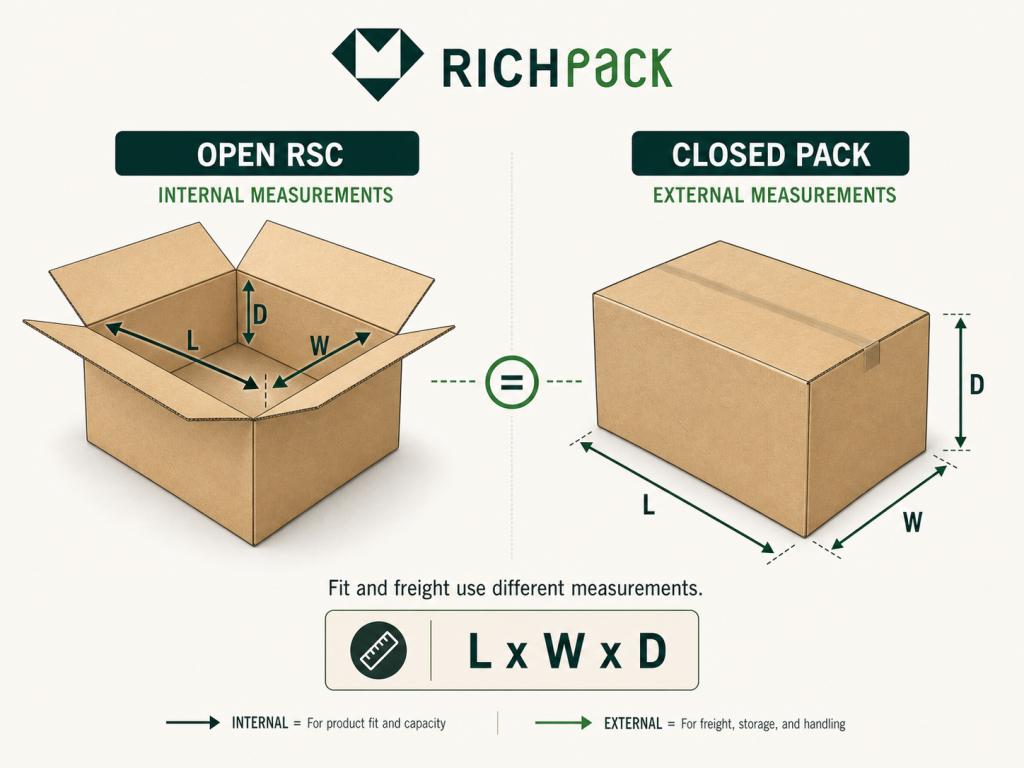
Use the same size format on drawings, quotes, warehouse records, and carrier systems. Label every three-number size as L x W x D.
Internal dimensions control product fit. External dimensions describe the packed box. Those outside numbers affect shelves, pallets, and carrier rating.
A supplier may quote inside dimensions for a standard RSC. Check the size rule on the drawing. Board thickness, scores, overlap, and manufacturing variation change the outside dimensions.
For a standard RSC, length is the longer side of the opening. Width is the shorter side. Depth runs away from the opening. Write L x W x D beside every size.
Also identify the measured state:
Measure the product in the orientation used for shipping, not the way it sits in a product photo. Include protrusions, hardware, bags, cards, tissue, and the presentation box.
For jewelry, measure the assembled presentation pack. Include the custom jewelry box inserts that hold rings, chains, earrings, or sets. Check the tallest crown, clasp, hinge, ribbon pull, and lid movement. A necklace may sit flat during approval and rise later when the chain bunches under the insert.
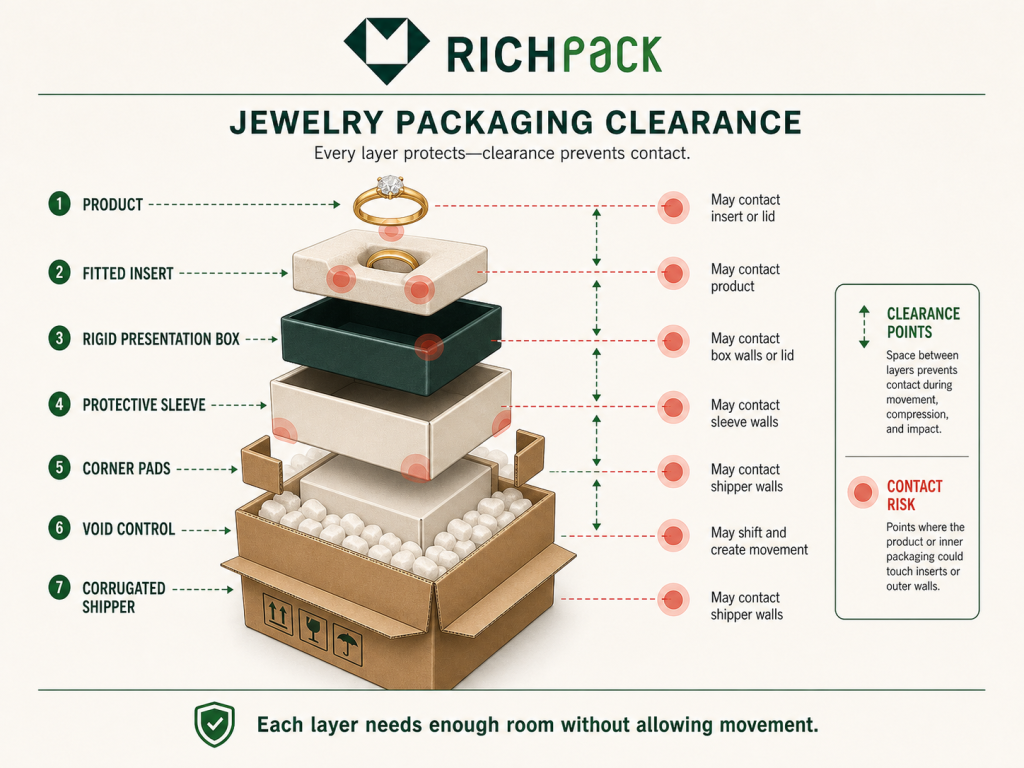
Clearance is working space for an insert, pad, wrap, or other protection. Too little clearance creates hard assembly and surface pressure. Too much clearance lets the load move and raises outside dimensions.
Set clearance with a physical sample. Pack it with normal tools and operators. Then shake, open, and inspect it before formal testing.
A dieline describes a target. It does not promise a perfect physical part. Paper moisture, score width, die wear, folding, and joining can all shift the final size. Ask the supplier to state the key tolerances and how they measure them.
Check worst-case combinations. A large inner box inside a small outer box may jam even when both parts fall within their own limits. The same issue appears when a thick insert meets a shallow lid.
Carrier charges may use weight, package size, service, origin, destination, and other rules. Close the box and let the panels settle, then record the finished size. Do not use the blank size or an empty-box estimate in the rate system.
When SKU sizes vary, one default package profile will not fit the full range. Checkout may use the wrong size. The shipping charge and label may then differ from the box that leaves the warehouse.
A stock box avoids tooling and can ship fast. It suits uncertain demand, mixed products, or low volume when the fit is close. A custom size makes more sense at steady volume. It can cut void and packing time. It may also lower storage, damage, or freight.
Compare both options with one worksheet.
| Input | Stock option | Custom option |
| Box unit cost | Record quote | Record quote and setup |
| Void fill | Type and amount | Type and amount |
| External packed size | Measure sample | Measure sample |
| Packing time | Time a pilot | Time a pilot |
| Storage | Bundles and reorder point | Bundles and reorder point |
| Damage result | Pilot or test | Pilot or test |
| Inventory risk | Number of sizes held | MOQ and forecast risk |
A lower box price may be offset by added filler, labor, freight, storage, or damage.
Strength is not one property. A panel may resist edge crush but still fail under a sharp part. A box may pass a board test and fail later because of humidity, poor sealing, or product movement.
Start with the product and route. Record the product weight, size, and center of gravity. Add its fragility, surface risk, and replacement cost. Note whether the inner box must arrive unmarked.
Then map the route:
A package design brief should connect each hazard to a pack part or test. “Handle with care” is not a control.
ECT measures edgewise crush resistance under a defined method. It helps compare board choices for stacking and compression design.
ECT does not measure puncture, drop, or vibration performance. It also leaves out moisture, closure, and product restraint. Use it as one input, not as the finished answer.
The Mullen test uses hydraulic pressure through a diaphragm to burst a board sample. It measures face burst strength. It does not measure direct puncture from a sharp object.
ECT and burst results describe different failure modes. A rough conversion chart cannot tell a buyer which box will protect a specific product.
Box compression testing loads the finished box between plates. Board and box size affect the result. Flute direction, scores, and joints also matter. Print, hand holes, and test conditions add more variables.
Warehouse stacking adds time, humidity, pallet overhang, uneven loads, and handling damage. Build the safety margin from the real route and test plan. Do not copy a lab peak into a stack-height rule.
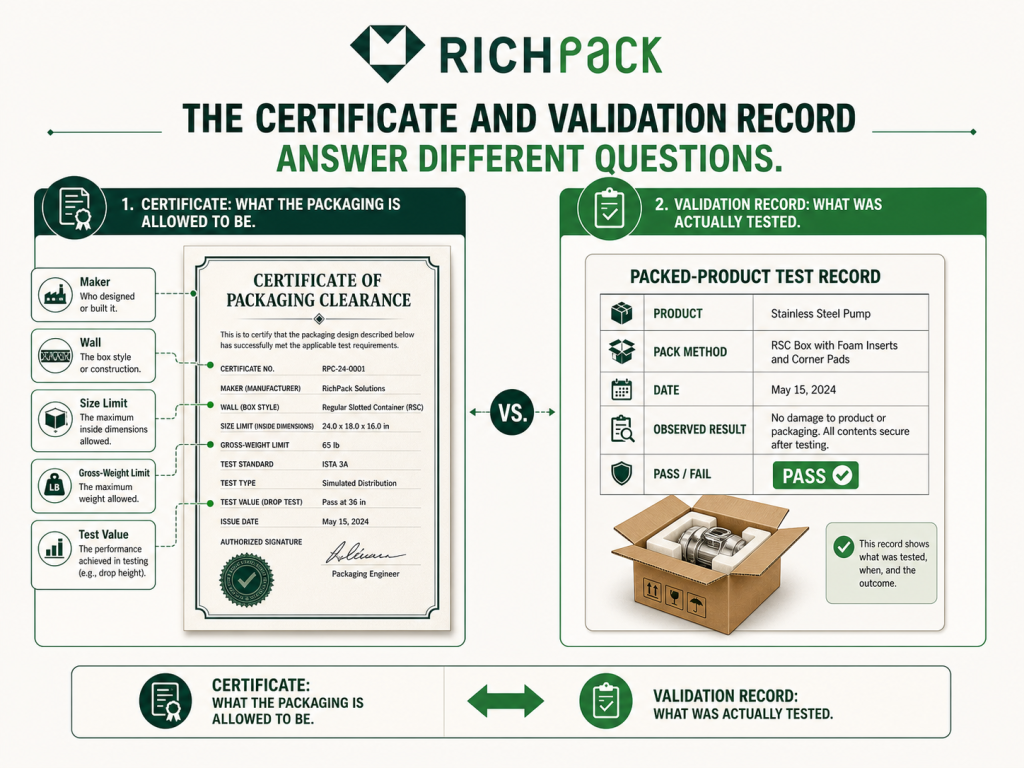
A box maker certificate may list the maker and construction. It may also show size, gross weight, ECT, or burst limits. Read every field. Do not stop at the largest number.
The certificate cannot show product movement, tape lift, inner-box scuffing, or route damage. Keep it with the drawing and material callout. Add the closure method, packed weight, and test record.
Paper reacts to moisture. High humidity, water, and damp floors can soften a box and reduce stack margin. Old crush damage does not disappear when the box dries.
Store blanks off the floor and away from leaks. Rotate stock and protect each bundle. Reject blanks with crushed edges, warped panels, or loose joints. Also reject stains and torn scores.
ISTA separates tests by purpose. The 1-Series screens package integrity. It does not simulate the full shipping environment. The 2-Series adds some simulation steps, but it does not predict shipping performance.
The ISTA 3-Series models a defined shipment type. It uses motions and forces that cause damage. It also applies route conditions and test sequences. Procedure 3A covers parcel-delivery packs at 150 pounds or less. Project 3L covers a specific retailer-fulfillment path to the final customer.
ISTA 3A does not assign a wall type. It does not publish a universal damage rate for single-wall versus double-wall boxes. For an e-commerce comparison, test matched samples under the same procedure. Record damage by wall type and use enough repeats for the lab’s analysis plan.
Choose the procedure with a packaging professional or qualified lab. The route, pack type, weight, goal, and customer rules decide which test applies.
Test the product and package together. Use production versions of every pack part. Include the product, insert, inner box, outer box, tape, and label. Use the final pads, filler, and sleeve or bag.
An empty box drop says little about a ring box that can move inside it. A hand-packed prototype says little when production methods change. Use the same filler and tape pattern in the test.
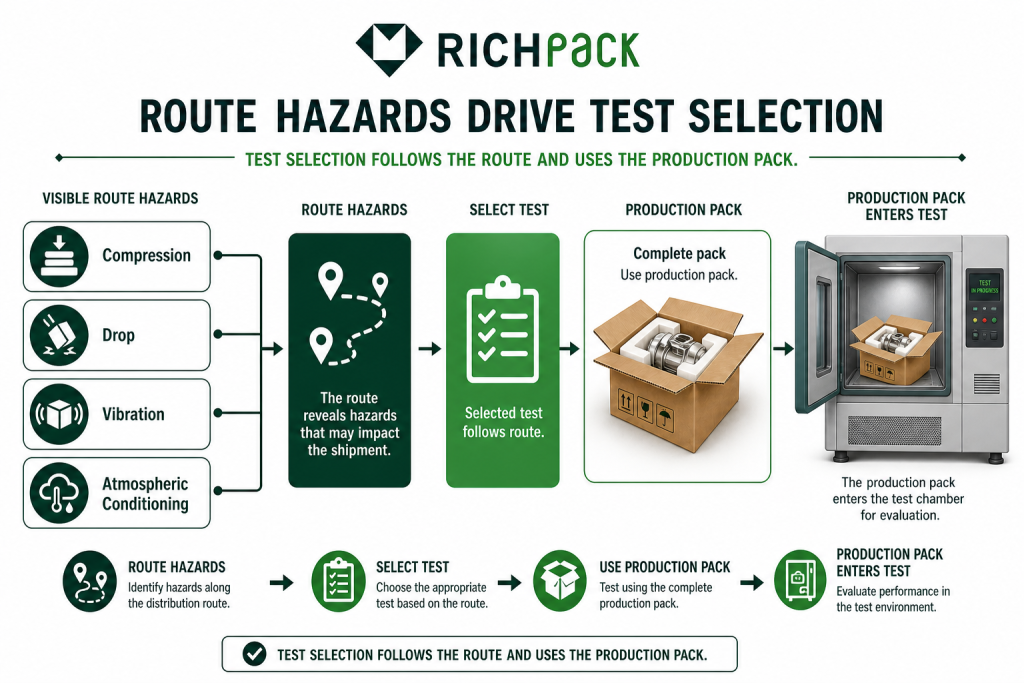
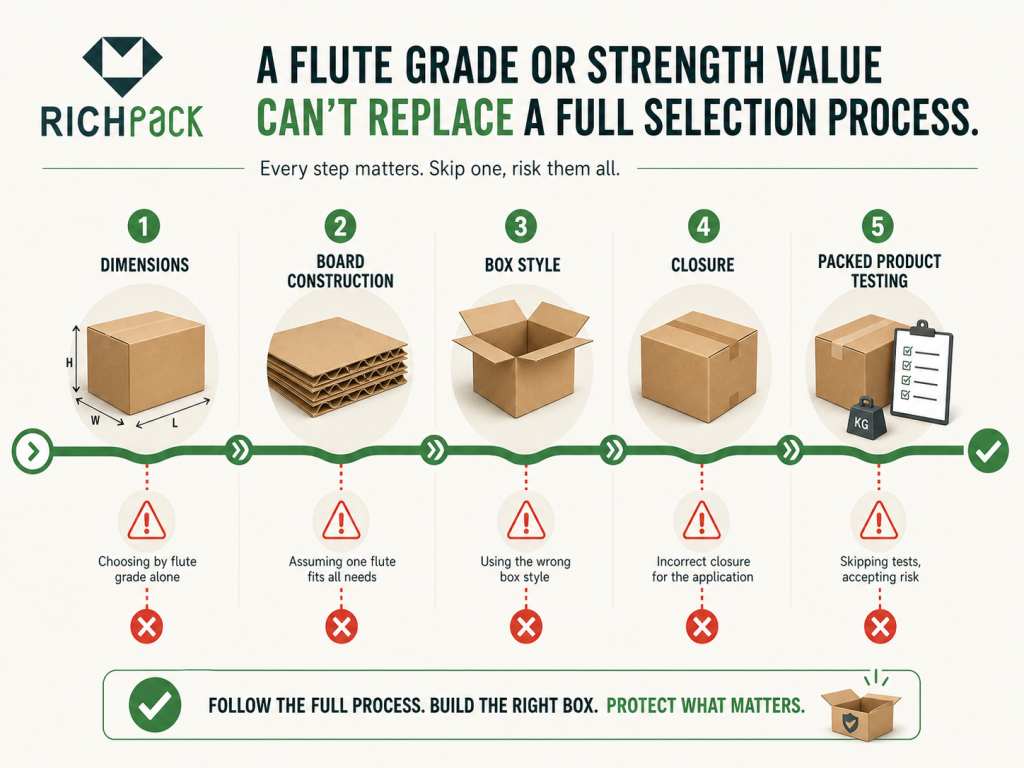
Start with product size and shipping conditions. Compare appearance and unit price after that. This keeps a familiar flute grade from becoming the default without proof.
Create one data sheet per product family. Record the product, inner pack, packed weight, and shipping position. Add size, fragility, and surface risks. Then note monthly volume, route, storage time, and failure history.
Do not start with “32 ECT C flute” because a previous SKU used it. Start with what the new pack must survive.
Begin with the main route hazard. Stacking pressure calls for one board design. Puncture or abrasion may call for another. If the answer is unclear, test two samples the same way.
A side-by-side pilot exposes tradeoffs fast. One construction may protect well but waste space. Another may print well but show corner damage after testing.
Watch the packer load and close the sample. Count folds, tape strips, turns, tools, and rework. Then watch a new operator repeat the process without coaching.
The opening matters too. A direct order may need a clean reveal. A warehouse case needs fast access and sound reclosure. If one style must serve both jobs, test three points. Check transit protection, opening, and reclosure.
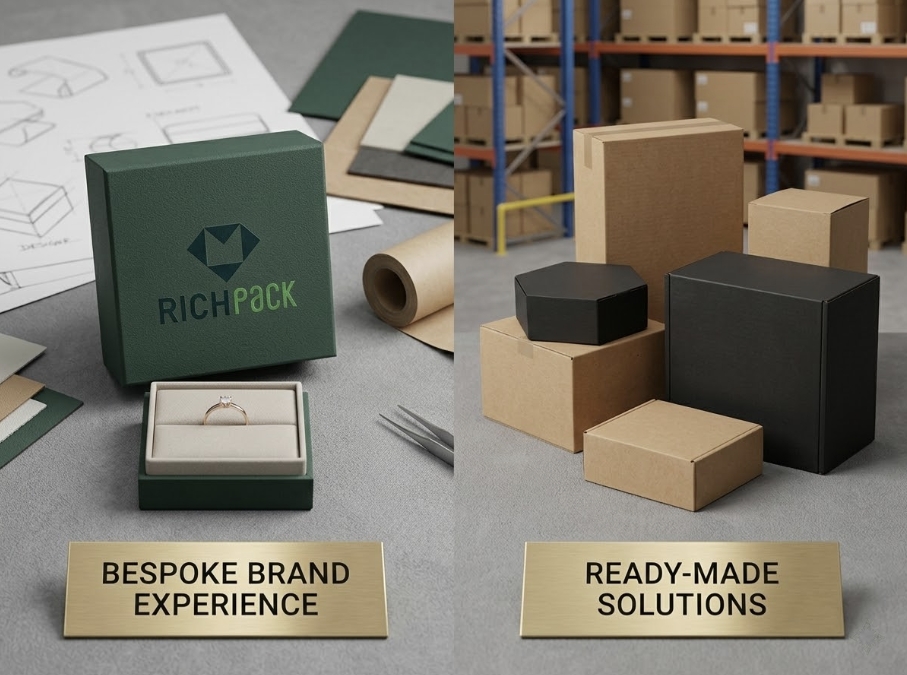
Use stock boxes when demand is uncertain, sizes change often, or the fit is already close. Use custom boxes when steady volume supports the setup. They can improve fit and packing speed. They may also cut freight or support a custom insert and brand print.
Custom does not mean every surface needs printing. A right-sized plain shipper with one label can beat a decorated oversized mailer.
Packaging cost does not stop at the box invoice. Include box, filler, label, tape, and labor costs. Add freight, storage, and damage costs. Then add replacement, setup, support, and slow stock.
The packaging cost case shows why unit price needs context. Use current quotes and real material use. Add packed size and pilot time to the comparison.
| Cost input | How to measure it |
| Box and setup | Supplier quote at forecast quantities |
| Filler and tape | Actual use per packed order |
| Labor | Timed pilot with normal operators |
| Freight | Packed dimensions, weight, service, and lane |
| Storage | Bundles, floor or rack space, and reorder point |
| Damage | Pilot, test, and order records |
| Inventory exposure | MOQ, forecast error, and artwork changes |
Put the supplier quote on one worksheet. Add packing time and filler use. Add storage, freight, and damage records.
Check that blanks fit the racks, benches, and carts. Then test the erectors, tapers, and scales. Check the scanners and pallet pattern too. Also check label placement. A box that forces a packer to rotate a heavy product will slow the line.
Run the pilot at realistic speed. Small assembly problems appear at a busy bench. Labels, tissue, inserts, and finished orders reduce the free space.
Reuse depends on box condition and the selected carrier’s current rules. Reject the box if it has crushed corners, torn scores, punctures, weak seams, or moisture marks. Also reject it if it has lost its shape or carries old labels you cannot cover. Past damage can reduce strength even when the panels look usable.
Recycling depends on the full pack and local rules. Review coatings, laminates, tapes, labels, adhesives, windows, magnets, foams, and fillers. RichPack’s paper packaging solutions page covers the material side. The sustainable jewelry packaging case shows one premium brand’s choices. It balances material goals with presentation.
Print an environmental claim after you confirm the target markets and disposal path.
A supplier cannot quote the right box from a logo and three numbers. Send a controlled specification through the custom packaging projects process.
Include:
Ask the supplier to list every assumption before you approve tooling. Changes cost much less at that stage than after production begins.
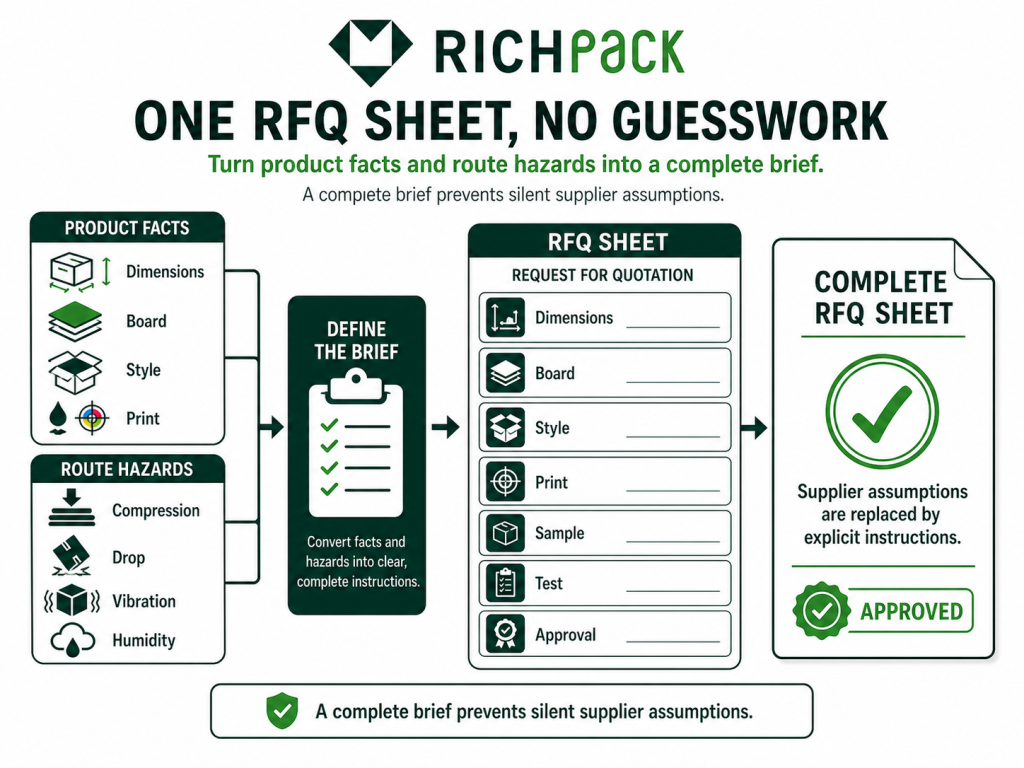
Custom features should solve a documented problem. Common examples are excess movement, slow packing, or avoidable freight volume. Set the fit and protection first. Add graphics after that.
A custom size can reduce movement, filler, external volume, and packing variation. A custom style can add access, restraint, display, or a better opening sequence.
Freeze the shipping orientation before the dieline. A 90-degree turn after artwork approval can change the insert and flute direction. It may also move the label panel and change the pallet pattern.
Flexographic printing uses relief plates. It works well for repeat graphics at production volume. Litho-lamination bonds a printed sheet to corrugated board. This can support finer retail graphics. Digital printing avoids conventional plates. It can suit prototypes, short runs, or changing art.
Compare more than image quality:
Print on the intended production substrate or facestock. Then run the sample through the planned laminating and converting path. A flat proof cannot show flute show-through, fold cracking, or die registration.
Set a measurable color target. Record the color reference, substrate, print method, and finish. Note the viewing light and measurement setup. Then set the color formula and allowed tolerance. Brown kraft, white liner, and laminated sheets produce different results.
Check reverse type, quiet zones, and barcodes on the dieline. Then check seams, scores, and tape. Check labels and hand holes last. Keep key graphics away from folds, overlaps, and shipping marks.
A coating can change gloss, rub resistance, and moisture response. It can also affect glue, tape grip, scoring, and recycling. “Water-resistant” and “waterproof” do not mean the same thing. Ask the supplier for the test and conditions behind the claim.
Test abrasion where boxes touch on conveyors, shelves, and pallets. Also test whether a slick finish weakens tape or makes stacked packs slide.
Inserts hold products in place. Partitions keep items apart. Void control stops the inner pack from moving inside the shipper. One part may do more than one job, but the drawing should name each function.
Choose a material and shape that can survive repeated packing. It should not tear, crush, shed, or mark the product. Check removal too. A secure item still fails if the customer cannot lift it without damage.
Four layers form one protection chain: the jewelry surface, insert, presentation box, and shipper. The insert holds the piece. The outer corrugated box shields the presentation pack during shipping.
Measure the inner box before you use a custom jewelry box with a logo as the presentation layer. Record its height, lid, wrap, corners, and finish. Add a sleeve, tissue, bag, pad, or molded restraint where the inner box could rub the shipper.
One loose chain can slip behind an insert, and one hard corner can scuff a wrapped lid during vibration. Check each material that touches the jewelry. This includes paper, fabric, foam, glue, ink, and coating. Test materials that share the closed space too.
Let production materials cure under the supplier’s stated conditions. Then screen them for odor, residue, discoloration, and surface change.
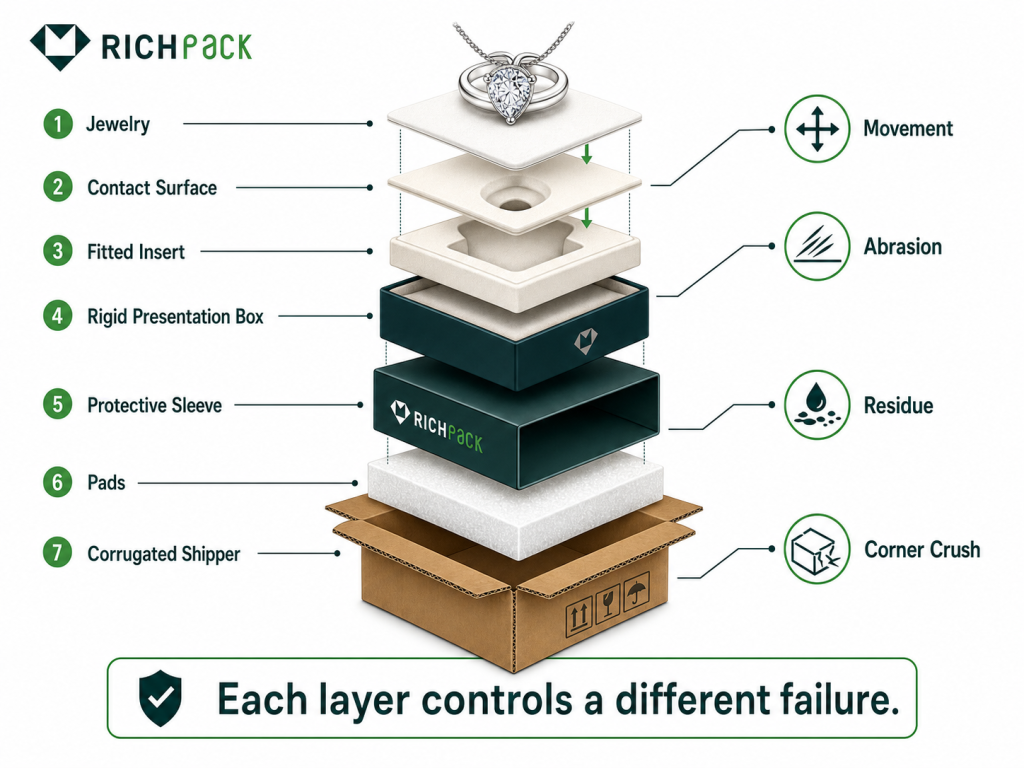
Approve the structure before the decoration. A simple order is:
See the low MOQ jewelry packaging case for staged samples and orders. It does not replace a current quote or a test of the new pack.
Turn the golden sample into an inspection plan. Check these points on each batch:
Photograph the sample and record the lot. Quarantine worn or damaged cartons before they reach the packing line. Incoming damage is not a problem that more filler can repair.
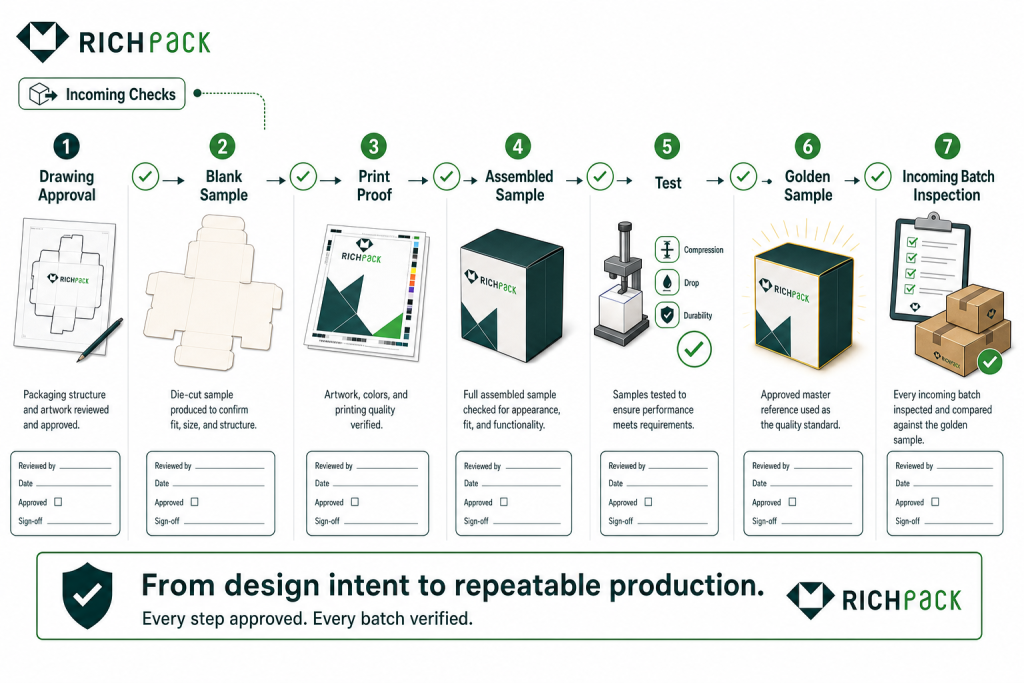
Reliable packing depends on a written process. It should not depend on one careful operator. A new packer should be able to repeat the method. An investigator should be able to trace what changed after a failure.
Use numbered work steps with photos of the real SKU. Show each packing step in the work guide. Include box setup, bottom closure, base pad, and product direction. Then show restraint, top pad, and final closure. End with the label, weight, and scan.
Set the allowed materials and quantities. Instructions such as “add enough paper” lead to inconsistent filler use between operators.
Restrain the product at strong points and fill the planned space. Loose filler can settle or move. It can also leave a dense item free to slide. Too much filler can bow panels and push flaps apart.
Run a simple bench check before formal testing. Close the box and move it in each direction. Reopen it, then inspect product position and pressure marks.
Wrap surfaces that can rub against another pack part. Isolate them from pads, partitions, staples, rough board, or other products. Give corners and raised parts enough space. They should not press into one small area of the shipper.
For a premium inner box, inspect the lid edges, hinge side, thumb notch, ribbon pull, and logo face after the pilot. These are common contact points.
Match the closure to the surface, joint, and packed weight. Test it under the route’s heat, cold, humidity, and storage time. UPS U.S. guidance calls for shipping tape and secure seams. Do not use masking tape, cellophane, or duct tape. The same guidance rejects string and paper overwrap.
An H-tape pattern closes the center seam and the two edge seams on an RSC. Treat it as a pattern, not a full tape spec. Tape backing, adhesive, width, overlap, pressure, and surface still need approval.
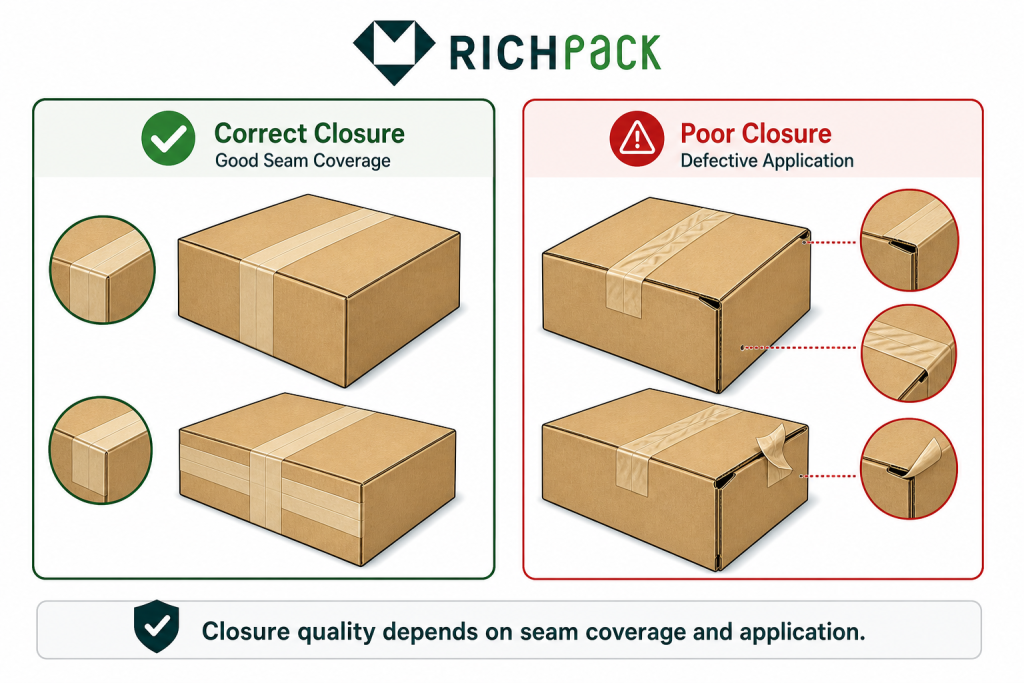
Put the shipping label on a broad, flat panel. Keep it away from seams, edges, tape glare, straps, and opening cuts. Remove or cover old labels and hazard marks before reuse.
UPS also advises placing a duplicate address label inside the package. Follow the current carrier rules for the actual service and destination.
Pilot with production materials, packers, and tools. Time the work. Weigh and measure the closed package. Check the label and record any forced folds or improvised filler.
Then run the selected screening or distribution test. Follow the written test method before you open or adjust the package between stages. Record every intervention.
When damage occurs, keep the package until the review is complete. Photograph every side of the package. Capture the label, seals, and damage points. Then photograph the filler, insert, inner box, and product.
Record the order, SKU, lot, packer, weight, size, and date. Add the route and any known weather exposure. Include the customer’s description. Photos reveal patterns across claims. Compare the damage point, closure, and product movement.
Use the symptom to narrow the cause. Reproduce the failure before changing the design.
| Symptom | Areas to inspect | Useful next check |
| Product movement | Clearance, insert fit, filler migration | Mark the start position and repeat the route test |
| Inner-box scuffing | Rough contact, loose fit, vibration | Add temporary witness film to find contact points |
| Panel bulge | Overfill, poor fit, weak panel | Weigh filler and check internal dimensions |
| Corner crush | Drop orientation, empty corner, stacking | Review corner support and drop sequence |
| Seam opening | Tape, surface, dust, pressure, flap stress | Run closure aging and peel checks |
| Tape lift | Coating, cold, humidity, low pressure | Apply approved tape under route conditions |
| Puncture | Sharp product or external contact | Add local restraint or wall protection |
| Moisture softening | Storage, condensation, leak, wet route | Condition samples and retest |
| Batch fit change | Dimensions, score, board thickness | Compare lot measurements with the golden sample |
If careful packing does not stop the failure, inspect the box size and board. Change the work steps after that review.
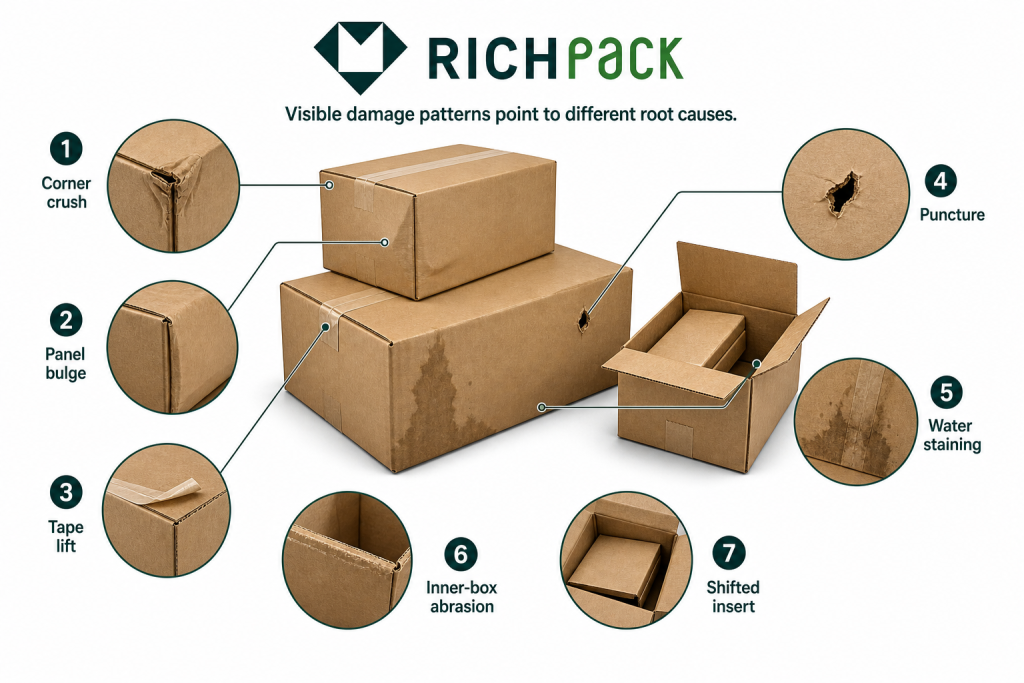
Corrugated fiberboard bonds fluted medium to flat linerboard. Paperboard and other materials called cardboard are flat, unfluted sheets used for lighter retail packs. Use the precise material name on drawings and quotes.
No single type is strongest for every product and route. Strength depends on paper, flute, wall type, box style, size, joints, closure, environment, product fit, and test conditions. Compare packed samples against the real route.
Measure the product in its shipping position, including the insert and inner presentation pack. Add the clearance needed for restraint and protection. State the internal size and tolerance, then measure the closed outer package for storage and freight.
Yes, if the carrier permits reuse and the box is still clean, dry, square, and strong. Reject boxes with crushed corners, torn scores, punctures, weak seams, moisture marks, or labels you cannot remove or cover. Test reuse for the product and route before treating it like a new box.
Consider custom packaging when a stable product and steady volume make the setup worth it. The gain may come from better fit, less void, faster packing, smaller outer size, better protection, or controlled graphics. Compare one stock sample and one custom sample with current quotes and route data.
The right box protects the packed product on its real shipping route. Board grade matters. Fit, closure, handling, and the test method matter too.
A first trial can start with one real SKU and two plausible structures. Measure the full presentation pack, document the route, and time the packing work.
Test both production-ready samples. Keep the drawing, golden sample, closure method, and inspection record together.
That discipline matters even more when a high-value item sits in a presentation box that must arrive unmarked. RichPack can coordinate the presentation box, insert, protective shipping layers, samples, production, and delivery. When the product data and route are ready, contact the packaging team with the supplier specification.


2026-05-19


2025-01-06

2025-04-12
2026-04-28

2026-04-30

2026-04-20
White Corrugated Boxes in Stock – Blank White Shipping Boxes & White Cardboard Shipping Boxes
View More
Color Marble Packing Box Kraft Box 3layer Corrugated Paper Box
View More
Flexible Multi-Form Packaging | Adapting to Any Situation | Unleashing Product Potential
View More
Light Blue Cardboard Shipping Boxes – 18x13x5.5cm Blue Mailer Boxes & Corrugated Tuck Top Box
View More
White Shipper Box | Custom Corrugated Packaging for Jewelry – Richpack
View More
Wholesale Flip Top Boxes – Your Cost-Effective Choice丨Bulk Orders Available, Quality Assured
View More

