

 PREV
PREV

10 Creative Jewelry Packaging Ideas for Small Businesses
2026-07-28
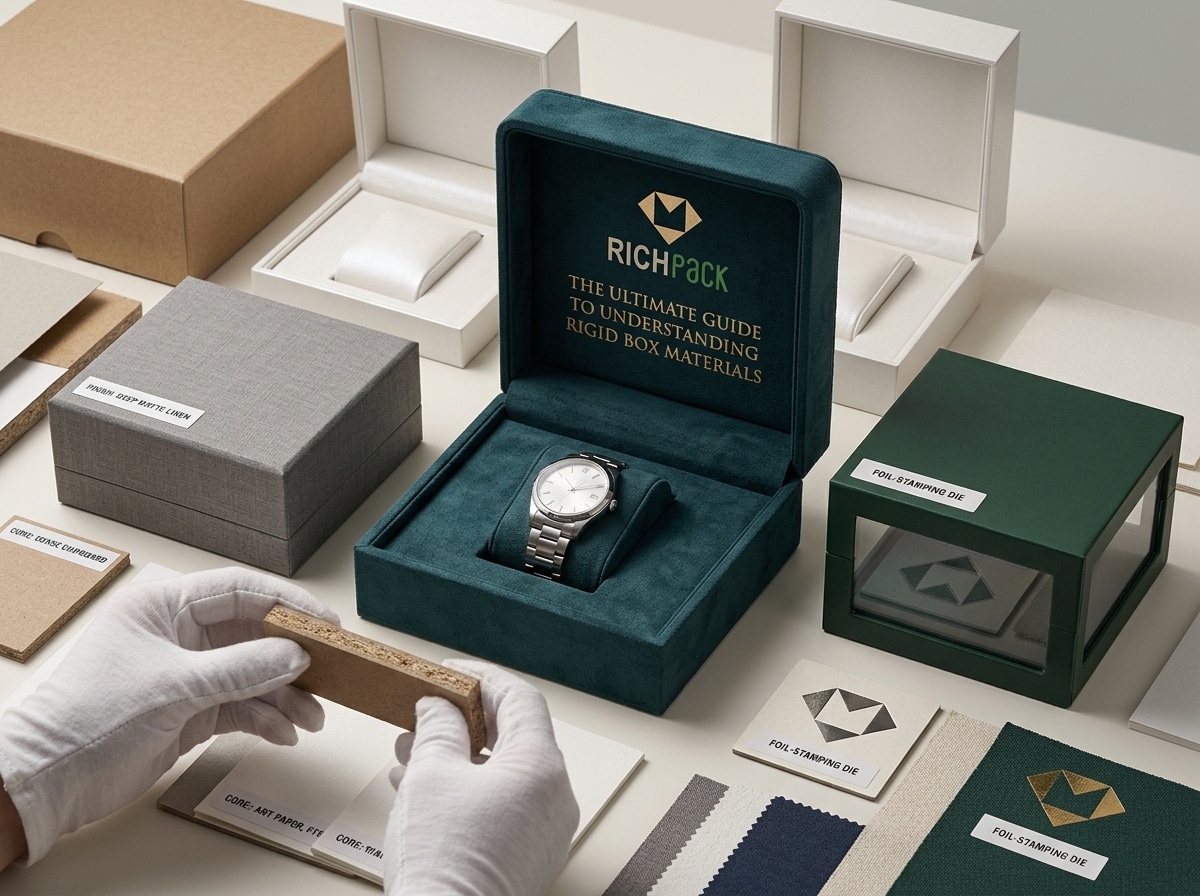



A rigid jewelry box can look perfect in a photo and still fail in real use. The lid may rub a raised ring. A necklace may slide under the insert. A soft lining may leave fibers on a clasp, or a closed box may hold a glue smell for days.
That is why Rigid Box Materials should never be listed as a single board name on a quote. A good rigid box is a group of layers that work together. The board gives the box its shape. The wrap gives it color and feel. The insert keeps the jewelry still. The lining is the surface the jewelry touches.
Public 2026 pricing guides place many custom rigid boxes around 3 to 15+ per unit. One supplier page lists 100 units as a specialty rigid-box MOQ. Treat those numbers as planning signals, not your quote. Your price still depends on size, board, wrap, finish, insert, order size, packing route, and sample approval.
After reading this guide, you will leave with a practical way to compare rigid box materials for jewelry packaging. You will know what each layer does, what can go wrong in a sample, and what to ask your supplier before mass production.
If you are a brand that needs a full material and structure program, you can start with RichPack’s custom jewelry boxes, then use the checks below to prepare a clearer request.
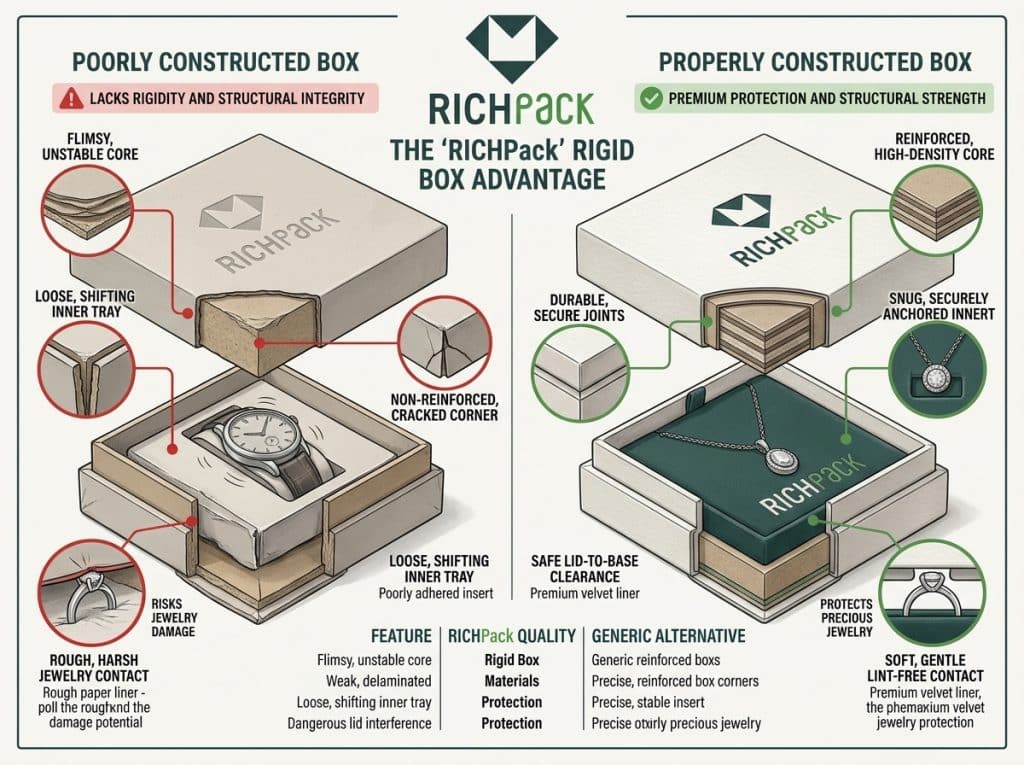
Rigid boxes are paper-based boxes that maintain their shape before a product is placed inside. Many suppliers call them set-up boxes because the shell reaches the packing line already formed, not flat.
The simple way to picture one is this: a rigid box is a strong shell covered with a finished outer layer. Inside, it may hold an insert, a lining, a ribbon, a magnet, or a custom tray.
The box feels rigid because of the thick board shell under the wrap. The wrap may look beautiful, but it is not the main source of strength.
The Paperboard Packaging Council describes rigid boxes as often using about 36- to 120-point board. That is a useful trade range, not a rule. A small ring box and a large necklace set do not need the same board.
Ask for the actual board thickness, grade, wall build, and finished sample. Do not approve by material name alone.
A folding carton starts as thinner paperboard. The converter cuts and creases it, ships it flat, and the packing line folds it into shape.
A rigid box is different. It usually arrives already formed and wrapped. That gives it cleaner corners, stronger walls, and a more controlled opening feel.
The trade-off is space. Rigid boxes take up more room to store and ship.
Corrugated board has a fluted layer between flat liner sheets. It is made for shipping strength, stacking, and handling.
A luxury rigid box usually has a different job. It presents the jewelry, holds the product, and supports the unboxing moment.
Many brands need both. The rigid box protects the product experience. The corrugated shipper protects the rigid box during parcel delivery.
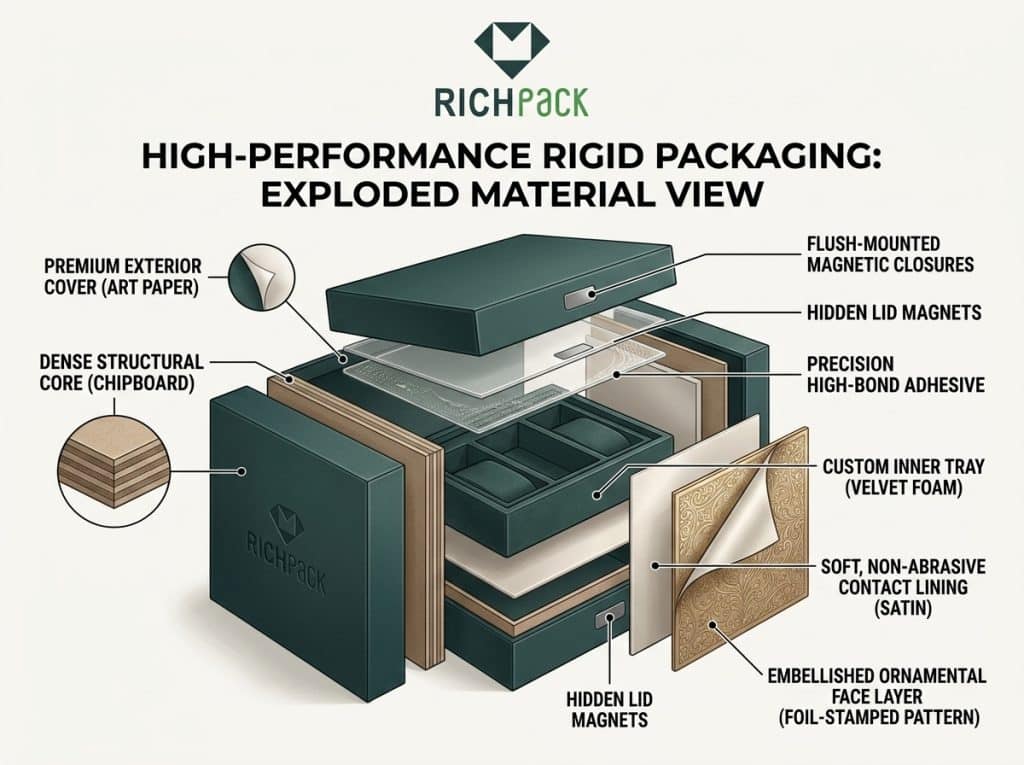
A good material brief separates the box into layers. Do not stop at “cardboard box.” That phrase hides too many decisions.
| Layer | What It Does | Common Options | What to Check |
| Board shell | Gives the box shape | Greyboard, chipboard, duplex board, coated paperboard | Thickness, grade, density, wall build |
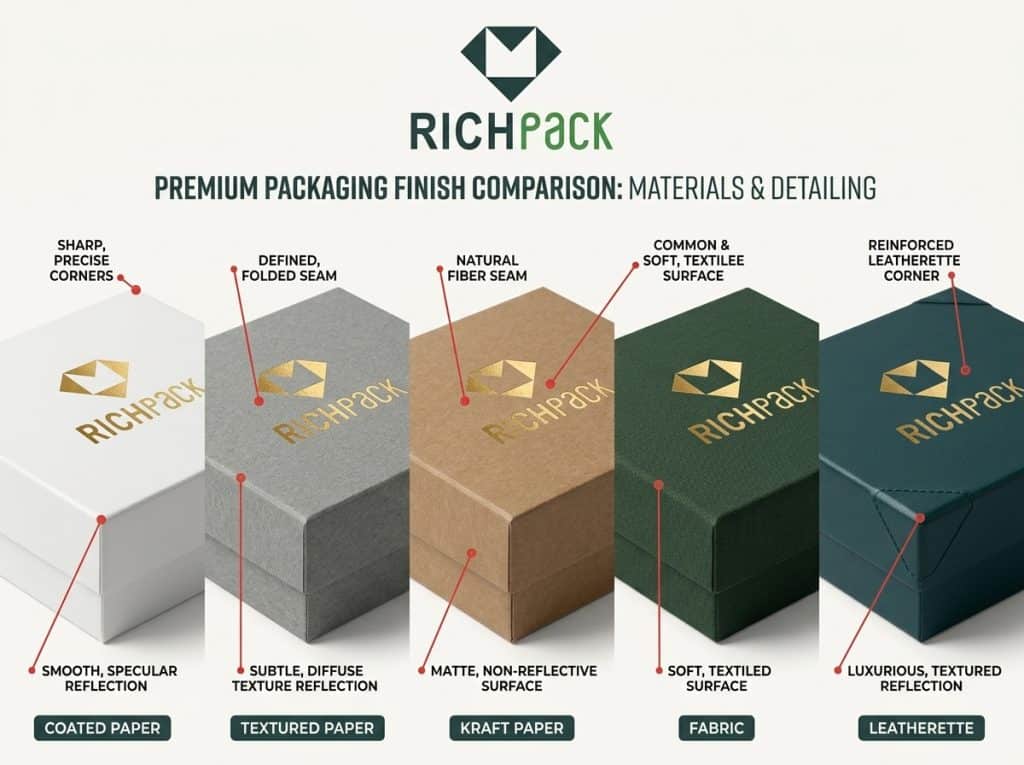
| Outer wrap | Creates the visible surface | Coated paper, kraft paper, textured paper, fabric, leatherette | Fold quality, print, glue, rub, shade |
| Insert | Keeps the jewelry still | EVA, paperboard, molded pulp, cards, pillows | Fit, movement, removal, lid gap |
| Lining | Touches the jewelry | Velvet, flock, microfiber, woven fabric | Fibers, dye, glue, residue |
| Added parts | Help the box close or open | Magnets, ribbons, hinges, tabs | Position, pull, wear, separability |
| Finish | Adds the final brand detail | Ink, foil, embossing, coating, lamination | Color, register, scuff, crack risk |
Once the layers are clear, the rest of the material choice becomes easier.
Jewelry needs more control than many retail products. A ring must stay upright. A pendant should face forward. A chain needs a place for its loose length.
The lid also matters. It should close without touching a raised stone, a watch crystal, or a tall pendant setting.
Rigid boxes give packaging teams room to control those details. They also help a collection use the same color, foil, texture, and insert language across several products. RichPack’s branded jewelry packaging page shows how those choices can work as one product family.
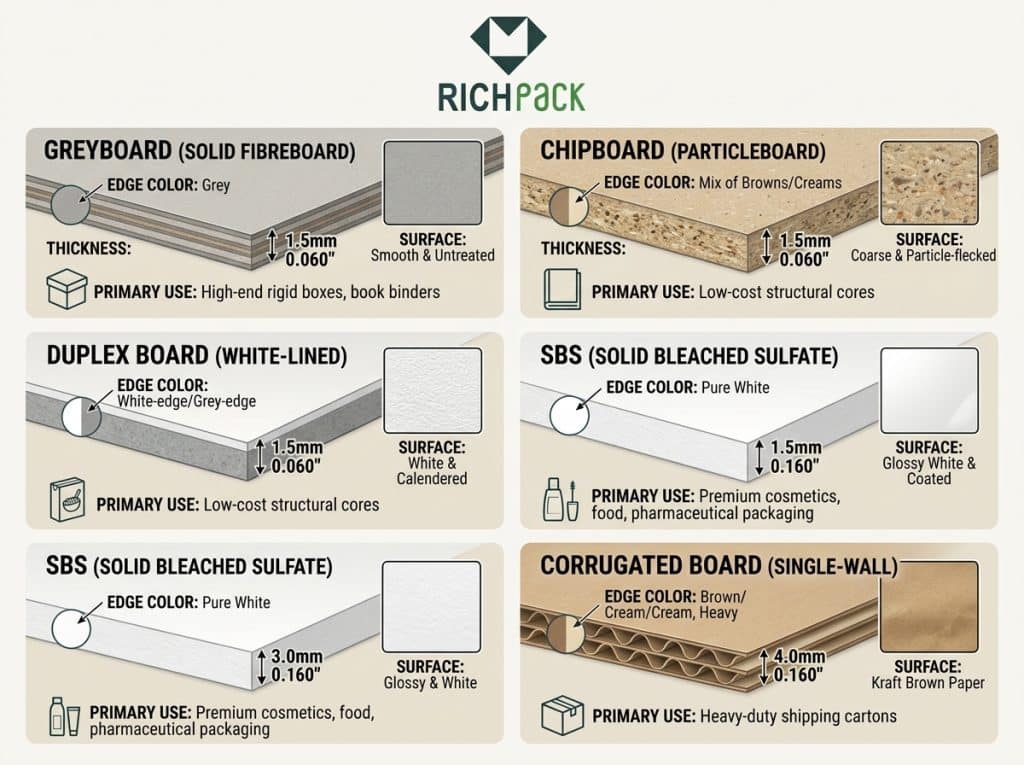
Start with the board because it gives the box its shape. A supplier may call it greyboard, chipboard, duplex board, or coated board. The name helps, but it does not tell the full story.
For small luxury jewelry rigid boxes, a common planning range is about 1.0 to 3.0 mm board. Many supplier pages cite 1.5 to 2.5 mm chipboard. Some teams describe this as roughly 800 to 1800 gsm, but that shortcut can mislead buyers. GSM and thickness do not convert cleanly.
Use the table below to screen options. Then approve the real board in a finished sample.
| Board Family | Best For | Watch Out For | Ask the Supplier For |
| Greyboard | Common rigid-box shells | Grade and density can vary | Caliper, density, grade, moisture control |
| Chipboard | Cost-aware rigid shells | Name means different things by supplier | Grade code, fiber notes, thickness |
| Duplex board | Printed parts or layered necks | Coated face does not prove shell strength | Coated sides, stiffness, role in the box |
| SBS and coated paperboard | White panels and print surfaces | Coating is not the same as board grade | Board family, coated side, caliper |
| Kraft or recycled board | Natural-look packaging | Brown color is not proof of recycled content | Fiber claim, grade, color tolerance |
| Corrugated board | Shippers and hybrid structures | Not the default luxury presentation shell | Flute, wall type, board grade, route |
Greyboard is one of the most common cores for wrapped rigid boxes. It often uses recovered fiber and gives the box its thick, formed shell.
The grey color usually disappears under the wrap and lining. What matters is the grade behind that color. Ask for caliper, density, edge quality, flatness, and a sample made at the final box size.
If the lid is long, press lightly at the center. A board that feels strong in a small ring box may bow on a large necklace box.
Chipboard is a broad trade term. One supplier may use it for dense recycled board. Another may use it for a lighter paperboard part.
This is where quotes become confusing. Two suppliers can both write “chipboard” and still mean different materials.
Ask for the grade code, thickness, fiber notes, density or stiffness data, and a physical sample. The sample will tell you more than the label.
A duplex board usually has a different face and back. One side may be coated for printing, while the reverse may be grey or brown.
That coated face can help a printed part look cleaner. It does not mean the board is strong enough for every rigid shell.
Use duplex board only after you know its role. It may work for an inner neck, divider, printed panel, or laminated part. If it forms part of the shell, test the corners and wall strength.
SBS means solid bleached sulfate. It is a board family with a clean white look and a strong print surface.
C1S and C2S mean coating on one or two sides. They describe the surface, not the fiber family. Do not write SBS/C2S as if the two terms mean the same thing.
If you specify SBS, say what you need from it. Is it a visible white panel, a printed part, or a structural layer? Then ask for coated side, caliper, finish, and print process.
Kraft and recycled boards can support a natural look. Brown color alone does not prove recycled content.
A kraft board may use virgin fiber, recycled fiber, or a mix. Ask for the actual claim and the document behind it.
Also set a color tolerance. Natural fibers can shift from batch to batch. That can look charming on one brand and careless on another.
Corrugated board belongs in the system when the package needs shipping strength, lower weight, or a separate parcel shipper. It combines flat linerboard with a fluted medium.
It is not a simple replacement for a wrapped greyboard presentation box. The flute adds bulk and changes the edge, fold, and surface.
Use corrugated board for an outer shipper, a hybrid mailer, or a protected retail set when the delivery route requires it. Specify flute, wall type, board grade, outer size, and route.
Thickness is the distance between board surfaces. Density tells you how much material sits inside that thickness.
This is why GSM alone is risky. Two boards can have the same grammage and still feel different in a finished box.
Ask for caliper, grade, and a finished wall measurement. If the board may split between layers, ask whether the supplier can compare internal bond strength. TAPPI methods such as T 411 for caliper and T 569 for internal bond can support a technical review when the project needs it.
Once the board is clear, look at the wrap. The wrap is what the customer sees and touches first. It controls color, texture, light reflection, and much of the hand feel.
A flat paper swatch can look great and still fail on a box corner. Always review the wrap on the real board, with the real glue and finish.
Coated papers are useful when the design needs clean color, small type, photos, or a sharp logo. They give print more control than many rough papers.
The risk is at the fold. Coating and lamination can crack, lift, or show white lines at tight corners.
Inspect the wrapped corners. Then rub the finished sample against the intended shipper and packing material.
Textured papers add depth without heavy decoration. Linen, felt, pearl, and metallic surfaces can make a simple logo feel more deliberate.
Texture also changes how foil and ink behave. Deep grain can break fine lines, reduce foil coverage, or trap glue at folds.
Use larger, simpler foil marks on deep texture. Test the smallest logo detail before approval.
Natural kraft wrap paper has a brown fiber tone and a less coated surface. It works well for brands that want a warm, honest material look.
Pale ink can disappear on the brown base. White ink, foil, labels, or darker print colors may give better control.
If the color of the paper is part of the brand look, approve a shade range. Do not assume every batch will match the first swatch.
White kraft wrap paper keeps some natural paper character while giving graphics a lighter base. It can look softer than coated art paper.
The print may also look softer. Compare both papers under the same light, with the same artwork and finish.
Choose white kraft when you want a paper character. Choose coated paper when sharp graphics matter more.
Fabric makes the box feel warmer and softer. It can work well for jewelry brands that want a display-case feel rather than a printed-carton feel.
The risk is bulk. Fabric builds up at corners, seams, and hinges. It can also fray, show glue strike-through, or shift color by lot.
Check corners, seams, hinge areas, and abrasion before mass production.
Leatherette gives a leather-like surface without assuming the material is animal hide. It may be coated fabric, synthetic sheet, or another composite.
Name the construction in the spec. Then test fold whitening, odor, scuffing, glue bond, and foil transfer.
Also check closure fit. A thick leatherette wrap can change magnet distance, drawer clearance, and lid seating.
Finishes do not sit in isolation. They depend on the wrap below them.
Foil needs enough contact to transfer well. Embossing needs a board and wrap stack that can hold relief without cracking. Lamination can protect print but may change fold behavior and recycling claims.
Approve the full stack together: paper, ink, foil, coating, glue, and board.
| Wrap Choice | Best For | Watch Out For | Sample Test |
| Smooth coated paper | Sharp print and brand color | Cracking on tight folds | Fold and rub test |
| Uncoated paper | Softer natural look | Ink spread and glue absorption | Color and glue check |
| Deep textured paper | Tactile luxury | Broken fine lines or foil gaps | Small logo test |
| Fabric | Soft jewelry feel | Bulk, fray, glue marks | Corner and hinge check |
| Leatherette | Structured luxury cases | Whitening and closure changes | Fold and magnet test |
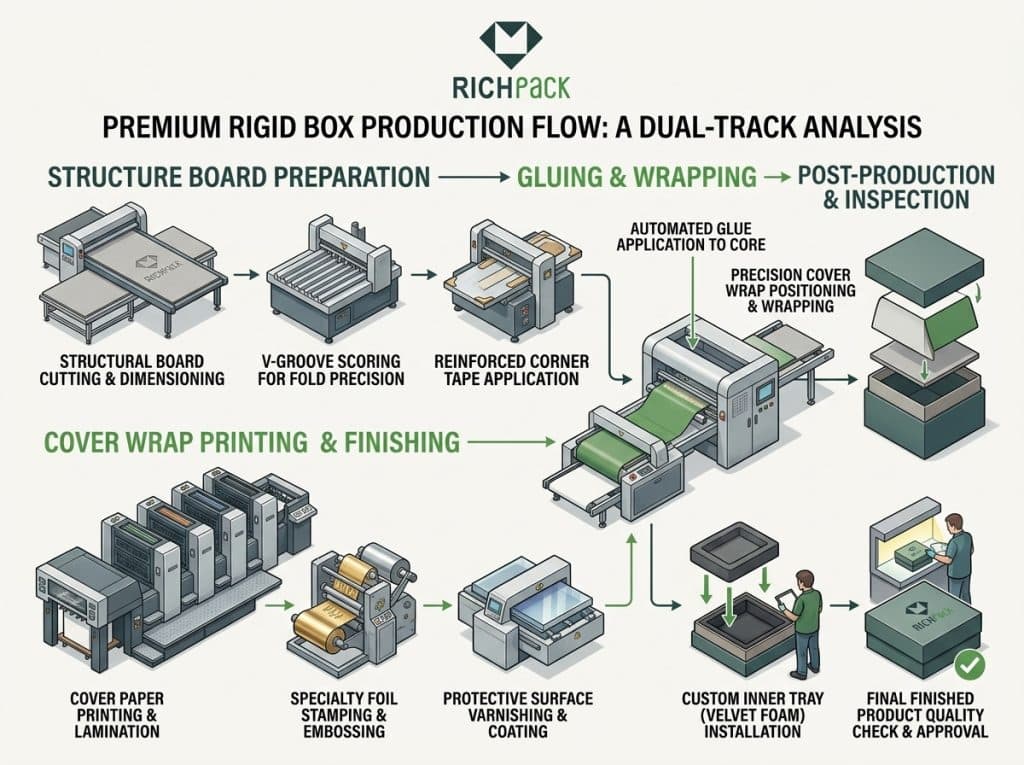
A rigid box usually comes together in two streams. One stream forms the board shell. The other prepares the printed or finished wrap. The two meet when the wrap is glued around the shell.
The exact order can change by factory and box style. The material logic stays the same.
The board is cut into panels or blanks. Grooves, scores, or miters create the fold lines the structure needs.
This step has to match the board. A groove that works on one grade may cut too deep on another. It may also spring open or create a weak hinge.
For a classic set-up tray, the walls are raised, and the corners are held in place. Staying tape or another joining method keeps the shell square before wrapping.
Look at the unwrapped shell if you can. A crooked wall or bulky corner can show through the final paper.
The wrap may be printed, foil-stamped, embossed, coated, or laminated before it reaches the shell. Some details may be added after wrapping.
Leave enough room for turn-ins, seams, corners, and bleed. A design that looks centered on a flat sheet can shift after wrapping.
The operator applies glue to the wrap or board, then positions the sheet around the shell. The wrap must lie flat, close the corners, and avoid bubbles or open seams.
Too little glue can lift. Too much glue can stain porous paper or squeeze through fabric.
Approve glue with the real wrap and the real drying time.
The finished shell receives its insert, lining, pull tab, ribbon, pillow, or card. This step turns an empty box into a restraint system.
Install the actual jewelry before approval. The piece should stay in position, lift out easily, and clear the closed lid.
Pressing helps the wrap bond and keeps panels flat during set. Final checks should cover size, squareness, lid fit, corners, seams, bubbles, and color.
Also check foil position, insert location, jewelry movement, glue cure, odor, and residue.
RichPack describes its packaging quality controls across material and finished-pack review. Use similar checkpoints in your buying spec, even when another supplier produces the box.
The insert holds the jewelry in place. The lining is the surface the jewelry touches.
Some products combine both jobs in one wrapped foam piece. Even then, the spec should name the core and the contact material.
EVA foam works well when the box needs shaped cavities, firm support, or repeatable placement. It can be cut into ring slots, earring channels, pendant cavities, or watch pillows.
Foam density and surface wrap change the result. Check the cut edge, compression, recovery, odor, dust, and removal force.
A tight cavity may hold a ring well but feel hard to use.
For a repeatable custom insert, use RichPack’s custom jewelry box inserts as a reference point for cavities, wrapped surfaces, and product fit.
Paperboard inserts suit light jewelry, cards, dividers, and paper-based designs. Folded tabs, slots, and pockets can hold earrings, chains, or small sets without filling the box with foam.
The edge design matters. A sharp cut edge can catch a chain or scratch a delicate surface. A loose slot lets the piece shift.
Test the real item through packing, closing, transit movement, and removal.
Molded pulp creates shaped cavities from fiber. It can support a paper-led material story, but the surface and shape need review.
A pulp cavity may suit a simple shape better than a fine jewelry piece with small contact points. Check cavity accuracy, fiber shedding, compression, staining, and final appearance.
Velvet is a pile fabric. Flocking applies short fibers to a base. Both can create a soft visual field, but they do not work the same way.
Check pile direction, shedding, dye transfer, seam quality, and compression marks. A dark surface can make bright metal stand out. Loose fibers around clasps or stones can still create a cleaning problem.
Microfiber and suede-touch materials can give a smooth, low-nap contact surface. The label alone is not enough.
Name the fiber, backing, dye, coating, and glue in the material file. Then test the finished lining with the actual jewelry finish.
Satin describes a smooth woven surface, not one required fiber. A satin lining can use silk, polyester, rayon, or a blend.
That fiber choice affects cost, strength, snagging, dye behavior, and care.
Test tension, seams, wrinkles, friction, and fabric position after repeated opening and closing.
The softest lining can still be wrong if its dye, backing, glue, or residue changes the jewelry surface. Silver is sensitive to sulfur-containing environments. Moisture, storage time, and handling can add more variables.
Treat glue as a named material, not a hidden shop supply. Ask the supplier to name the glue family and cure condition.
Water-based, hot-melt, pressure-sensitive, and solvent-based systems can all fail. The risk rises when the wrong glue touches the wrong lining or metal.
The Canadian Conservation Institute warns that fresh paints, coatings, and adhesives can release volatile compounds inside small enclosures. For sensitive objects, it recommends about three to four weeks for adhesives to dry, cure, set, or off-gas. This matters most when the bonded area is large.
Use a cured sample. Check odor, residue, color change, surface dulling, and transfer after the stated cure time. “Low odor” or “water-based” is not a contact test.
| Adhesive or Additive Risk | What Can Go Wrong | Buyer Check |
| Excess glue | Staining, waves, squeeze-out | Inspect seams and lining edges |
| Slow cure | Odor inside a closed box | Seal a sample for 48 to 72 hours |
| Acidic byproducts | Surface change on sensitive metals | Ask for glue family and cured test data |
| Sulfur contamination | Silver darkening risk | Screen lining, backing, glue, and storage bag |
| Dye or coating transfer | Marks on metal or stones | Rub and storage contact test |
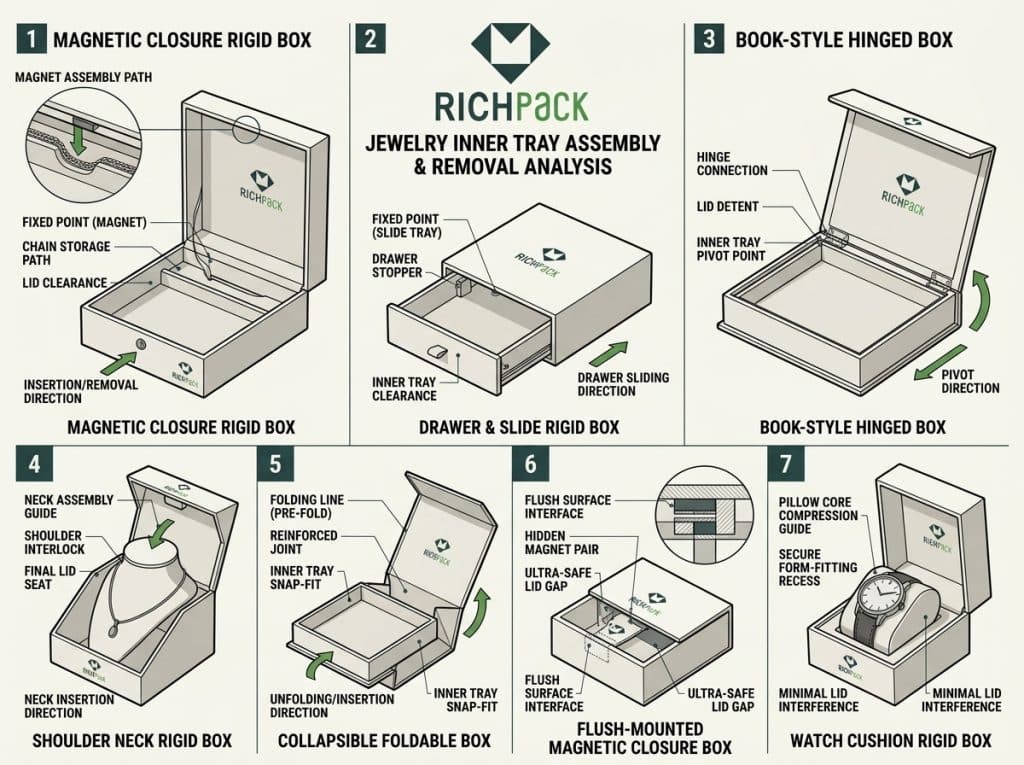
Box style changes more than the opening gesture. It changes where the board bends, where paper turns in, where magnets sit, and how much insert space the jewelry gets.
A two-piece box separates the lid from the base. Fit depends on the board stack, wrap thickness, insert height, and gap between lid and base.
A tight fit can make opening feel stiff. It may also pull the insert out with the lid. A loose fit can look cheap and let the jewelry move.
Measure opening force and lid seating after wrapping and lining.
Book-style boxes use a connected cover and base, often with a wrapped spine or hinge. The hinge needs a clean fold, a controlled gap, and enough flex for repeated opening.
The cover also affects lid clearance. High rings, watch crystals, and raised pendant settings need more space than a flat card or shallow earring cavity.
A magnetic closure adds a closing system inside the board and wrap stack. Magnet position, pull strength, pocket depth, wrap thickness, and glue all affect the final feel.
The strongest magnet is not always the best choice. The lid should close without snapping hard against delicate contents. It should not make the customer fight the opening.
RichPack’s custom magnetic gift boxes show magnetic closure as a structural and material decision.
Drawer and slide boxes add a moving inner tray. The tray needs enough stiffness to stay square. The wrap and lining must not create too much friction against the outer sleeve.
Test the tray with the final product load. Check scraping, side play, pull force, ribbon access, and finger access.
Then check whether the tray still moves well after repeated cycles.
A shoulder-neck box uses a raised inner structure between the base and lid. That neck creates a strong visual frame, but it adds board layers, wrap edges, and fit tolerance.
The neck should not pinch the lid or interfere with the insert. Check the shoulder line, corner coverage, and how the jewelry sits below the opening.
Collapsible rigid boxes fold for lower storage and shipping volume, then open into a firm structure. The fold areas, joints, magnets, tapes, and wrap must survive repeated use.
Review the flat-packed version and the opened version separately. Check fold memory, hinge cracks, corner return, and lid alignment.
Also check whether the collapsed package rubs against the printed surface.
Material choice starts with the item, not the box style. Record weight, height, surface, movement, closure, and removal path before choosing the insert or lining.
The table below turns jewelry type into a material choice. It is for planning only. Test the final sample with the real product before approval.
| Jewelry Type | Main Risk | Better Material Direction | Sample Test |
| Rings and studs | Lid contact or hard removal | Dense slot insert with soft contact wrap | Close the lid over the tallest stone |
| Hoops and drops | Swing and pair contact | Card, channel, or shaped cavity | Turn the closed box in each direction |
| Necklaces | Chain tangling | Upper fixing point plus pendant cavity | Open after shake and check chain path |
| Bracelets | Clasp pressure or curve mismatch | Pillow, channel, or curved paper support | Test removal with one hand |
| Watches | Weight and crystal clearance | Firm pillow, stronger board, soft lining | Check pillow compression and lid gap |
| Sets | Piece-to-piece contact | Separate cavities or layered tray | Ship-order opening test |
| Silver pieces | Tarnish and residue | Screened lining, low-residue adhesive | Cured material contact test |
Rings need a slot or shaped support that holds the band and leaves space for a raised stone. Stud earrings need paired holes or a card that keeps posts and backs aligned.
Check the stone height against the lid lining. A ring can fit the cavity and still touch the lid when the box closes. Brands developing custom ring boxes should approve the actual ring, not a drawing alone.
Hoops and drop earrings need more open space than small studs. The insert must control swing, pair separation, and contact with the lid or nearby pieces.
Use a channel, card, or shaped support that matches the earring length. Shake the closed sample in each direction. Then inspect hooks, stones, and lining for contact marks.
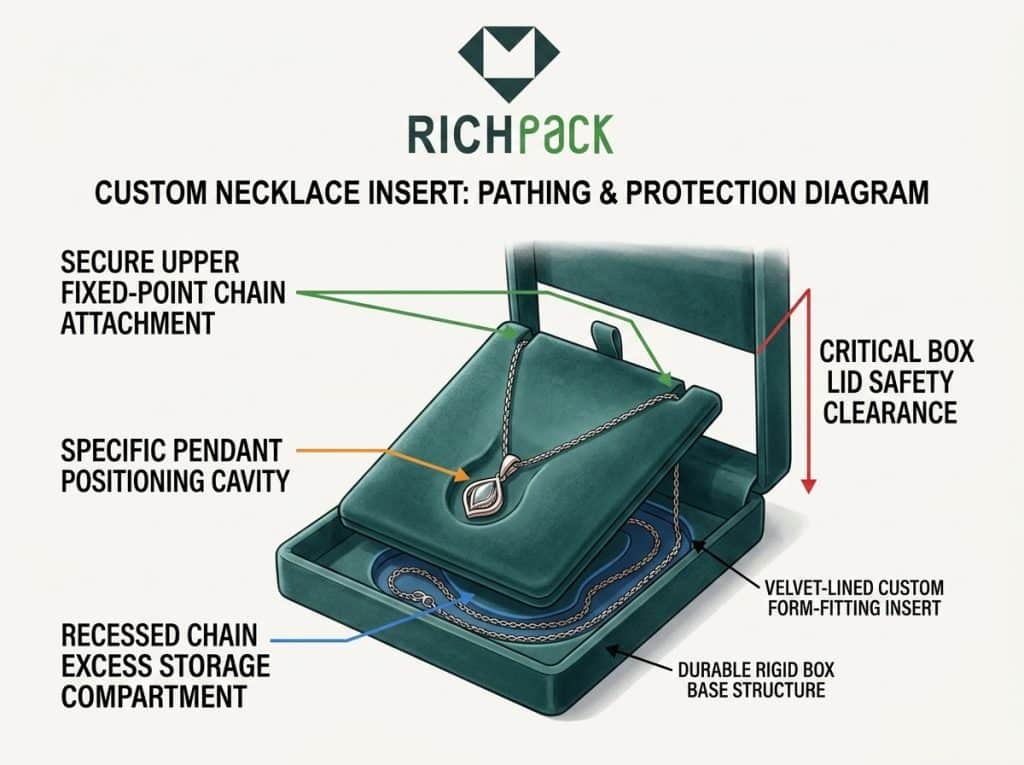
A necklace needs a fixed point for the chain and a shaped area for the pendant. A loose chain length needs a controlled home. A flat cavity can let it gather under the pendant.
Place the chain support high enough to keep the pendant facing forward. Use the same check for RichPack’s necklace packaging boxes. Review the fixed point, pendant position, loose-chain storage, surface contact, and lid clearance.
Soft bracelets and rigid bangles need different support. A chain bracelet may sit around a pillow or in a channel. A bangle may need a curved recess with enough opening space.
Check clasp access and the point where the jewelry touches the lining. A strong restraint can hide the clasp or force the customer to bend the piece. That hurts the opening experience.
Watches add weight, case height, strap curve, and crystal clearance. A pillow that compresses too much may let the watch move. A stiff pillow may stress the strap or make removal awkward.
Check the watch head, strap, pillow, and lid as one assembly. RichPack’s luxury watch box packaging page fits briefs that need more than a generic insert.
A set needs separate restraint for each piece. Leave enough space to stop contact between metal surfaces, stones, chains, and cards.
Opening order also matters. The customer should see the intended focal piece first.
Use dividers, separate cavities, or layered trays when one flat pad cannot control movement. Test the set after closing, turning, and opening it in the delivery order.
Sterling silver can darken when sulfur-containing compounds react with the metal surface. Packaging may add risk through materials, residues, storage humidity, or dirty air. No single-lining label proves protection.
Screen the cured material system. Review the lining, dye, backing, glue, insert, storage condition, and airflow together. If the claim matters, record the test method and the actual metal sample.
A paper-based box is not always recyclable as a finished product. The final claim depends on every layer. It also depends on how parts are joined, whether the buyer can separate them, and what local facilities accept.
Recycled content describes what part of a material comes from recovered fiber or other recycled feedstock. It does not describe the box’s finish, glue, magnet, foam, or end-of-life route.
Ask whether the claim refers to pre-consumer or post-consumer content. Then ask which part it covers and what document supports it.
Keep the claim tied to the named part.
A fiber certificate can support a sourcing or chain-of-custody claim. It does not prove that every component has the same certificate. It also does not prove that the finished box can enter one recycling stream.
Record the certificate scope, supplier status, material covered, and approved claim language. FSC 100%, FSC Mix, and FSC Recycled mean different things, so do not merge them in copy.
RichPack’s sustainable packaging program can sit beside that proof, not replace it.
Paperboard and molded pulp inserts can reduce reliance on foam or plastic in some product formats. The change works only if the new insert still holds the jewelry. It must also keep the surface clean and survive the delivery route.
Compare the full insert system, including coating, glue, lining, tabs, and dividers. A paper-based cavity that lets a pendant slide is not a responsible trade-off.
Mono-material design aims to reduce mixed-material complexity. Fewer material families can make sorting easier. The package still has to protect small, valuable, and surface-sensitive jewelry.
Start with the failure the package must prevent. Then remove layers that do not help protection, handling, branding, or reuse. Do not remove a needed restraint just to make a claim sound cleaner.
Magnets, foam, fabric, coatings, and glue can make a paper box harder to separate. That matters because a consumer may not remove the parts. A local facility may also reject the mixed construction.
Create a full bill of materials. Mark each component as removable, bonded, laminated, stitched, or embedded. Then check the disposal path in the markets where the package will be sold.
Reuse means another use for the box. Recycling means the material can enter a suitable recovery process. Local collection decides whether that process is available to the customer.
Keep those claims separate. A durable jewelry box may earn a second life as a storage case. Its mixed parts may still need special handling at disposal.
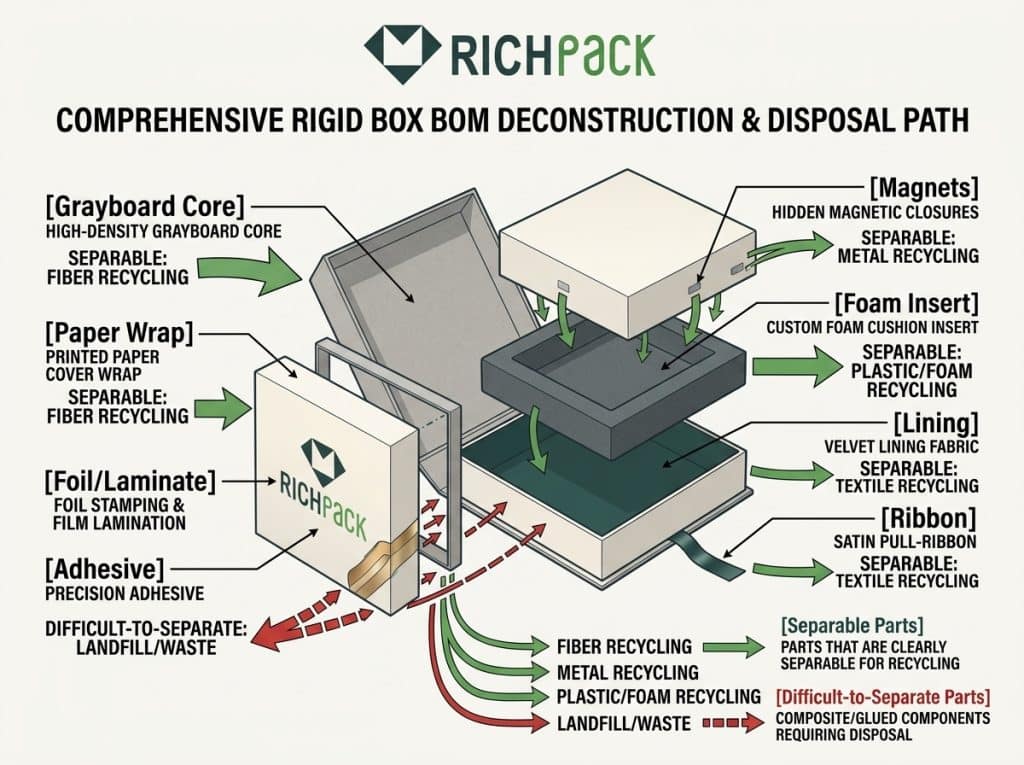
The fastest way to reduce material confusion is to turn the product brief into a sample brief. Give the supplier the item, route, look, production target, and failures you cannot accept.
Record product type, size, weight, fragile points, surface finish, order channel, route, storage time, and packing speed.
A box for a boutique counter can use one material balance. A box that travels through parcel networks may need another. The outer shipper, insert restraint, and surface protection should match the route.
ISTA notes that transit tests apply to a complete packed product, not to a material alone. Its 3-Series tests simulate common transport hazards for selected routes. If the route is risky, test the jewelry, inner box, insert, and shipper as one system.
List board family, supplier grade, thickness, density or stiffness data, wall construction, box size, and unsupported panel spans.
Ask for a physical sample made with the proposed board. Measure lid fit, corner quality, panel flatness, and product load after wrapping and lining.
State the wrap family, color target, print process, foil or embossing, coating or lamination, fold needs, and rub standard.
A color reference alone does not control the final result. Approve the color on the real substrate, under a named light source, with the final finish and viewing angle.
Use the actual jewelry in the sample. Check fixed points, cavity size, movement, surface contact, removal force, clasp access, and the gap between the product and lid.
Move the closed sample by hand before arranging formal shipping tests. A small shake can reveal a loose chain, a shifting pillow, or a lid that lands on a high stone.
A white sample answers structure, size, fit, and operation questions. A printed sample answers color, artwork, wrap position, texture, foil, coating, and visual balance.
Keep both approval records. A printed sample can hide a structural error. A white sample cannot prove that the final finish will fold, rub, or match well. RichPack’s custom packaging design service can move those checks from structure into a finished sample.
Compare material systems, not isolated unit prices. Public 2026 price guides place many rigid boxes around 3 to 15+ per unit, with higher prices at low volume and complex finishes. One rigid-box supplier page lists 100 units as a specialty MOQ, while other programs may start higher or lower.
Use these planning ranges to challenge a quote. Do not use them to replace one:
| Cost Bucket | Planning Share of Unit Cost | What Moves It |
| Board shell and wrap | 25% to 40% | Board thickness, wrap grade, box size |
| Insert and lining | 15% to 30% | EVA, molded pulp, fabric wrap, precision cuts |
| Printing and finishes | 10% to 25% | Foil, embossing, lamination, color control |
| Tooling and setup | 5% to 15% | Dieline, cutting tools, foil dies, sample work |
| Assembly and QC | 10% to 20% | Manual wrapping, magnet placement, inspection |
| Freight and packing | 5% to 25% | Box volume, carton count, shipping route |
A thicker board can add weight. Fabric can add labor. A custom insert can add setup. A magnetic closure can change assembly and shipping volume.
Record MOQ, sample charge, production lead time, delivery terms, outer-carton count, and reorder terms. Use the same spec when comparing suppliers.
The final approval pack should name the board, wrap, lining, insert, glue, closure, finish, color reference, tolerance, and test condition.
Sign off on a physical golden sample when possible. Store the reference with photos and inspection notes so a later reorder does not depend on memory.
The best material for a luxury rigid box is often a 1.5 to 3.0 mm paperboard core. Common wraps include coated paper, textured paper, fabric, and leatherette. Jewelry boxes also need an insert, a contact lining, glue, and a tested finish. The right mix depends on the product, box style, route, and budget.
Not always. Suppliers may use the names in different ways. Compare grade, thickness, density, fiber notes, stiffness data, and the physical sample. Do not treat the terms as the same.
Many small jewelry rigid boxes use about 1.0 to 3.0 mm board. Supplier pages often cite 1.5 to 2.5 mm chipboard for custom rigid boxes. Choose the final thickness after checking box size, product weight, board density, lid fit, and route.
The best insert holds the specific jewelry without movement, scratches, pressure, or hard removal. EVA, paperboard, molded pulp, pillows, and fabric-lined supports can all work. Test the cavity, contact surface, and lid clearance with the real item.
Sometimes, but the answer depends on the full material list and local facilities. Paperboard, wrap, coatings, glue, magnets, foam, fabric, and separability all affect the actual end-of-life route.
Rigid Box Materials should work as a complete system. The board shapes the box. The wrap creates the look and feel. The insert keeps the jewelry still. The lining touches the jewelry.
The safest process is simple. Record the product and route. Compare board and wrap specs. Test the insert with the real piece. Review every material claim. Approve a physical sample before production.
This avoids a common packaging mistake. The box looks right in a photo, then fails at the packing table or in the customer’s hands.
For a jewelry brand, the next step is a material brief. Include product size, insert needs, finish target, route, and approval standards. RichPack can connect those decisions through package design, material matching, sampling, quality review, and production delivery.


2026-07-28

2025-01-10
2025-04-23

2025-05-19
2025-12-03

2025-05-27
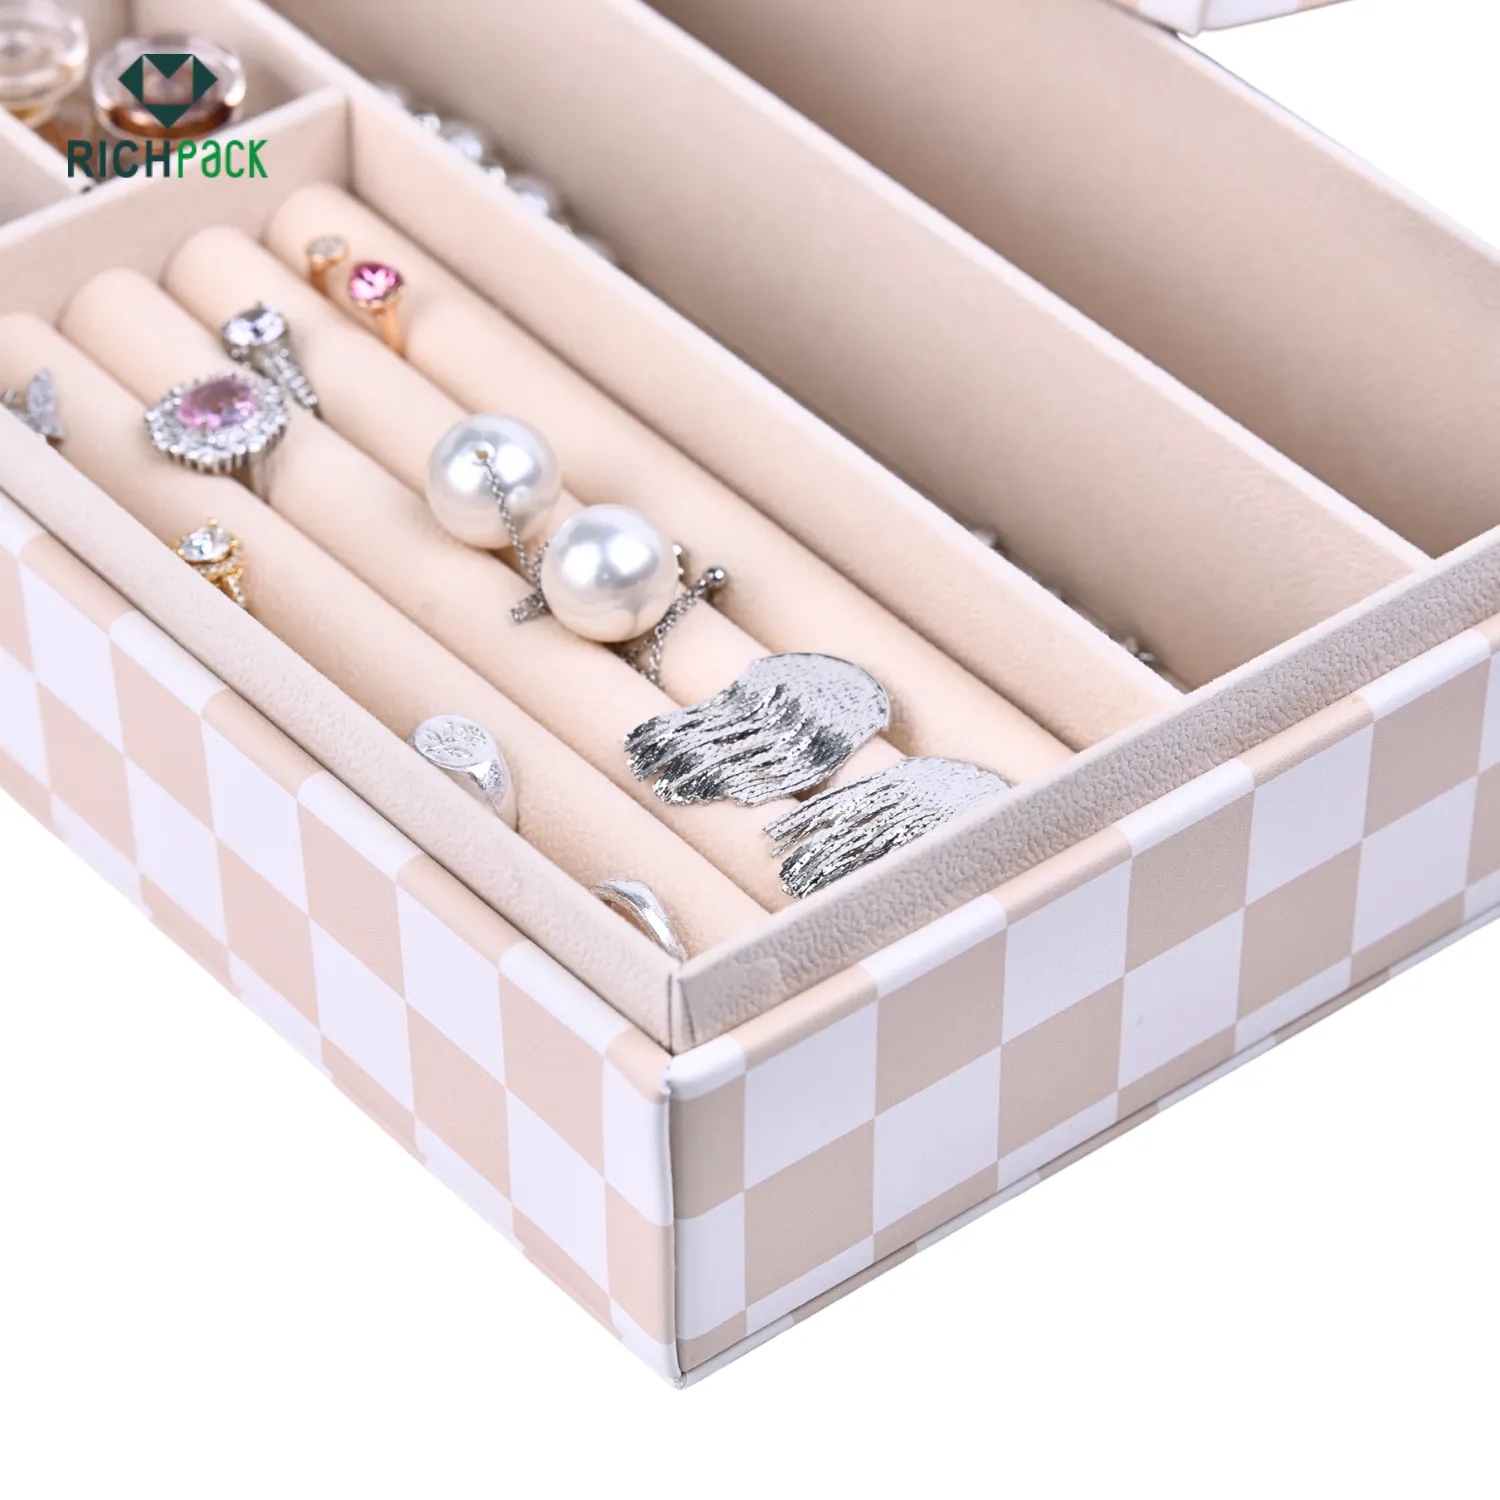
Bespoke Compact Travel Jewelry Trays with Secure Closures | Custom, Durable Packaging for Retail Businesses and Wholesale Jewelry Suppliers in Bulk Orders
View More
Birthday Gift Boxes for men – Sturdy Boxes for His Special Day’s Elegance
View More
Black box with lid for jewelry | Matte black rigid packaging box with lid | Custom sizes and bulk orders at Richpack
View More
Bulk Gift Boxes for High-Volume Buyers with Custom Branding | Cost-Effective Solutions for Wholesale Purchases
View More
Cosmetic Packaging Sets with Matching Designs | Perfect for Beauty Brands Needing Cohesive and Branded Packaging for Skincare and Cosmetics
View More
Creative Picture Gift Boxes | Custom Photo Box Gifts with Unique Designs and Personalized Options for Any Occasion
View More

